
A Venturi injector is a relatively simple and cost-effective way to use an irrigation system for fertilization. Venturi injectors have been used in agriculture for many decades, but are also well-suited for use in your own garden. Below, I’ll explain how they work in detail and what to look out for when purchasing and installing them.
Principle of the Venturi Nozzle
A Venturi injector is based on the Venturi nozzle invented by Giovanni Battista Venturi over 200 years ago: This is a smooth-walled tube with a sharp constriction in the center, from which an opening leads downwards. At the constricted point in the tube, due to the laws of physics, the velocity of the water flowing through it increases (= increasing flow pressure), while at the same time the static pressure on the tube wall decreases; total pressure = flow pressure + static pressure. The constriction in a Venturi nozzle is designed so large that the static pressure at the constriction not only decreases, but even creates a negative pressure (vacuum). This means that no water escapes from the opening leading away from the constriction; on the contrary, a suction is created.
How a Venturi Injector Works
The suction created by the flow through the Venturi nozzle is used to draw in a gas or liquid via a hose mounted at the constriction. In the application described here, liquid fertilizer is drawn in. For this purpose, the hose is simply led away from the Venturi nozzle into a container containing fertilizer. As soon as irrigation is running, the created suction ensures that the fertilizer is gradually mixed into the irrigation water.
At the opening from which the fertilizer intake hose leads, a mechanism is installed in the Venturi nozzle that prevents water from flowing into the fertilizer container. In practice, this would occur when irrigation is stopped, thus creating pressure at the intake opening instead of a negative pressure. The water remaining in the irrigation system would then be forced outward and flow into the fertilizer container.
In most Venturi injectors, the backflow prevention mechanism works with a small spring that pushes a plastic ball in front of the outlet, thus closing it. Only when sufficient suction is applied does the ball retract, opening the outlet so that the fertilizer can be drawn in.

Intake outlet ready for use and below with removed seal, ball and spring
The ratio of fertilizer addition is primarily determined by the following three parameters:
- Diameter of the Venturi nozzle and the nozzle constriction
- Inlet pressure at the inlet of the Venturi nozzle
- Outlet pressure at the outlet of the Venturi nozzle
The following applies: The greater the pressure difference between the inlet pressure (at the inlet of the nozzle) and the outlet pressure (at the outlet of the nozzle, after passing the constriction), the greater the suction effect and, consequently, the more fertilizer is added. This difference is achieved, on the one hand, by the constriction in the Venturi nozzle, as the water loses pressure due to the strong friction when passing through the constriction. The narrower the constriction, the greater the pressure loss. When installing the Venturi nozzle via a pipe bypass, the pressure difference can be further increased by deliberately slowing the water flow upstream of the outlet side of the Venturi nozzle with a valve, allowing the fertilizer dosage to be controlled according to your preferences.
Depending on the model, Venturi injectors require at least a 20 to 30% pressure difference between the inlet and outlet of the nozzle to function. A difference of around 50% typically achieves the maximum possible fertilizer dosage. The minimum pressure difference required to draw in fertilizer cannot be achieved with all Venturi injectors and at all inlet pressures using only the Venturi nozzle; in some cases, creating an additional pressure difference using a bypass is absolutely necessary.
The maximum technically achievable mixing rate for a Venturi injector is a maximum of 10% (i.e., 1 gallon of fertilizer to 10 gallons of water). For the sake of completeness: In addition to the size and design of the Venturi nozzle, the inlet and outlet pressures, other factors can have a minor impact on the dosage ratio: the liquid fertilizer used (viscous or watery), how deep the fertilizer container is placed below the nozzle, the outside temperature, and the elevation of the application site.
The diameter of the Venturi nozzle, the inlet pressure, and the outlet pressure also determine how many gallons of water per hour can flow through the nozzle in this configuration. Quality manufacturers list these parameters for each nozzle size and different inlet and outlet pressures in performance tables. Below is the example performance table for Irritec’s Venturi injectors:
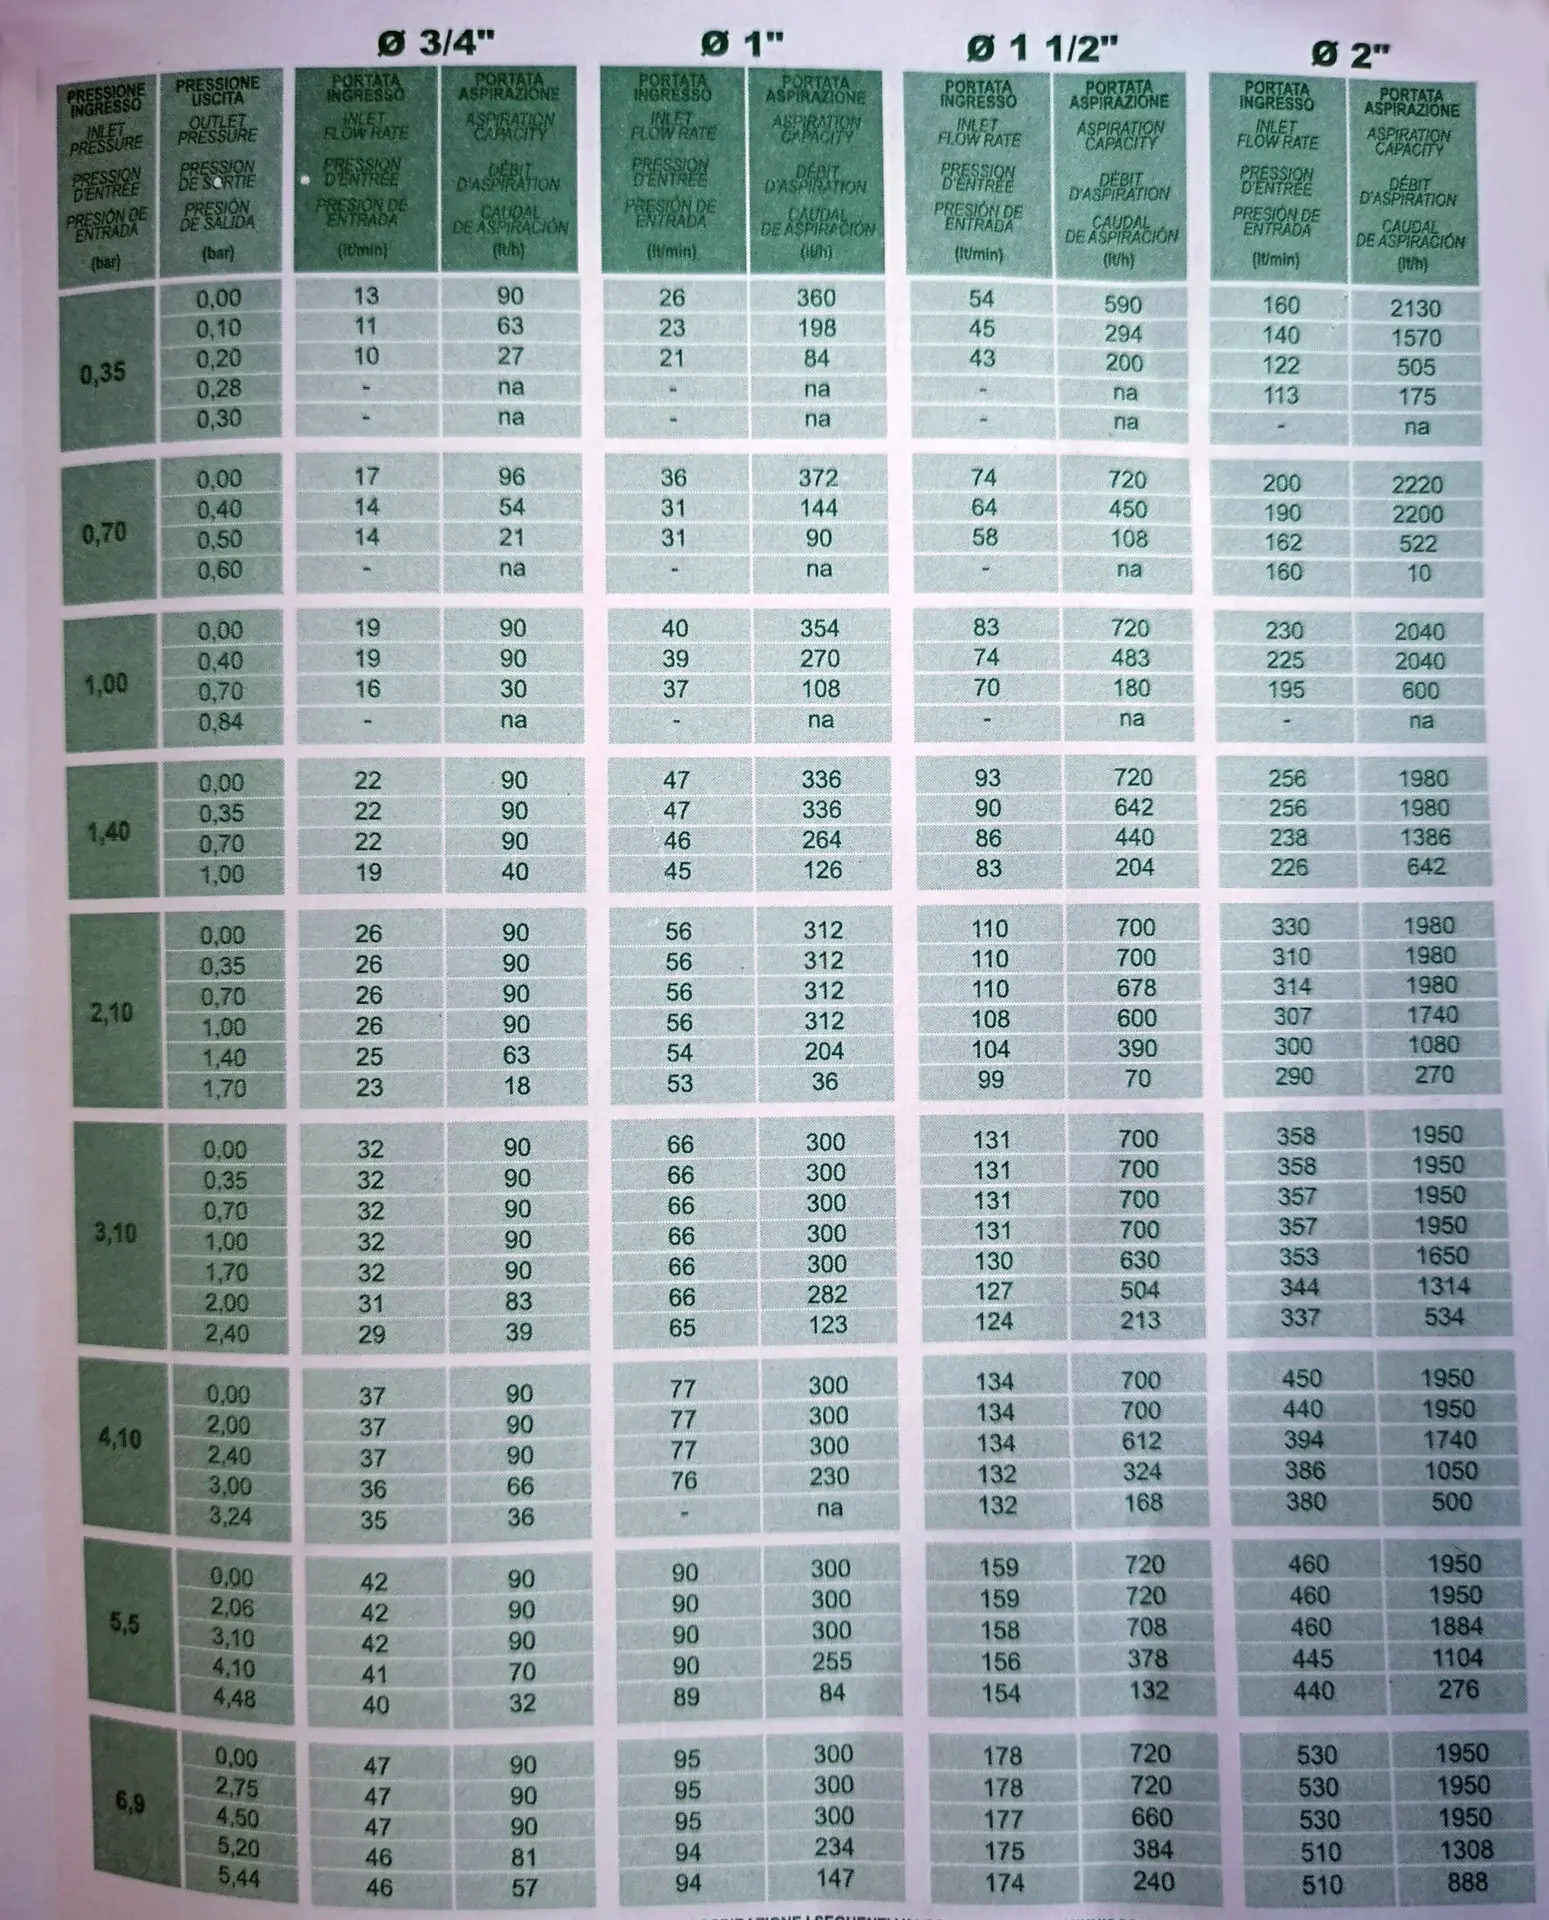
Performance table of Irritec Venturi injectors
The first column shows the inlet pressure, followed by a range of possible outlet pressures. For each combination of inlet and outlet pressure, the corresponding water flow and fertilizer output are listed. This is for four different Venturi injector models ranging in size from 3/4 inch to 2 inches.
An example explains how to read such a table:
Using a 3/4-inch injector, an inlet pressure of 60 psi (4.2 bar), and an outlet pressure of 43 psi (3.0 bar), a flow of 10 gallons per minute (36 liters per minute) or 570 gallons per hour (2,160 liters per hour) is possible, and the fertilizer addition would be 17 gallons (66 liters) per hour. With a 1-inch injector, the water flow at the same pressure would be 1,200 gallons (4,560 liters) per hour, and the fertilizer addition would be 60 gallons (230 liters).
What determines the outlet pressure?
The outlet pressure is determined by the requirements you want to meet with the fertilizer water. If the water were simply allowed to flow freely out of the pipe immediately after leaving the Venturi nozzle, a pressure close to zero on the outlet side would be sufficient. In this case, a valve installed in the bypass could reduce this pressure to near zero, thus exploiting the maximum possible pressure difference and achieving the highest possible fertilizer dosage.
However, if the fertilizer water still has to exert considerable pressure after leaving the Venturi nozzle – as is usually necessary in an irrigation system – to travel the distance through the irrigation pipeline and then ensure the sprinklers extend and function correctly, a significantly higher pressure is required on the outlet side.
This is essentially the same consideration as when calculating the water flow rate in an irrigation system. For example, if the sprinklers require 40 psi (2.8 bar) and there is a further pressure loss of 10 psi (0.7 bar) in the pipeline due to friction, then 50 psi (3.5 bar) of pressure would be needed on the outlet side just to exert the necessary static pressure in the irrigation system. At such a pressure, however, the entire output pressure would be used for static pressure, leaving no dynamic pressure to drive the water through the pipes. For irrigation to function with a reasonable amount of water, a slightly higher output pressure than 50 psi (3.5 bar) would be required. According to a practical example used here in the blog, for example, with the water source used there, you would need 60 psi (4.2 bar) to achieve a water output of 280 gallons (1,060 liters) per hour with a pressure requirement of 50 psi (3.5 bar) in the irrigation system.
This shows that in practice, you have to weigh and balance between higher fertilizer dosage and still sufficient output pressure, and in many cases, you will have to focus on the lowest possible dosage. Unless you use the Venturi injector for micro-irrigation, which has significantly lower pressure requirements, or you have a very powerful pump available that still has considerable reserves for everyday irrigation needs.
Advantages and Disadvantages of Fertilization with a Venturi Injector
The main advantage of fertilization with a Venturi injector is that it is very easy and cost-effective to implement. Furthermore, Venturi injectors are simple and have no moving parts, so almost nothing can break during operation and they are therefore very low-maintenance.
A significant disadvantage is that the Venturi nozzle relies on the existing water pressure to function. Bernoulli’s law “Total pressure = flow pressure + static pressure” only applies one-to-one to frictionless fluids, which water is not. Therefore, when water flows through the constriction of the Venturi nozzle, friction losses occur and, consequently, pressure losses. The function of the Venturi nozzle is based precisely on this pressure loss, which leads to the pressure difference.
Depending on the nozzle model, a pressure drop of at least 20 to 25% is required for proper functioning. If the natural pressure loss through the nozzle is insufficient, the water must be additionally slowed down in a bypass system with a valve.
Consequently, the use of a Venturi injector leads to a certain pressure loss, so that the pressure ratios previously present in an irrigation system are no longer 1:1, and irrigation may then no longer function as perfectly as before (reduced uniformity). It is comparatively easy to use in micro-irrigation systems, which operate at low pressure. Therefore, reducing the pressure hardly plays a role in such systems.
For use in conventional irrigation, e.g., for watering the lawn, a powerful pump is advantageous, so that sufficient pressure remains for irrigation after the water has passed through the Venturi nozzle, and irrigation continues to function properly.
Compared to fertilizer systems with a dosing pump, a Venturi injector also has the disadvantage that the amount of fertilizer delivered depends on the pressure conditions. This makes it difficult to precisely adjust and maintain the fertilizer dosage, especially if the irrigation system is subject to fluctuating pressure conditions.
Finally, correctly adjusting the Venturi injector for the first time requires some effort, especially if you want to set the dosage to a predetermined level. After setup, the installation is ideally left untouched so that the desired adjustment can be used permanently.
How to Install the Venturi Injector
The Venturi Injector is typically installed in the main pipeline, i.e., in the section of the pipe at the beginning of the system that is passed through during each irrigation run, before the main line then splits into several branches for the individual irrigation sectors.
To prevent the risk of backflow of water mixed with fertilizer toward the water source, a backflow valve should be installed between the water source and the fertilization system, or the Venturi nozzle should be isolated from the main system with manual valves after fertilization. If drinking water is used directly from the drinking water system, the stricter regulations regarding drinking water protection must be observed.
The Venturi Injector can either be installed in-line with the main pipeline or in a branch (bypass) that diverts from the main pipeline to the Venturi Injector and returns to the main pipeline after the fertilizer has been absorbed.
Such a bypass installation has the following advantages:
- With a valve installed in the main line at the level of the bypass between the bypass inlet and bypass outlet, you can control the pressure difference between the inlet pressure and the outlet pressure of the Venturi nozzle, thus adjusting the fertilizer dosage. Some manufacturers even specify this type of installation to ensure their injector functions properly, or even strongly recommend it, because the Venturi nozzle alone cannot create the necessary pressure difference, or not in every pressure configuration.
- Furthermore, a bypass solution has a positive effect on water flow, as some of the water can bypass the Venturi nozzle and take the direct route through the pipeline. This enables higher flow rates than the Venturi nozzle itself would allow.
- The bypass can be deactivated relatively easily with valves installed in between, so that during normal non-fertilizer irrigation runs, the water does not have to flow through the Venturi nozzle. If the injector were installed directly into the main line, it would have to be removed every time after use to achieve the same result. The bypass, on the other hand, only needs to be installed once and can then remain as it is permanently.
Below are four possible installation methods for a Venturi injector from the Irritec user manual. In addition to the connection directly into the pipeline and the standard bypass connection, two alternative connections with an additional pump are also listed:

Four possible installation types
The Venturi injector should always be mounted horizontally or, alternatively, vertically upward (i.e., inlet at the bottom and outlet at the top). A vertically downward position can cause suction problems. The water must flow through the nozzle in the specified direction; this direction is indicated on the nozzle.
By installing a pressure gauge on the inlet and outlet sides of the bypass, the inlet and outlet pressure can always be precisely monitored, or a specific pressure difference can be set using a valve.
Since airtight connections are important for proper operation, it is recommended to use PE tape or other sealing material on the threads during installation. Ideally, the complete injector, i.e., both the nozzle and the suction hose, should be purchased from the same manufacturer to ensure optimal compatibility.
The suction hose is suspended completely down to the bottom of the fertilizer tank so that the fertilizer can be drawn all the way to the bottom. At the end of the suction hose there is usually a small filter basket that prevents the suction of larger protective particles.
How to Choose a Suitable Venturi Injector
The most important selection criterion is the size of the injector! This is not determined by the size of the pipeline used in the irrigation system, but by the available pressure and water flow rate. Specifically, the water flow rate achieved during operation, not the maximum available! This is further exacerbated by the fact that the Venturi nozzle requires a significant pressure reduction of 20% or more to function, and the water flow rate when using a Venturi nozzle will therefore be somewhat lower than in previous irrigation runs without a Venturi nozzle. Unless you haven’t yet fully utilized the potential pump capacity or the power from the domestic water supply, so you still have some reserves.
If in doubt, or if you’re unsure about the water flow rate, it’s better to buy a smaller Venturi injector!
If the injector is too large and the specified flow rate is not reached, the injector will not draw in any fertilizer. If the injector is too small, however, fertilization will work perfectly, but the injector will limit the flow. This problem can be solved relatively easily by incorporating it into a bypass so that excess water can bypass the nozzle.
Note: Micro-irrigation sectors are particularly problematic for Venturi injectors if they have very low water flow rates. Here, you must carefully find a suitable injector or, if that is not possible, use a different fertilization system altogether.
Regarding water flow, it is important to note that even with the same diameter, Venturi injectors can have very different performance characteristics. There are 3/4-inch injectors designed for high water flow and others for low water flow. The manufacturer Mazzei, for example, offers both the IM34L model with a minimum flow rate of 240 gallons (900 liters)/hour at 50 psi (3.5 bar) inlet pressure and the IM34H model with a minimum flow rate of 420 gallons (1,600 liters)/hour at 50 psi (3.5 bar) inlet pressure in 3/4-inch sizes. They also offer a 1/2-inch injector with a low flow rate of 60 gallons (230 liters)/hour or a high flow rate of 150 gallons (570 liters)/hour (IM12L and IM12H). The 3/4-inch Irritec model I tested requires approximately 500 gallons (1,900 liters)/hour at an inlet pressure of 50 psi (2.8 bar).
The possible fertilizer dosage is only a secondary selection criterion. Liquid fertilizer manufacturers specify a specific dosage ratio for their products, which the injector should be able to achieve. However, it is particularly important not to apply the fertilizer too concentrated, as this could damage the plants. However, this problem will rarely occur with Venturi injectors, as higher dosages require more pressure. When fertilizing with an irrigation system, it is generally recommended to apply the fertilizer slowly, as this allows for greater uniformity.
Products Available on the Market
Complete Venturi injectors, consisting of a nozzle and intake hose, as well as nozzles and intake hoses separately, are available on the market. Venturi injectors are available either as a standalone product, i.e., just the nozzle and a matching intake hose, or as part of a pre-assembled bypass. This saves you the trouble of assembling such a bypass yourself.
Numerous no-name products are available, as well as products from brand manufacturers such as Netafim, Irritec, or Mazzei. No-name Venturi injectors start at $20 to $30, while brand-name products cost approximately $60 to $100. A Venturi injector in a pre-assembled bypass solution will cost approximately $30 to $200 more, depending on the quality of the bypass and whether it includes a built-in pressure gauge. Some injectors also offer a way to adjust the dosage by using a valve on the intake hose to slow the suction.
Venturi injectors on Amazon:
No products found.
Practical Test of the Irritec 3/4-Inch Injector
To give you a concrete example of an application and a starting point for your own further considerations, I tested the Irritec 3/4-inch injector in practice. I tested it with a fairly powerful Grundfos Scala 1 5-55 pump, which still has reserves for its current irrigation task. A pressure of approximately 60 psi (4.2 bar) is required in the area to be irrigated (40 psi (2.8 bar) sprinkler, 10 psi (0.7 bar) pipeline, 10 psi (0.7 bar) elevation difference when drawing water from the well). The hourly water flow in the tested zone for irrigation without fertilization has so far been approximately 700 gallons (2,650 liters).
I screwed the nozzle and intake hose together to form the injector as they came, without any additional sealing material, and installed the injector directly into the pipeline, without a bypass. The intake hose simply hung from there into a standard bucket filled with fertilizer. A very simple design, but perfectly adequate for the test purpose. For permanent use, it could and should certainly be made even more stable and visually appealing.
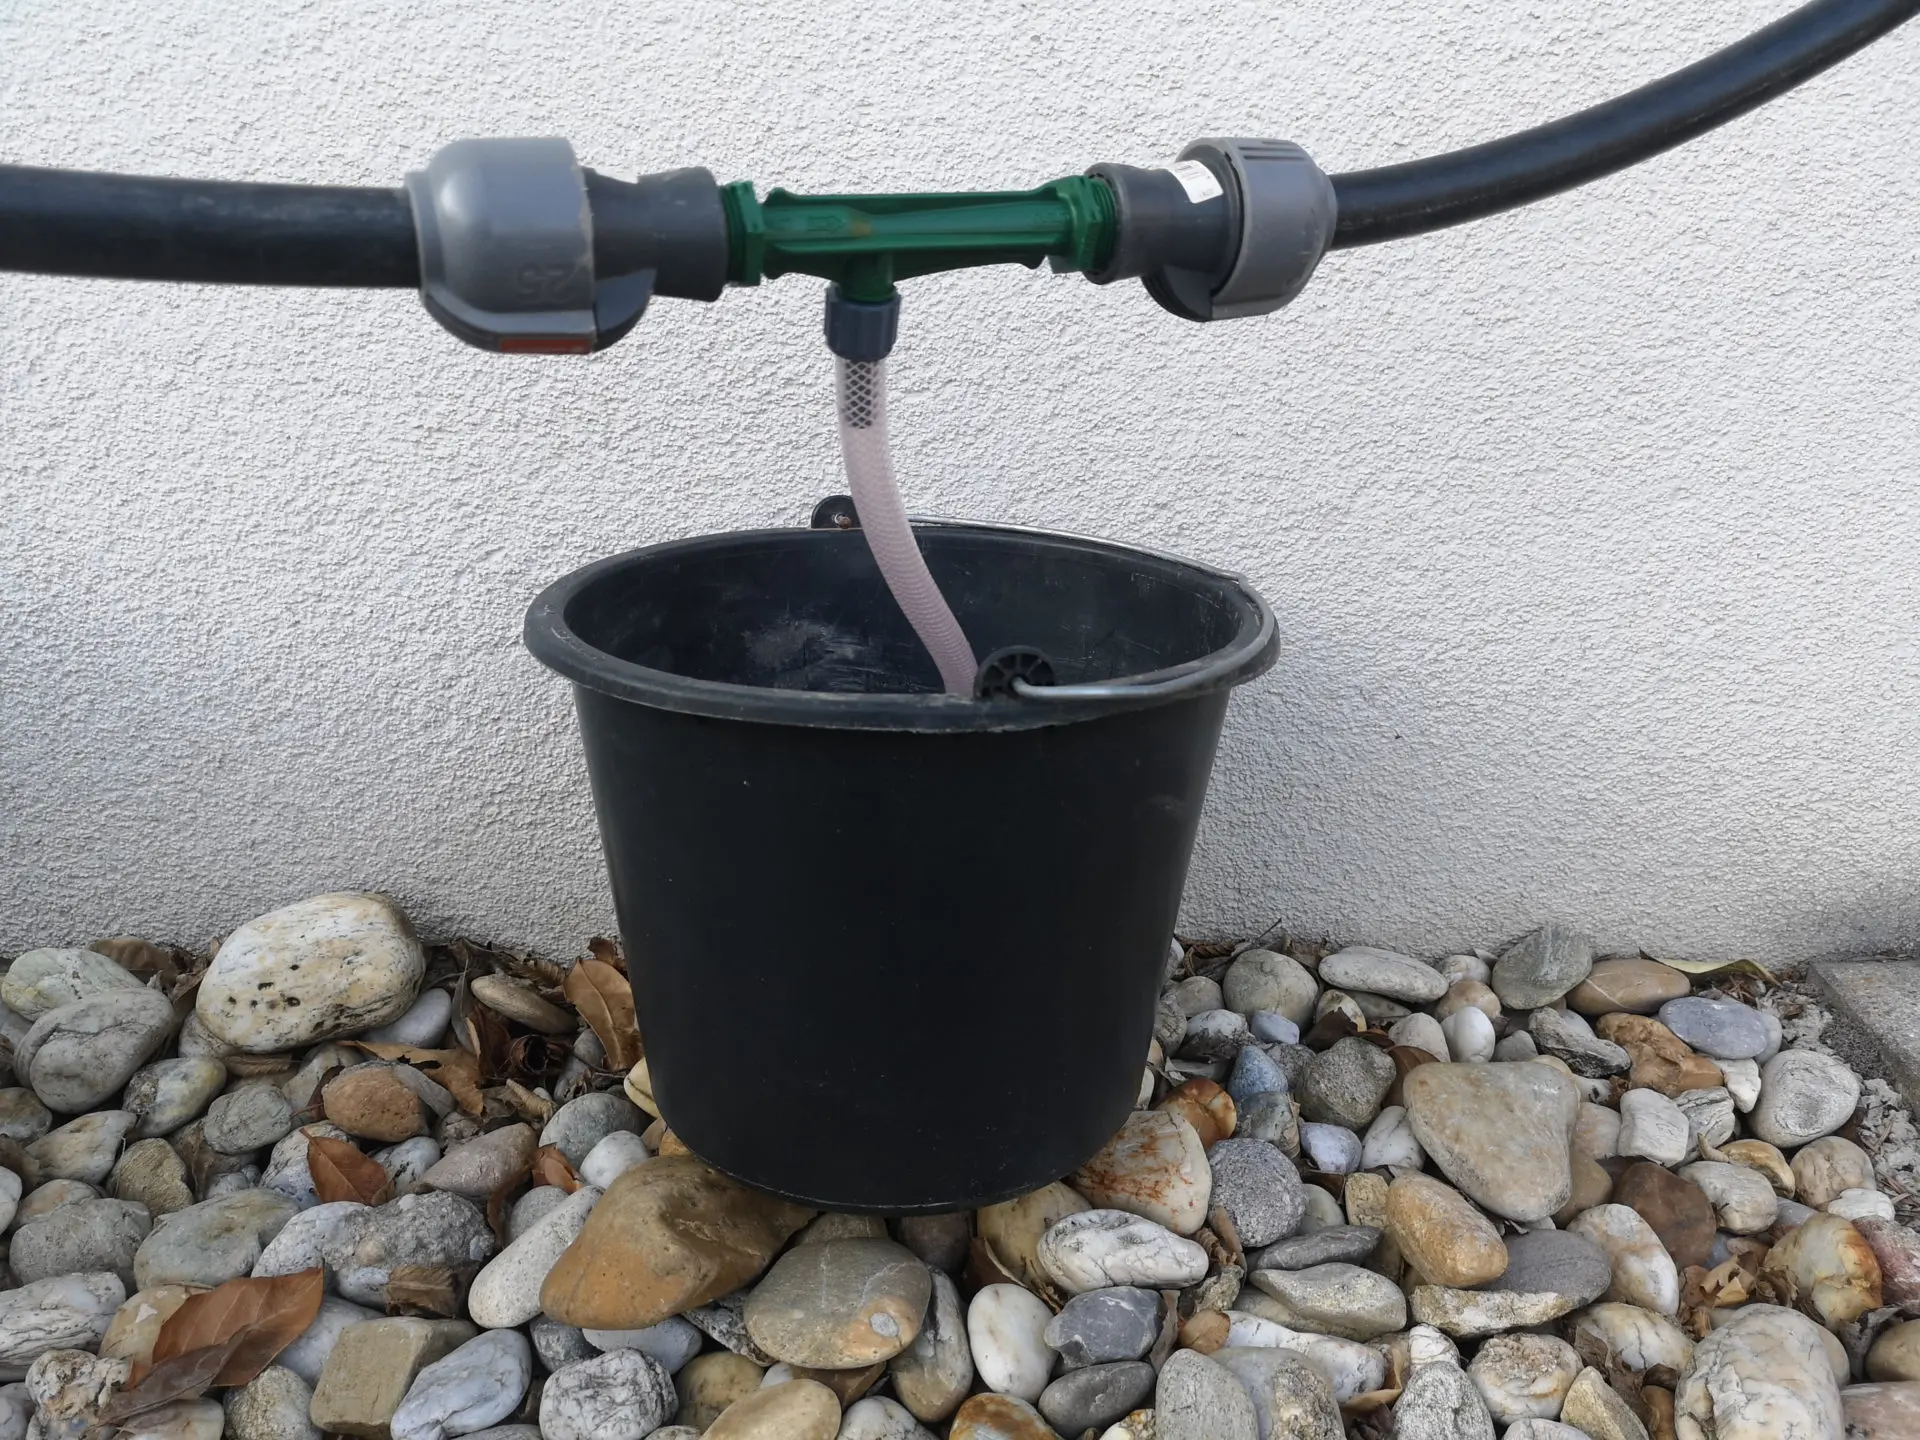
My simple installation, limited to the essential function, for test purposes
And then an irrigation run was started immediately. Result: The fertilizer intake in the Venturi injector worked perfectly and powerfully, but the sprinklers no longer had the necessary pressure to extend properly and only irrigated at half-mast with significantly reduced throw distances.
Interim conclusion: As expected from the manufacturer’s performance tables (see earlier in the article), the Venturi nozzle limited the maximum possible water flow due to the constriction in the nozzle. This would not be practical in this configuration, as the fertilizer would be distributed very unevenly due to the completely inadequate throw distances.
I then tested the same setup in a second zone, which has a significantly lower water flow of 450 gallons (1.700 liters) per hour. With this zone, irrigation worked perfectly as usual, with the usual spray distances. And the fertilizer intake also continued to work flawlessly.
Test with installed bypass
I conducted my next test again on the large 700-gallon (2,600 liters) zone. I quickly built a bypass branch using connectors, pipe sections, and a valve. The bypass branches off downward from the main line, then runs through the Venturi nozzle, and returns to the main line. Parallel to this, the main line continues directly, with an additional valve installed after the branch to the Venturi nozzle to regulate the pressure.
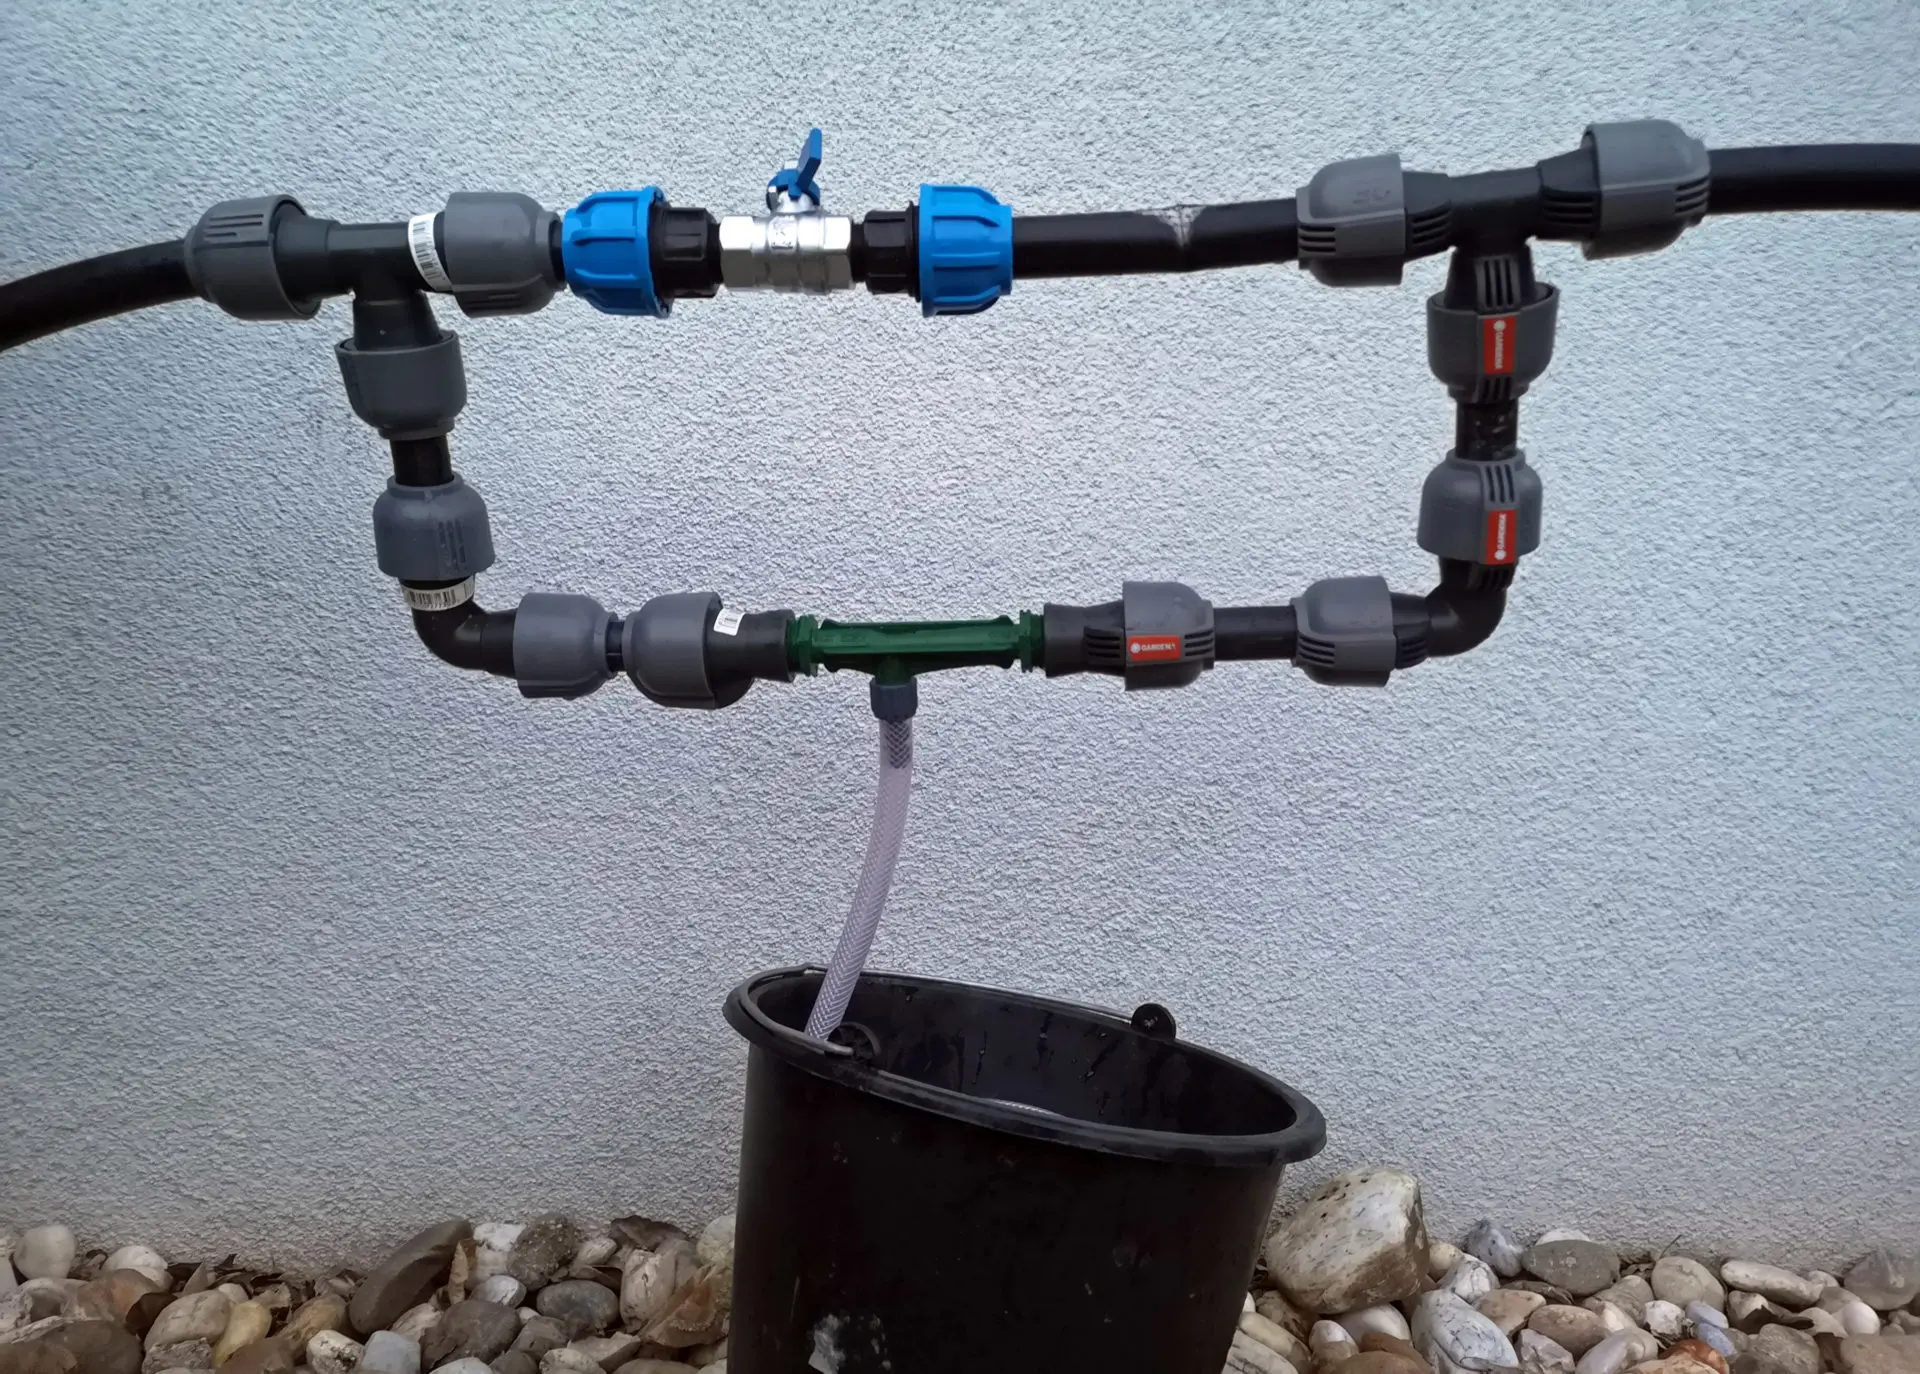
Venturi nozzle integrated into a bypass
In my first test run with the bypass solution, I left the valve fully open so that the water could flow through unhindered. As expected, the irrigation system received sufficient water and functioned as normal. However, the Venturi nozzle did not suck in any fertilizer in this way, as the nozzle constriction was not sufficient in this configuration to generate the required pressure difference.
I then gradually closed the valve until the intake hose began to draw in fertilizer. This was easy to control, and at the lowest possible dosage, where the fertilizer was only sucked out of the bucket very slowly, the irrigation felt almost normal, with only a very slightly reduced throw distance. But even at a higher dosage, it continued to function quite well, with throw distances that were still usable in practice.
Interim conclusion: With a bypass branch, you can easily get closer to the desired result and find a suitable balance between fertilizer dosage and pressure loss.
Test conclusion
The Venturi injector met my expectations: Setup is straightforward and inexpensive, and you can quickly achieve a usable result. Since it allows for significantly more flexible and precise adjustment, I would definitely prefer the bypass installation to the in-line installation for long-term use. The additional installation time only takes a few minutes, or if that’s too tedious for you, you can also purchase ready-made bypass solutions.
Note: After fertilization is complete, you should continue to water with clean water for about half an hour to ensure that all fertilizer residues are washed out of the system and that no algae or microorganisms can form.
