In this article I describe how the Orbit B-hyve system works, which is used in all web-enabled Orbit irrigation computers. This allows the irrigation computer to be programmed and operated from anywhere in the world via app or web browser and includes additional functionalities for intelligently controlling irrigation depending on weather and other events.
The article has become a little longer because the software contains very extensive options and I tried to describe them in as much detail as possible in order to provide a deep insight into the system. If you are only interested in individual details, then I have provided a table of contents in which you can jump directly to the points that are of interest to you. You can find my conclusion and a comparison with the previously tested systems from competitors Hunter, Rain Bird, Gardena and LinkTap at the very end of the article.
Orbit B-hyve product overview
The B-hyve software is currently used in the following five Orbit smart irrigation computers:
The B-hyve Smart Hose Timer and B-hyve XD Smart Hose Timer are water-flowing irrigation computers that are suitable for attaching to a faucet. The other three models are irrigation computers for solenoid valve control. These do not come into contact with water, but open and close connected solenoid valves through which the water flows.
Depending on which type of Orbit B-hyve irrigation computer is used, operating and programming the computer is also possible in a limited form directly on the device, or only via the app or web browser.
Main menu/navigation of the software
Navigation through the program is done using the following menu bar with 5 program items:
Help Symbol
Calendar: Provides a calendar overview of the planned and already carried out irrigation runs.
Program: Up to 4 irrigation runs (A, B, C, D) can be set up here.
Home: Home page when opening the app. Here you can see the next planned irrigation runs and can start manual irrigation or set a rain delay.
Zones: Here you can set up the irrigation zones and optionally make Smart Watering settings for the zone.
My B-hyve: There are a variety of settings hidden here, e.g. for the B-hyve account, the device used, Smart Watering, automatic notifications and much more.
In the program you will encounter the following question mark symbol in numerous places. If you click on it, you will see further information on a topic.
Help Symbol
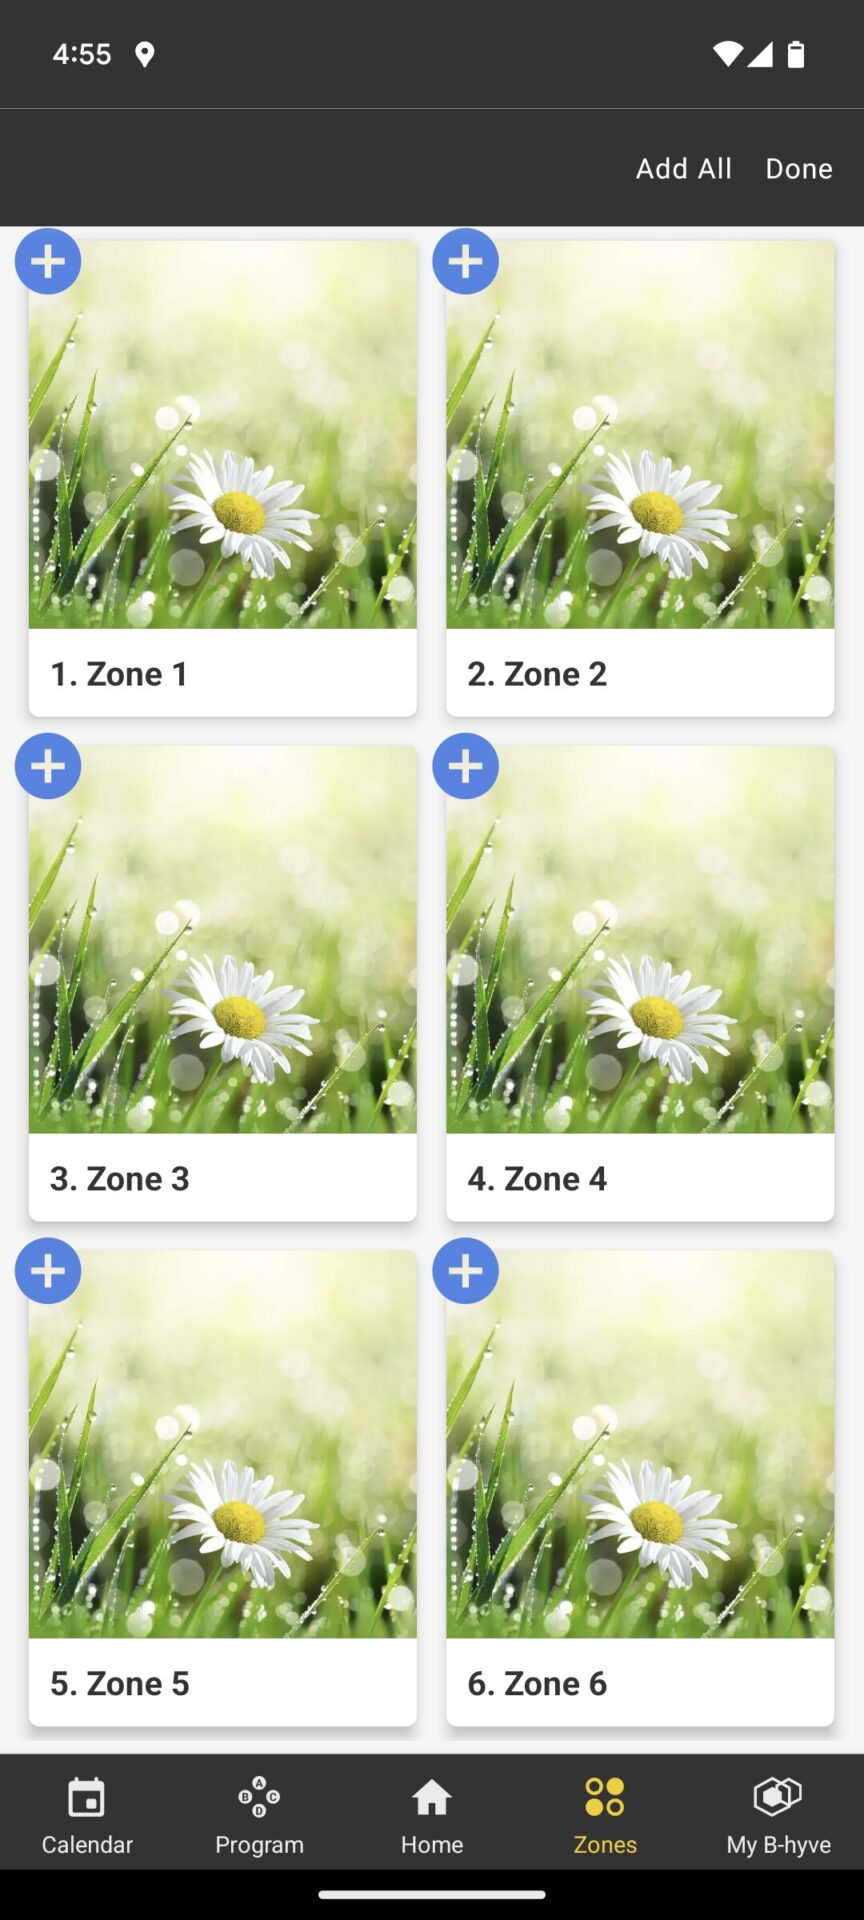
Set up zones
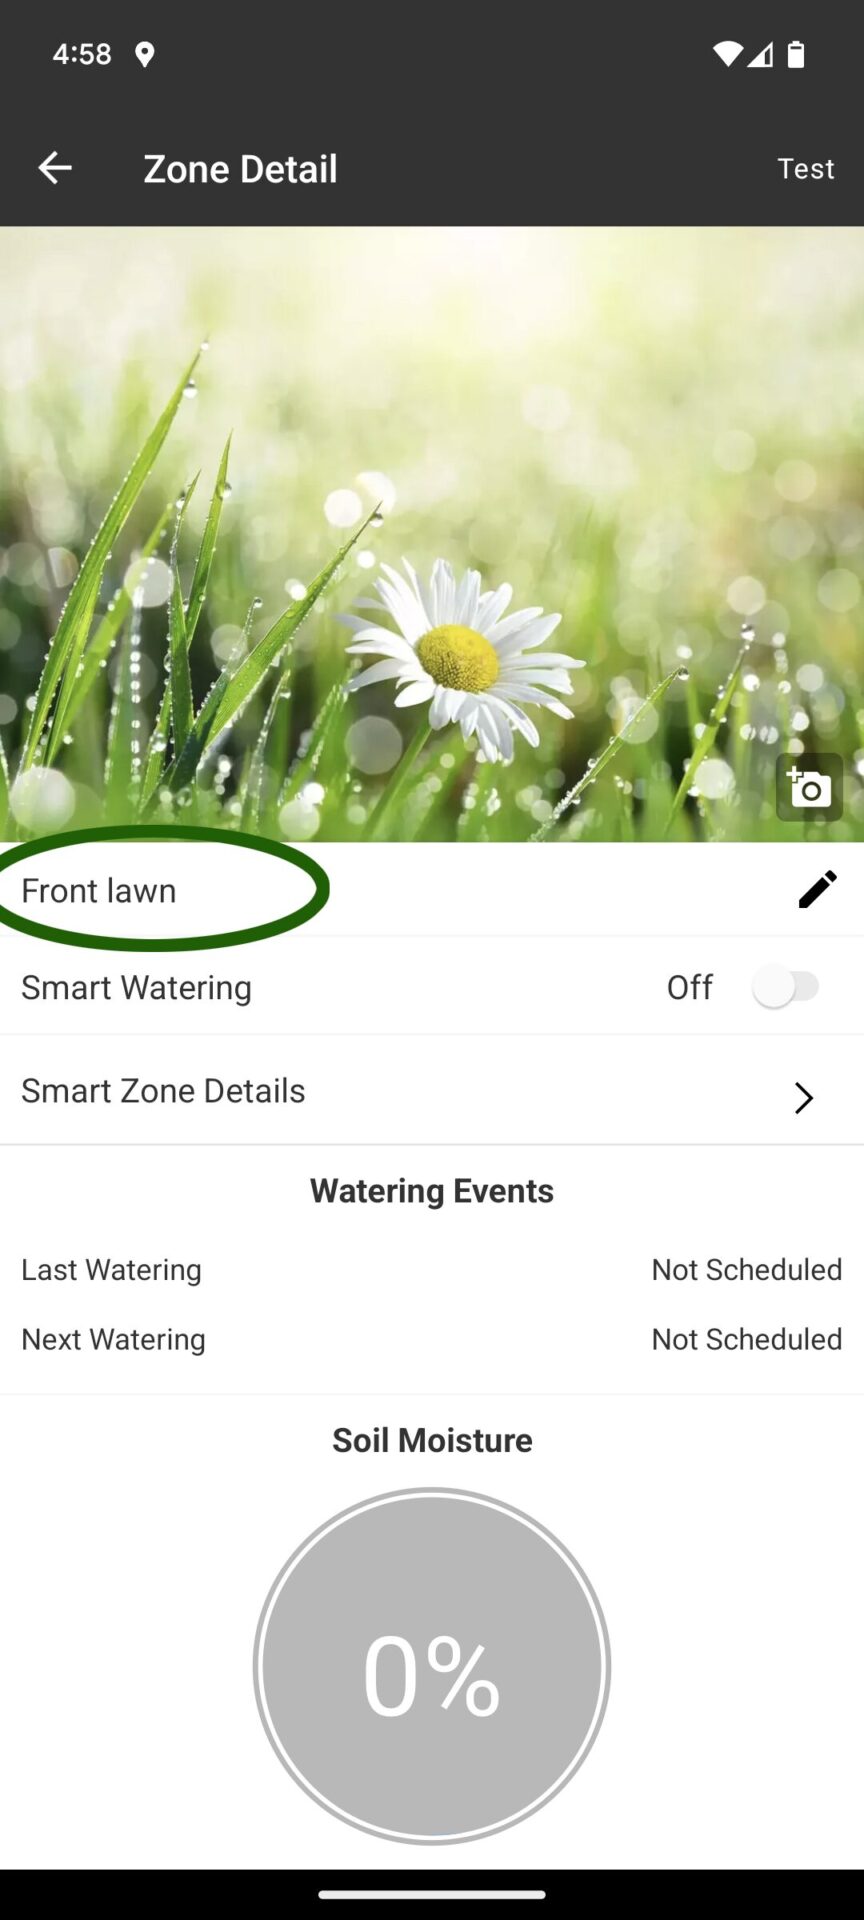
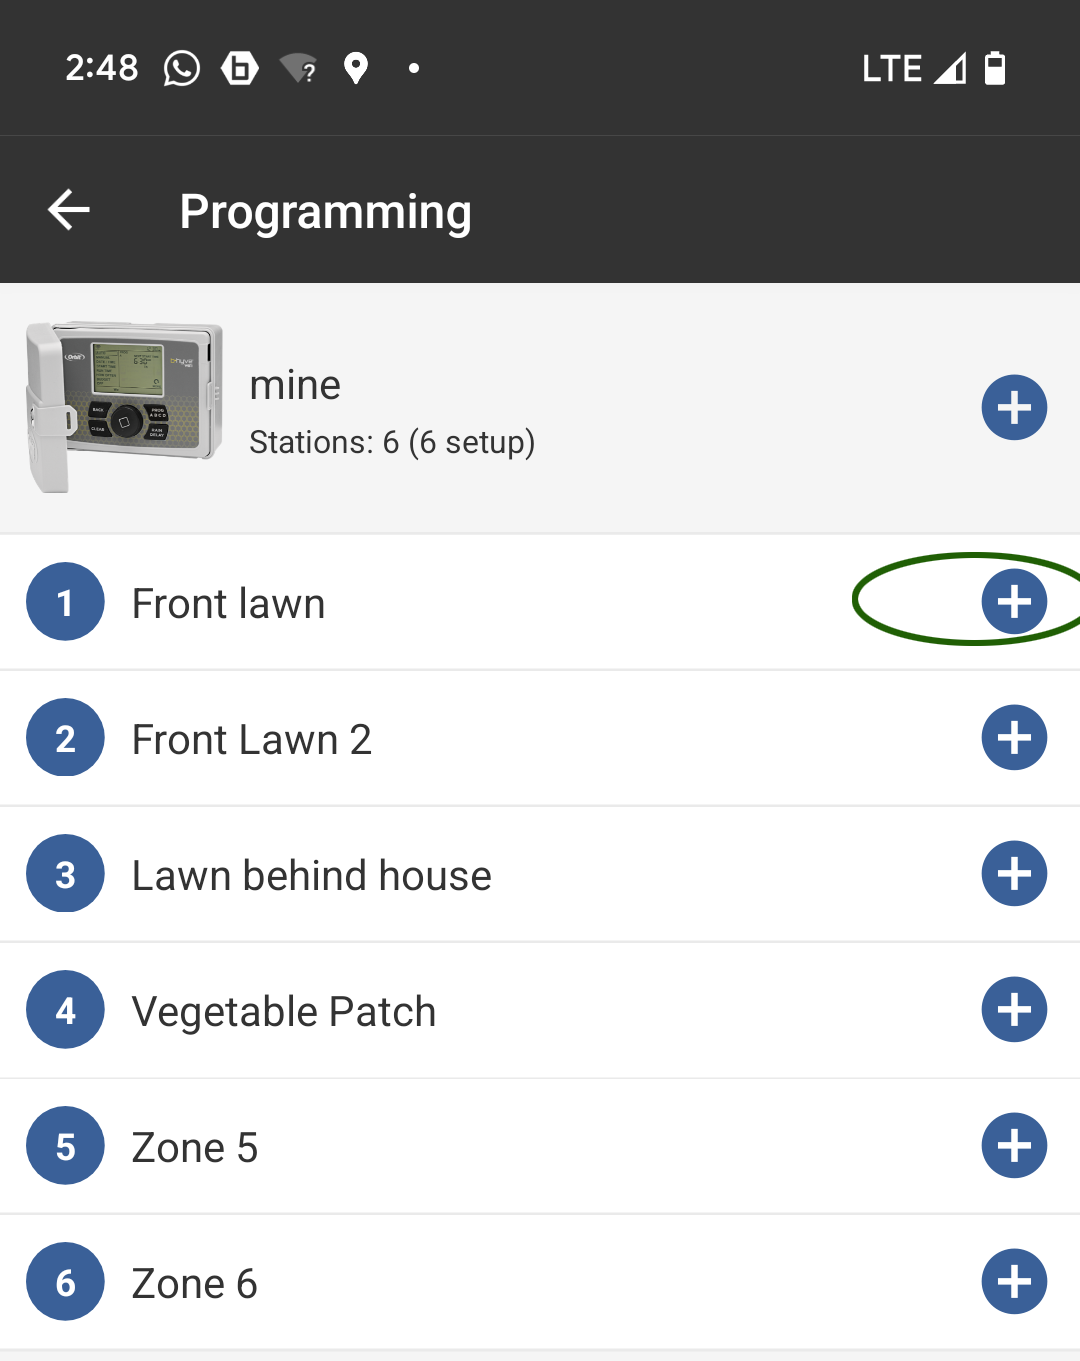
When you select the “Zones” menu item, a certain number of possible zones are displayed, depending on the computer model used. A zone corresponds to a sector output on the irrigation computer, whereby zone 1 also corresponds to output 1, zone 2 to output 2, etc. etc. So, for example, if you have planned 5 irrigation sectors in your garden, then zones 1 to 5 would have to be created. With the watering computer B-hyve Smart Hose Timer, which only has one output, there is only one zone to define.
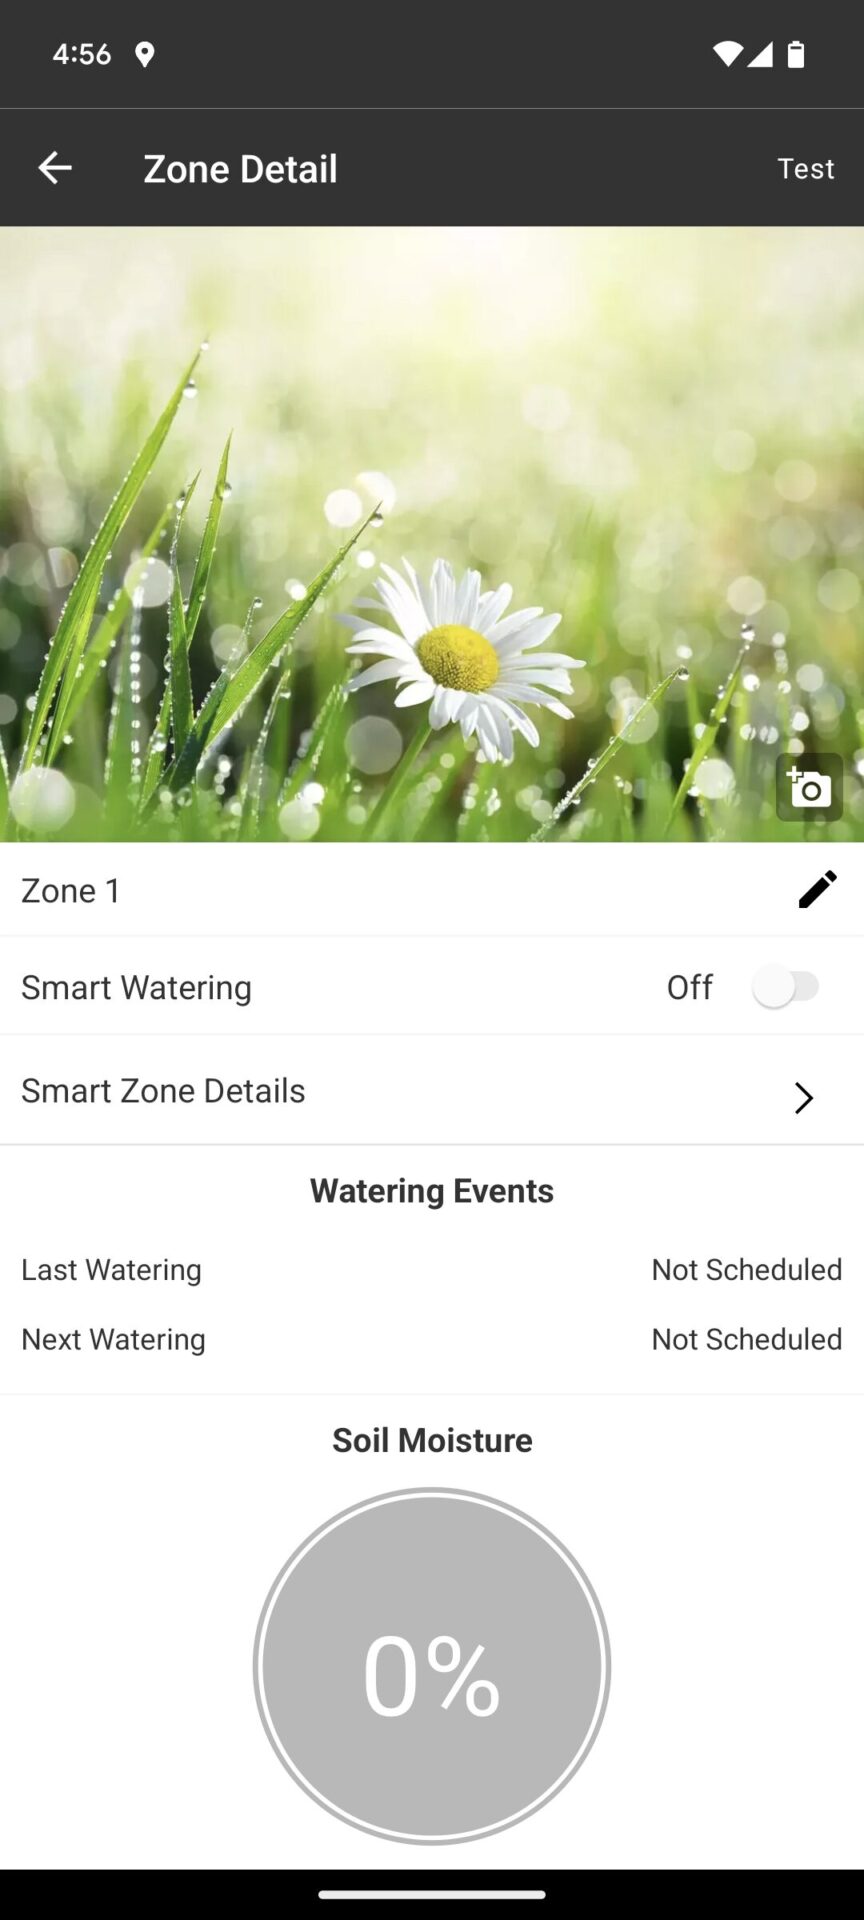
The zone can be activated by clicking on the plus symbol. If you then click on it again, the zone settings can be made:
Name of the zone (ideally as descriptive as possible so that you can tell from the name which sector it is (e.g. “lawn in front of the house” or “vegetable patch” or “strip of grass behind the house”)
optional: A picture of the zone (not really necessary, but nice to see in everyday use)
Activation/deactivation of Smart Watering for the zone (more on this in the chapter “Smart Watering Zone Settings”)
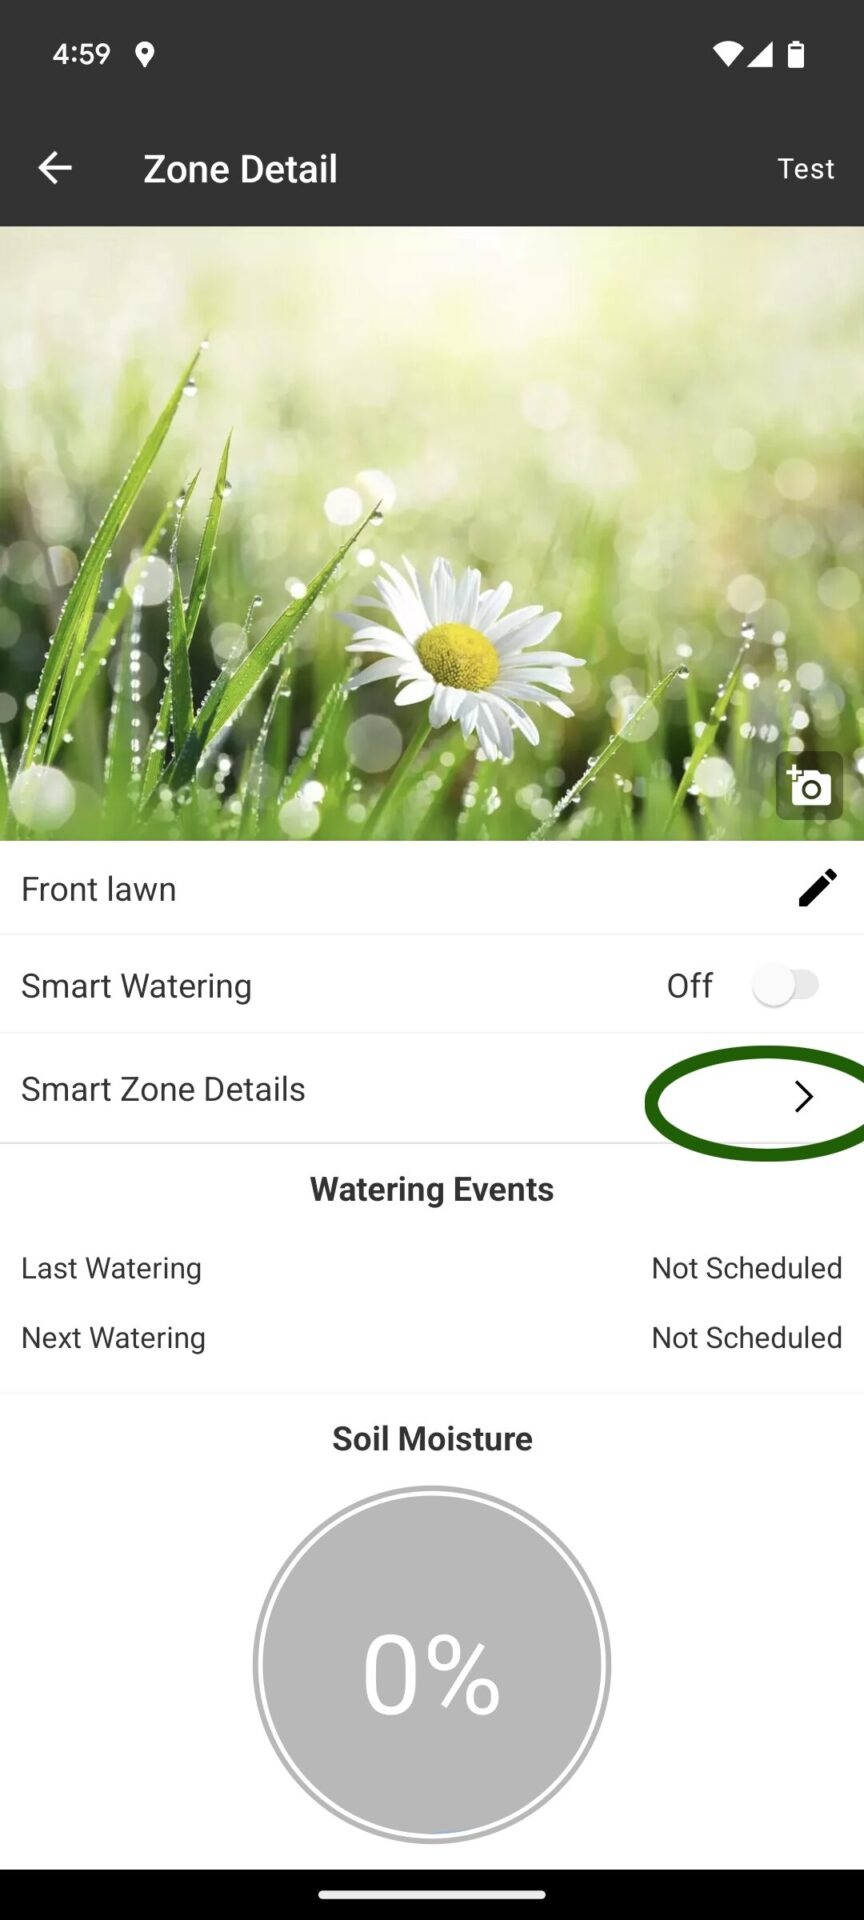
Smart Zone details (only required when using Smart Watering, see chapter “Smart Watering Zone Settings”)
Watering events (nothing can be actively entered here. As soon as the zone has been assigned to a watering program or Smart Watering has been activated, it will be listed here when the next watering is planned or the last one took place)
Specify soil moisture (also only required when using Smart Watering, see chapter “Smart Watering zone settings”
Test (by clicking on the test link at the top right, irrigation for the zone can be activated for a few minutes as a test)
Click on the plus symbol to create a zone
Enter the zone details
To create a simple zone without a Smart Watering function, you basically only need to assign the name of the zone:
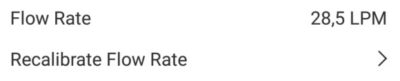
When using an Orbit B-hyve smart hose timer that has an integrated water flow meter, the zone menu also displays information about the zone’s water consumption (in gallons or liters per minute) and you also have the option of resetting the water flow calibrate. This calibrated value is used to extrapolate the water flow for manually executed irrigation runs, but has no effect on the actual measured water flow.
If you want to control the irrigation computer in the classic way with a program you specify yourself, then you should now continue with the point “Setting up programs”. If you would like to have the zone watered independently using artificial intelligence instead, then the necessary Smart Watering settings must be made in the zone as described in the next point. There is no need to create a program for such zones, as they would otherwise be watered twice (once with the manually created program and once due to the Smart Watering automatic).
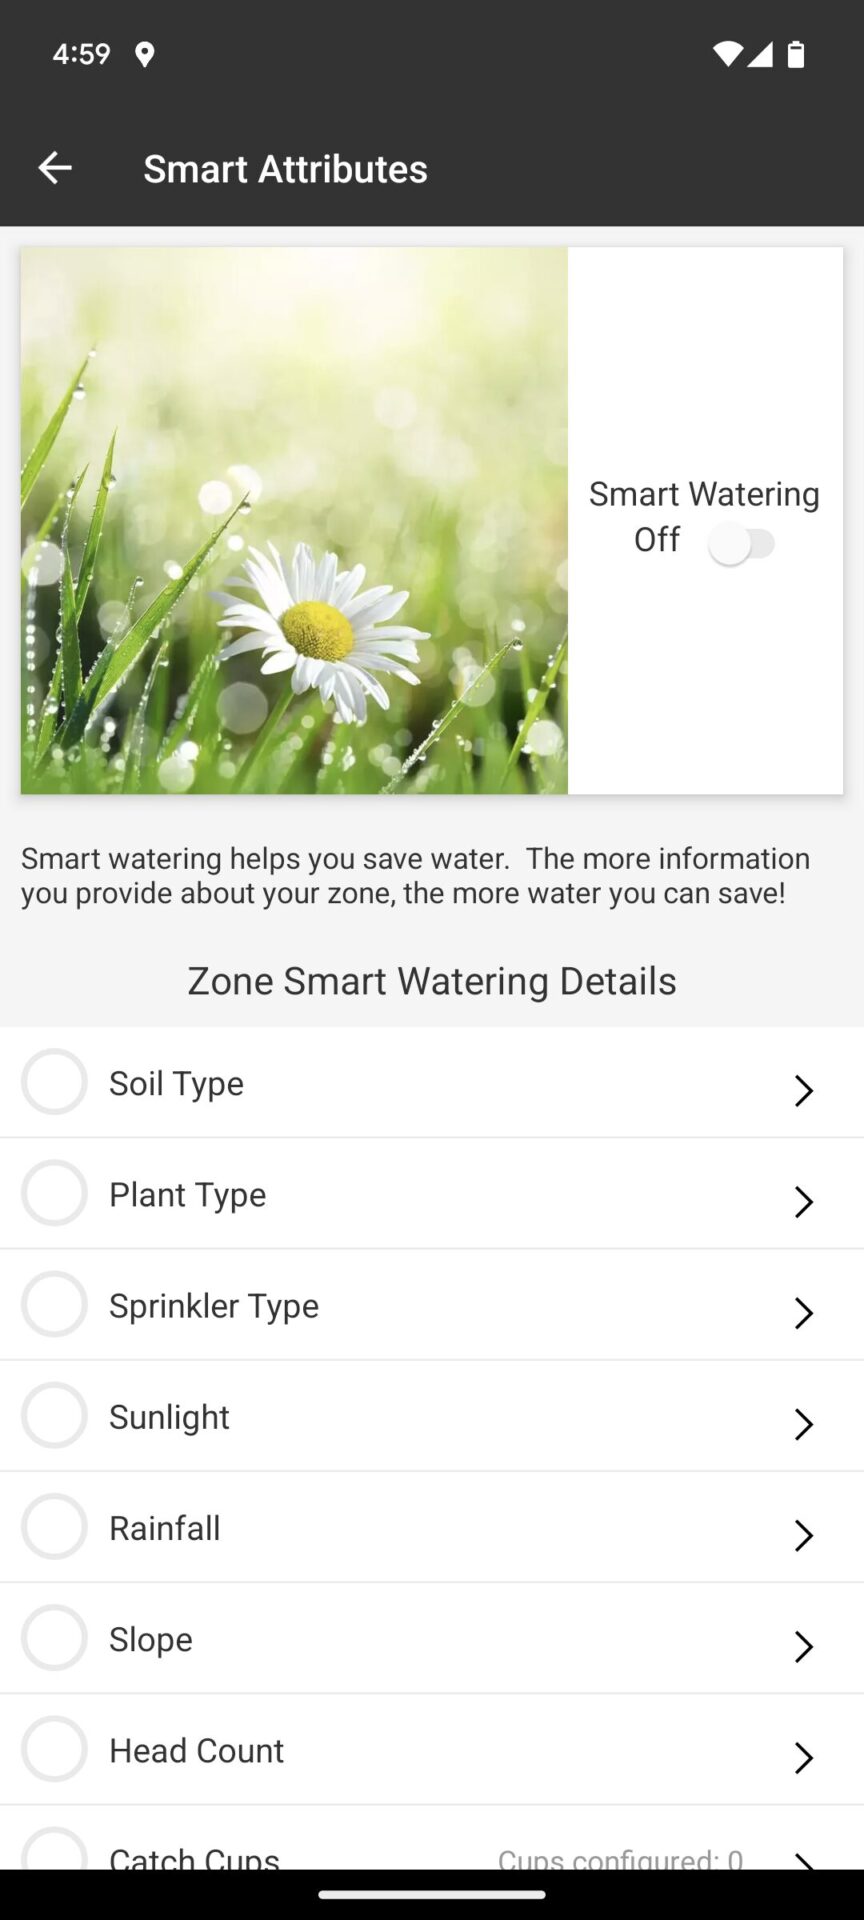
Make Smart Watering settings for the zone
Orbit B-hyve offers the option of having irrigation carried out fully automatically by the artificial intelligence included in the program. The system then autonomously decides on which days and times to irrigate or when irrigation is to be omitted, as well as the length of the irrigation runs. It does this with an algorithm that uses the following three types of data:
Weather data and irrigation data
Using its WeatherSense™ technology, B-hyve obtains local weather data. If there is a 30% chance of rain forecast for today, the system will skip the irrigation run (this percentage can be adjusted). Based on the irrigation runs that have taken place in the past, the system also knows how much water the lawn has already received and when it was last watered and takes these parameters into account in the planning.
Type and slope of the soil
Different types of soil absorb water at different rates. The B-hyve automatic takes this into account when planning the irrigation duration and frequency and, for example, waters sandy soils at a denser rhythm than clay soils because they cannot hold water for as long. In addition, the water can be better absorbed into the soil in flat gardens than on slopes, where some of it drains away before penetrating the earth. In order for these factors to be taken into account correctly, the B-hyve system must be fed with some information about the garden.
Type of plants and evaporation
From the information about what type of plant is being watered in the sector, the system determines what water requirement this type of plant has. Based on temperature, humidity and wind speed, it calculates how quickly the water will evaporate. The higher the evaporation, the greater the water requirement of the plant.
Saving the Smart Watering settings works as follows.
Calling up the “Zone Detail” menu item:
Smart Zone Details menu item
Setting options in the Smart Watering menu
As detailed as possible information about the garden and the irrigation system must now be stored here in order to give the system the best possible working basis.
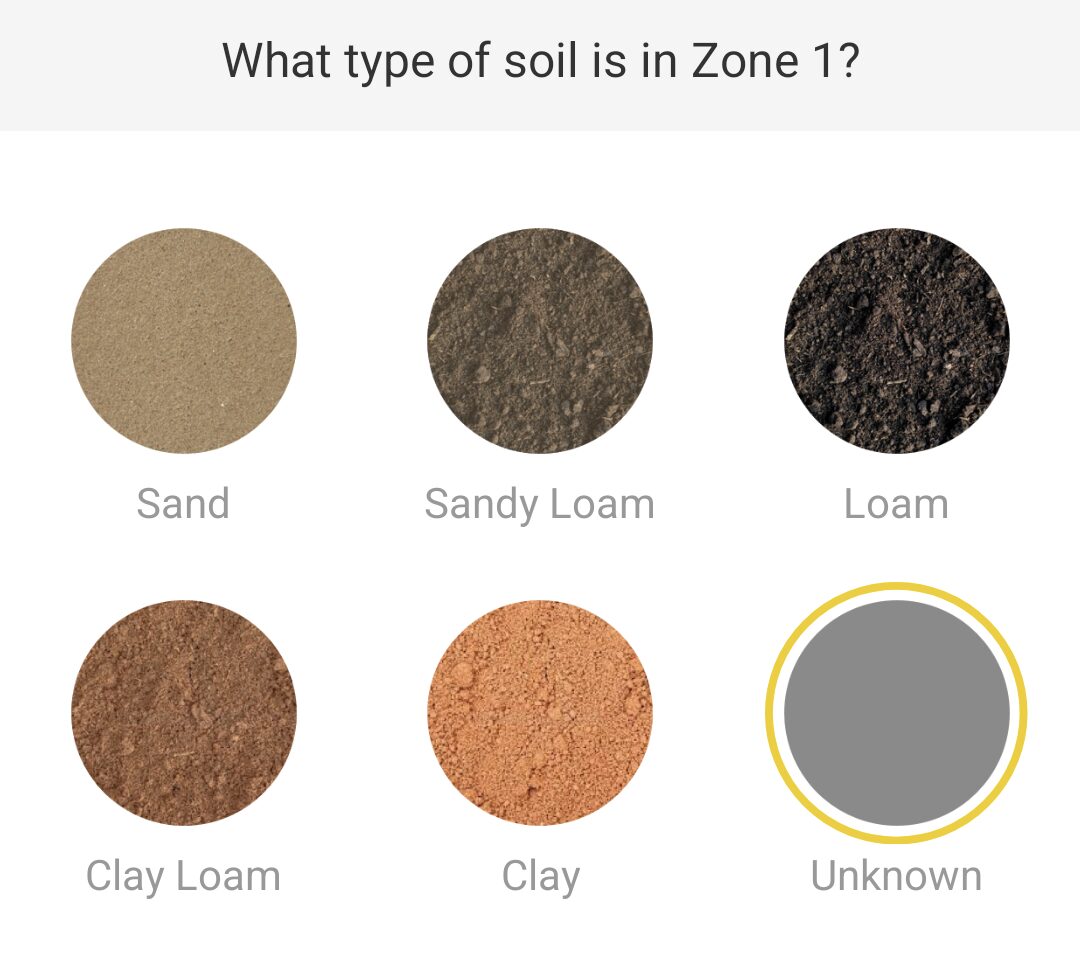
Define soil type
Here you have to choose the one that comes closest to your own from 6 types of soil:
Determination of soil type
By default, “Unknown” is selected, with a intake rate of 0.35 inches/hour (9 mm/hour), which corresponds to a clay soil. If your own soil is sandier or more clayey, then it needs to be changed accordingly.
If you know more about the soil and can quantify the infiltration rate exactly, you can enter this yourself in the advanced settings:
Exact entry of the intake rate
Impact: A higher infiltration rate increases the maximum possible running time as it reduces the risk that the soil will not be able to fully absorb the water.
Define plant species
There are 6 different plant types to choose from:
Determination of plant species
If you want to add a lawn, you should define “warm turf” in areas where it doesn’t freeze in winter, otherwise “cool turf”! Each type of plant is assigned a specific root zone depth, for warm climate lawns this is 6 inches (15 cm). Here too, you can precisely determine the root zone depth in the advanced settings.
Effect: A greater root zone depth leads to longer watering intervals and longer running times. In this way, the soil can be supplied with enough water so that it is moistened right down to the root zone. The type of plant selected has an impact on the estimated water requirement; for a lawn this is higher than for desert plants, for example.
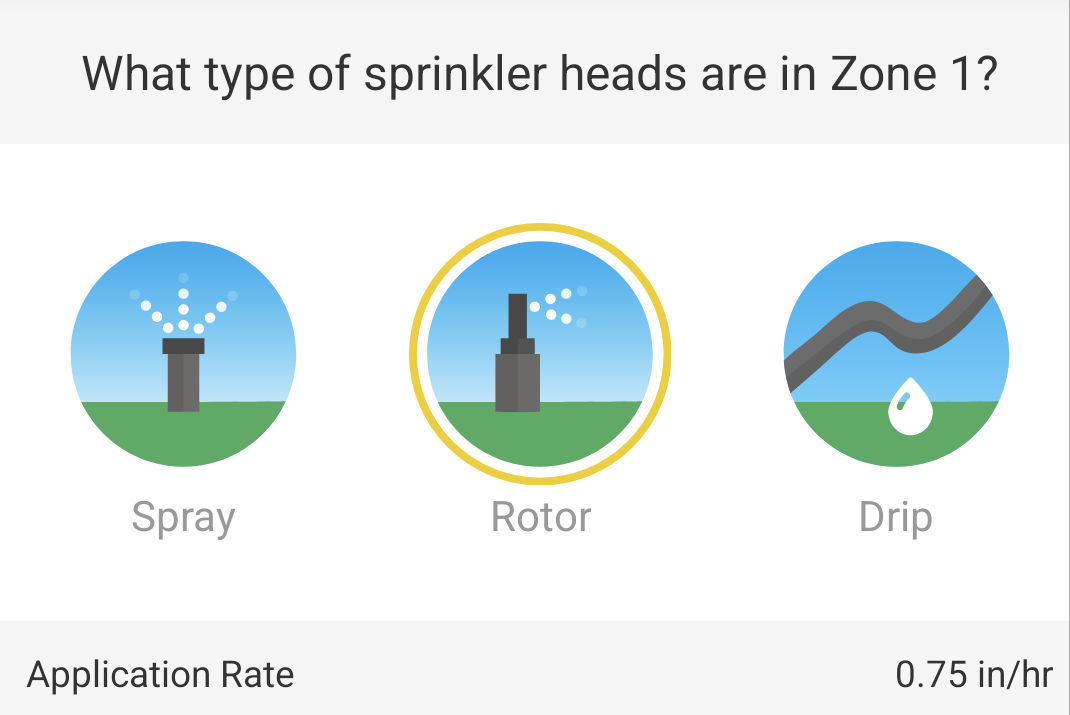
Determine type of irrigation
This point is about determining the precipitation rate, i.e. how much water the sprinklers or micro-irrigation system used release per hour. This rate is expressed in inches per hour or millimeter per hour. The system offers 3 different irrigation types to choose from:
Choosing the type of sprinkler
The first group includes spray sprinklers, which release a very large amount of water in a short time, the second includes gear sprinklers, which have a significantly lower precipitation rate, and the third includes irrigation with a drip hose. Here it is definitely advisable to use the advanced settings to determine the precipitation rate in detail, because the rates stored for the three groups are very imprecise and can vary greatly depending on the system actually used and amount to several times or even just a fraction!
For example, with the sprinkler I recommend in the blog, the Hunter MP Rotator, the precipitation rate is only about 0.4 inches (10 mm) per hour, i.e. about half of the value assumed here. You can find an overview of the precipitation rate for common sprinklers in the sprinkler performance data overview offered here on the website.
Impact: A higher precipitation rate leads to a shorter runtime because the soil must be able to absorb the water.
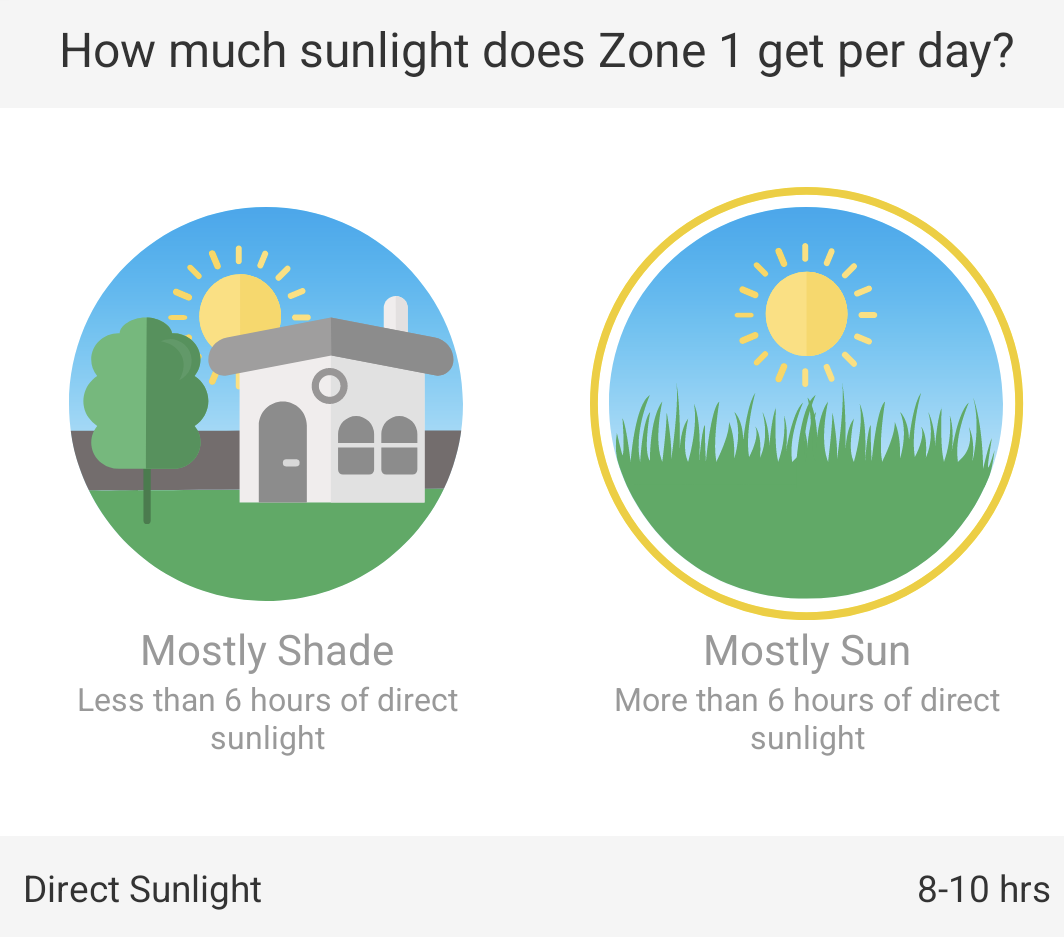
Define number of hours of sunshine
This point is about how sunny or shady the zone is. You can choose between a more shady and a more sunny garden, with anything under 6 hours of direct sunlight per day being considered a shady garden and anything above that being considered a sunny garden:
Choice between shady and sunny garden
In the advanced settings you can define the hours of sunshine even more precisely.
Impact: This point has an impact on the calculation of evaporation and consequently on the calculated water requirement. The more sun, the higher the water requirement. In addition, more sun means longer running times.
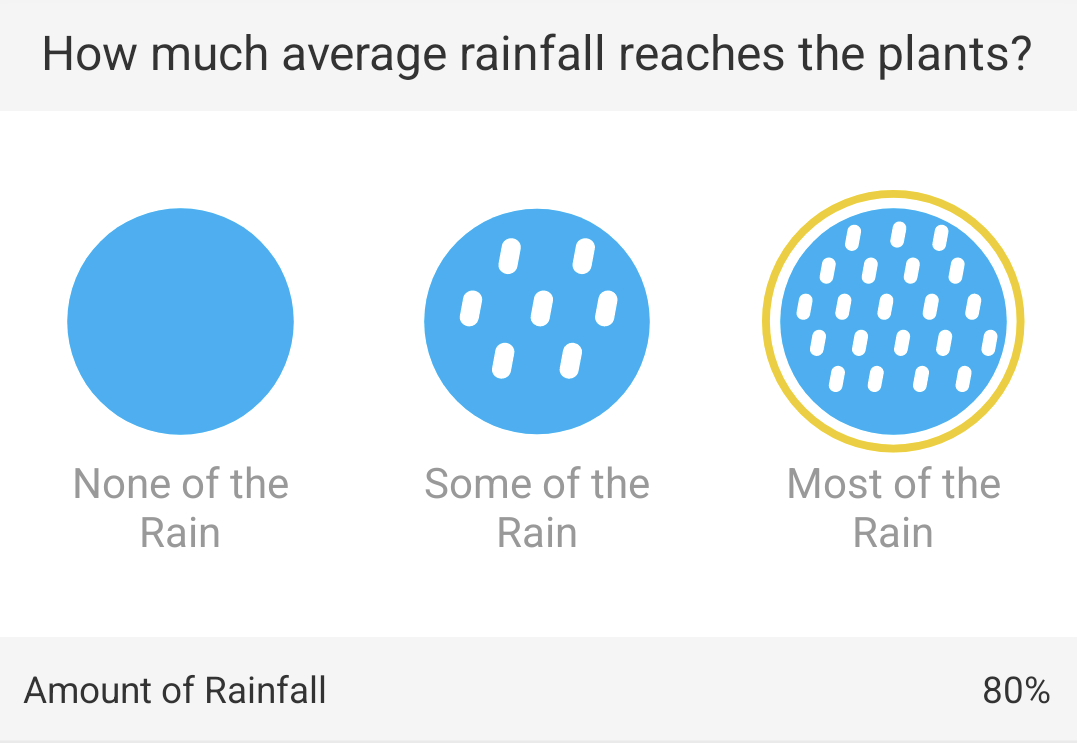
Determining how much of the natural rain arrives in the zone
For most zones this will be complete rain, i.e. 100%. However, it could also be that the zone is in a covered area or that only part of the rainfall reaches the zone due to certain structural conditions. Normally you leave the setting here at “Most of the rain”, otherwise you switch to “Some of the rain” (corresponds to 40%) or, if there is no rain at all, to “None of the rain”:
Determine which situation applies in terms of rainfall
In the advanced settings you can again specify this in detail (0 to 100%).
Impact: Has an impact on the calculated water requirement. The more natural rainfall there is, the less additional water is required.
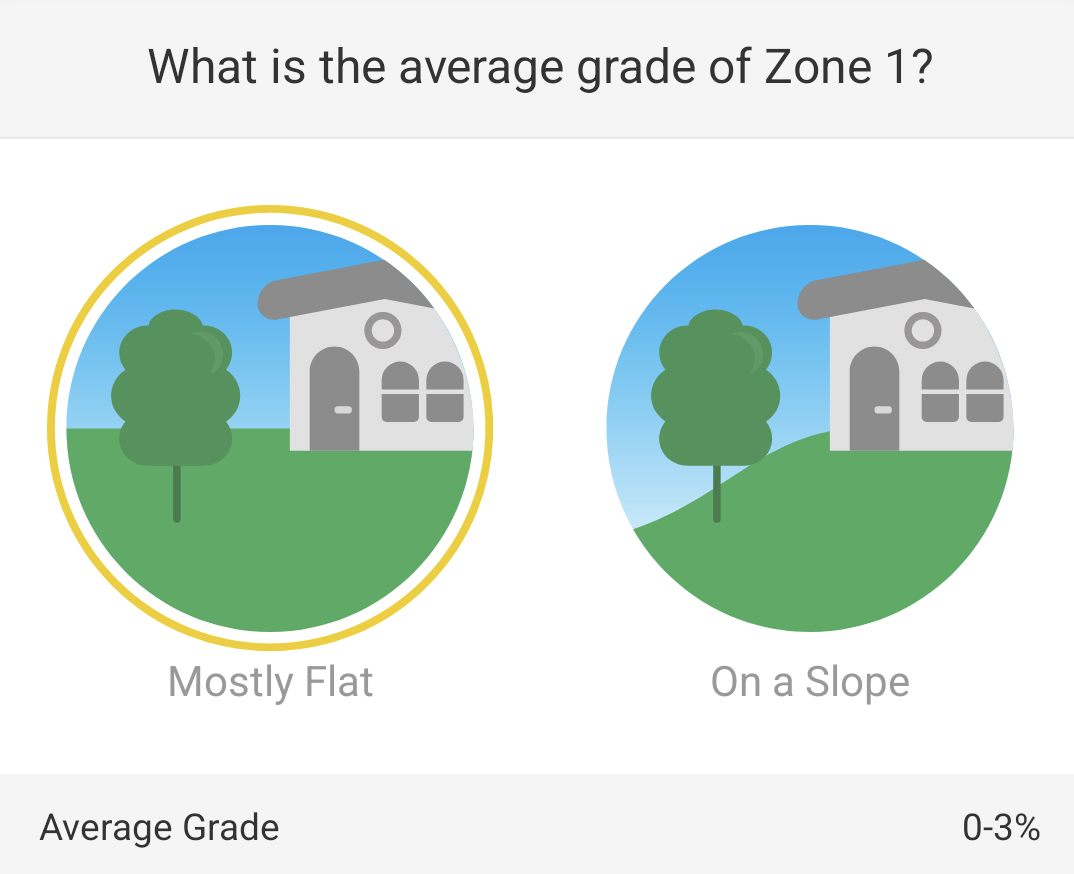
Determination of the slope of the terrain
At this point you determine whether the zone is flat or sloped:
Enter the slope of the terrain
In the advanced settings you can define the inclination in detail
Effect: The flatter the terrain, the longer the maximum possible running time, as there is then less risk of the water running off unused.
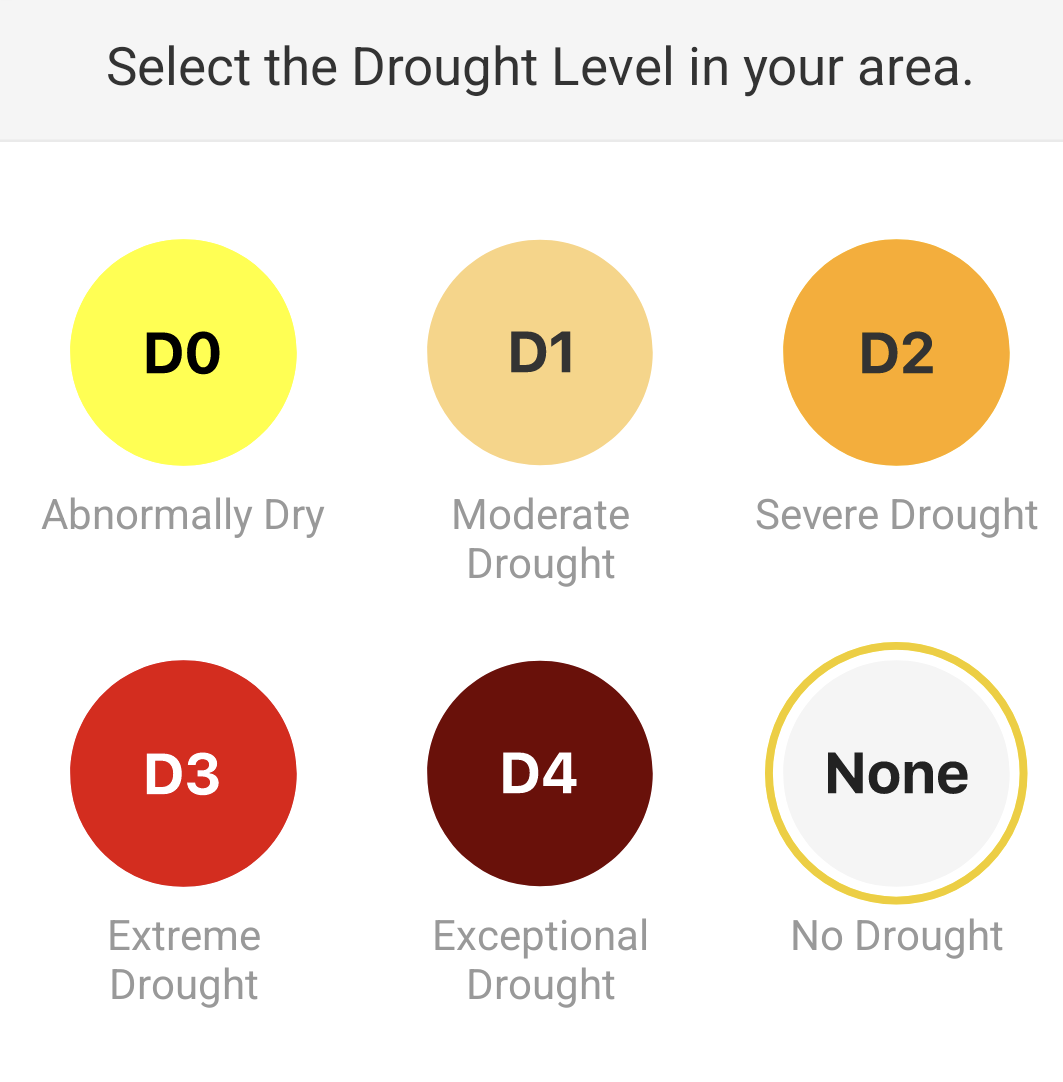
Determination of the drought factor
The Drought Index is used in the United States to predict the likelihood of wildfires. You can look up which factor applies to you in the B-hyve software using a US map; there is no information for areas outside the USA. The correct setting should then usually be “None”, i.e. no drought.
Determination of the drought situation
An exact setting would also be possible here in the advanced settings.
Impact: The impact of the drought factor is not clearly stated, but it probably affects the spacing between irrigations and water requirements.
In addition to these 7 points in which the Smart Watering settings can be made, there are three further points in the Smart Zone Details:
Advanced Details
Schedule adjustments
Catch cup test
Below is a description:
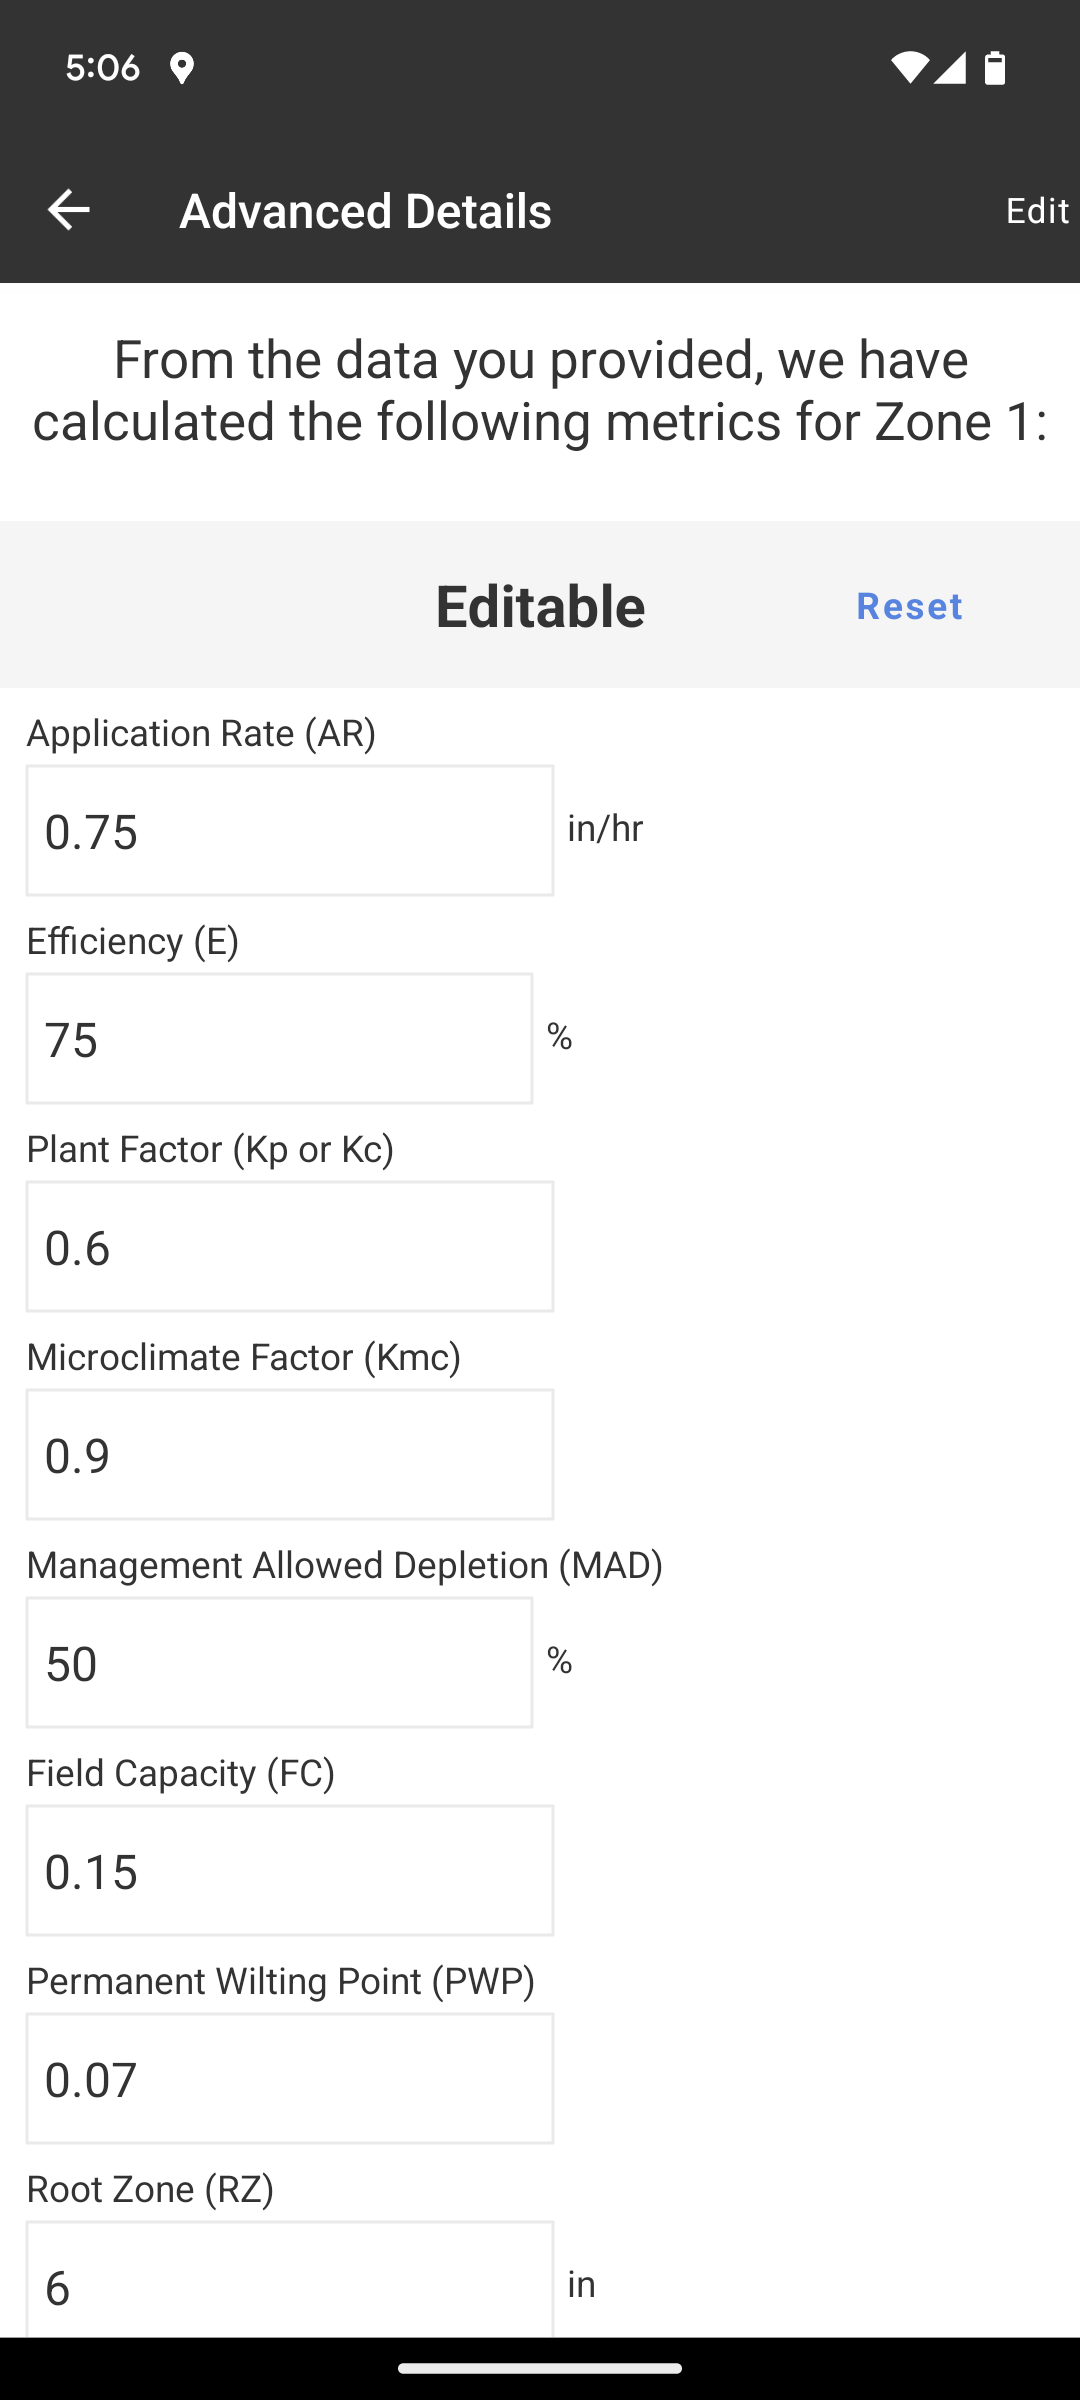
Advanced Smart Zone Details
Here you can see a compilation of a total of 13 parameters, which on the one hand reflect the seven previously made settings and on the other hand additional ones that are based on these. By changing these parameters, you can influence the calculated water requirements, the intervals at which watering occurs and how long the irrigation times are. The first four parameters that influence the amount of water are application rate, efficiency, plant factor and microclimate factor.
If you change parameters already known from the 7 points mentioned above, such as the root zone depth, then this change is directly reflected in the correspondending menu item. So it makes no difference whether you change the setting here or there.
However, two of the parameters can only be changed in the Advanced Details: Efficiency and Management Allowed Depletion (reflects the desired soil-water deficit at the time of irrigation).
Image excerpt from the extended details:
Extended Smart Watering Details
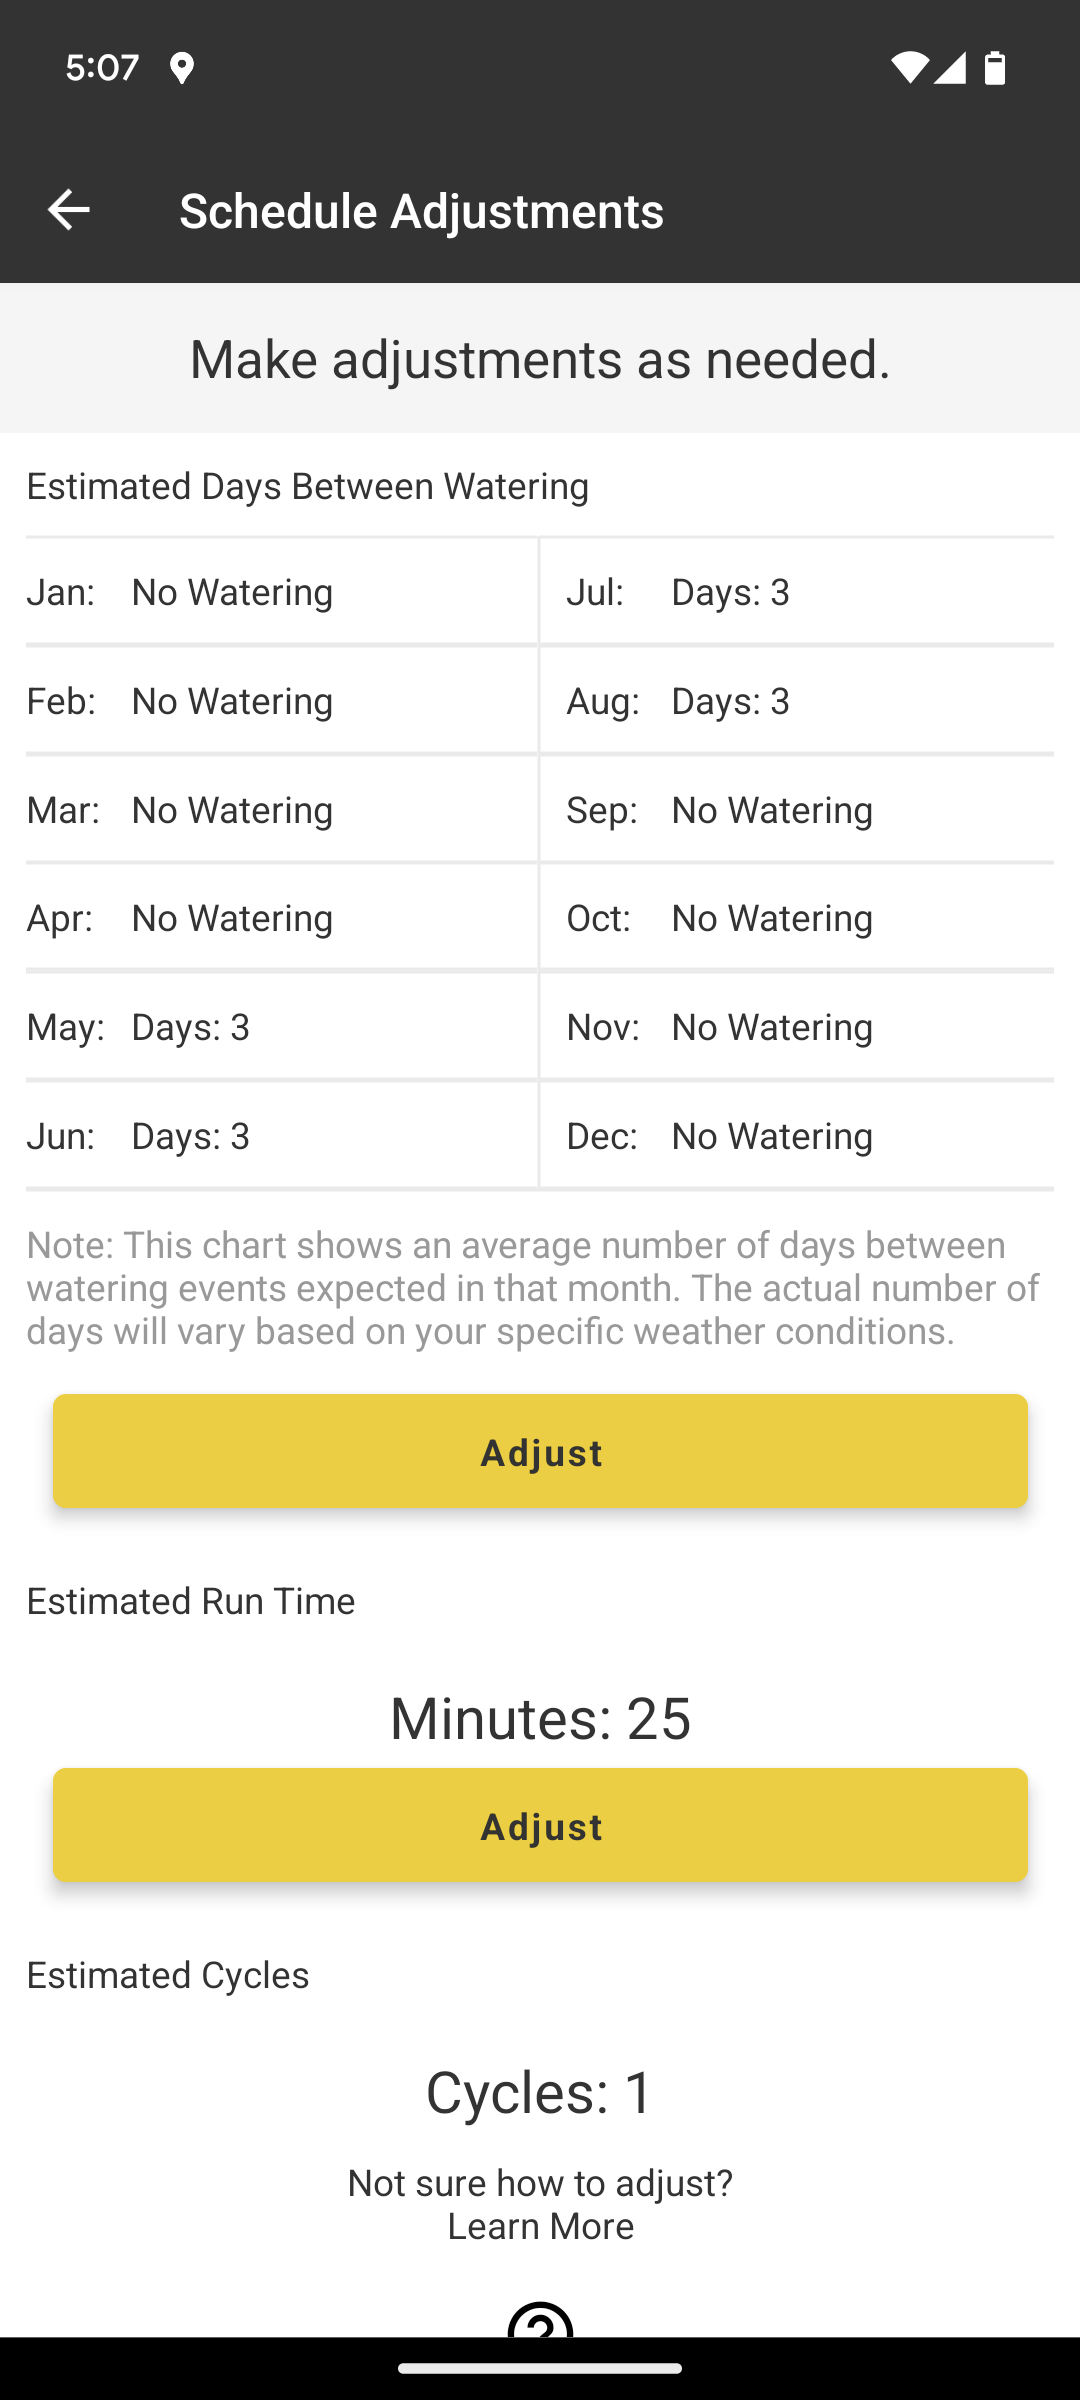
Watering schedule adjustments
Based on the values entered, the B-hyve system uses an algorithm to estimate the frequency with which irrigation will take place and the running time that the irrigation runs will have. Both values are not constant, but change depending on the weather conditions during a season. You can see this estimate in the watering schedule adjustment menu:
Irrigation schedule estimates of the system
The system would therefore not water at all from January to April and from September to December and would water every 3 days in the warm months. A watering run would last approximately 25 minutes and would be carried out in one cycle, i.e. not divided into multiple cycles.
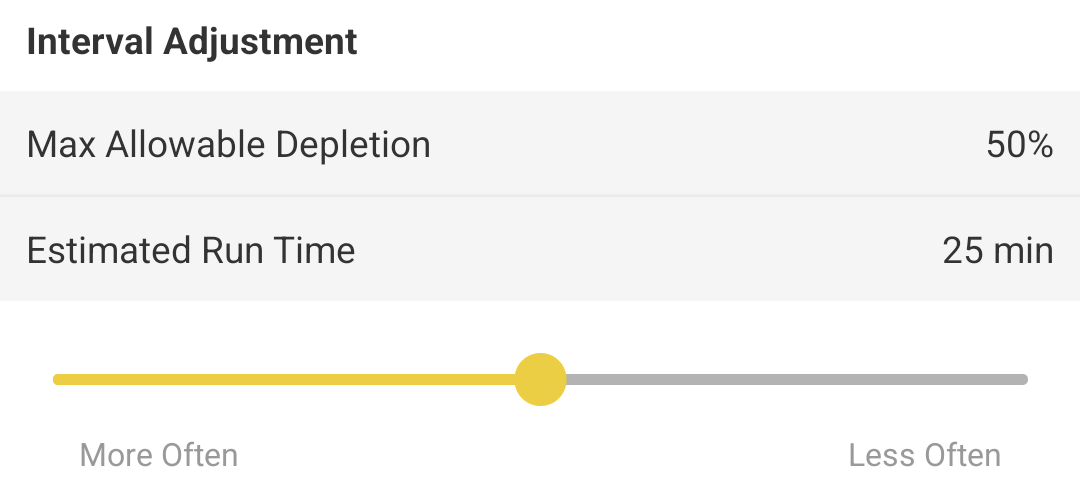
If you now observe that the system leaves a too small or too large gap between the individual irrigation runs, i.e. waters again when it is not yet necessary or desired, or waits too long to water, so that the lawn or plants suffers, then you can shorten or increase the interval so that watering occurs at smaller or larger intervals. This setting has no influence on the months in which watering takes place.
Set watering more or less frequently than estimated by the system:
Shortening or increasing the time between two watering runs
If you move the slider to the left, watering will occur more frequently in a month, for example 4 times instead of 3 times. If you move it to the right, you will water less frequently. To the same extent, the running time of irrigation is reduced or increased, so that this change has no effect on the total amount of water used, the water is just used differently.
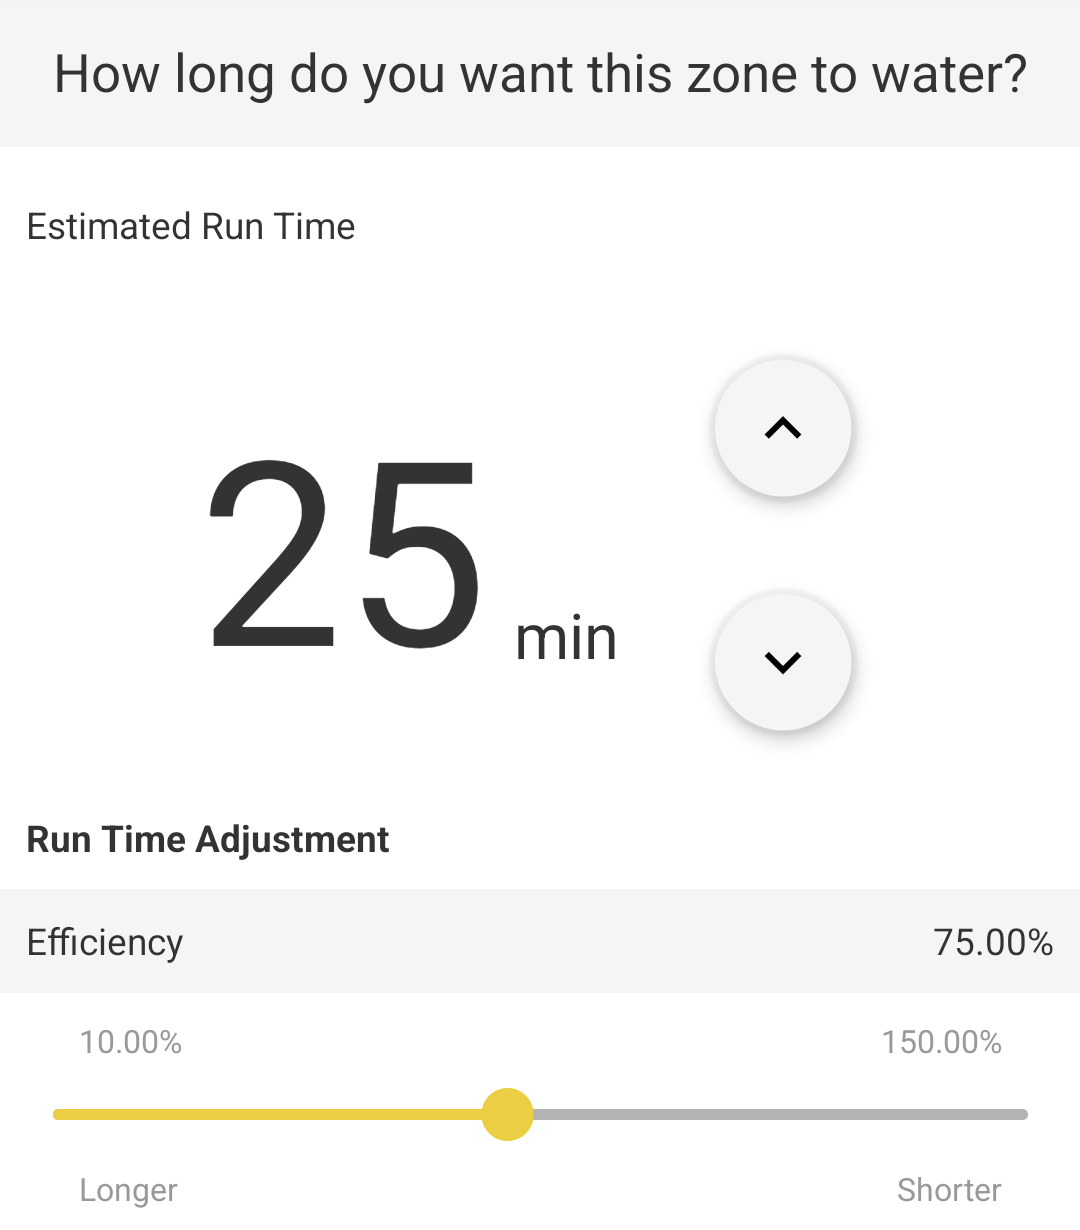
If instead you observe that the intervals would be ok in principle, but the running time is too short to supply the zone with sufficient water, or, conversely, unnecessarily long so that water is wasted, then you can adjust the running time of the irrigation. This change does not affect the intervals and therefore increases or decreases water consumption 1 to 1.
This is how you can set a longer or shorter running time:
Modification of the estimated running time
In the example, the system estimates a running time of 25 minutes. With this the efficiency would be 75%. 100% would be the theoretically possible optimal efficiency, in which as much as is necessary is poured precisely. However, exhausting this is associated with a very high risk that the plants will temporarily receive too little water and suffer as a result, so it makes more sense to take a certain reserve into account. The B-hyve system automatically sets to 75% efficiency. If you extend or shorten the running time using the slider, this reduces or increases the efficiency of the irrigation and at the same time the water consumption for the zone.
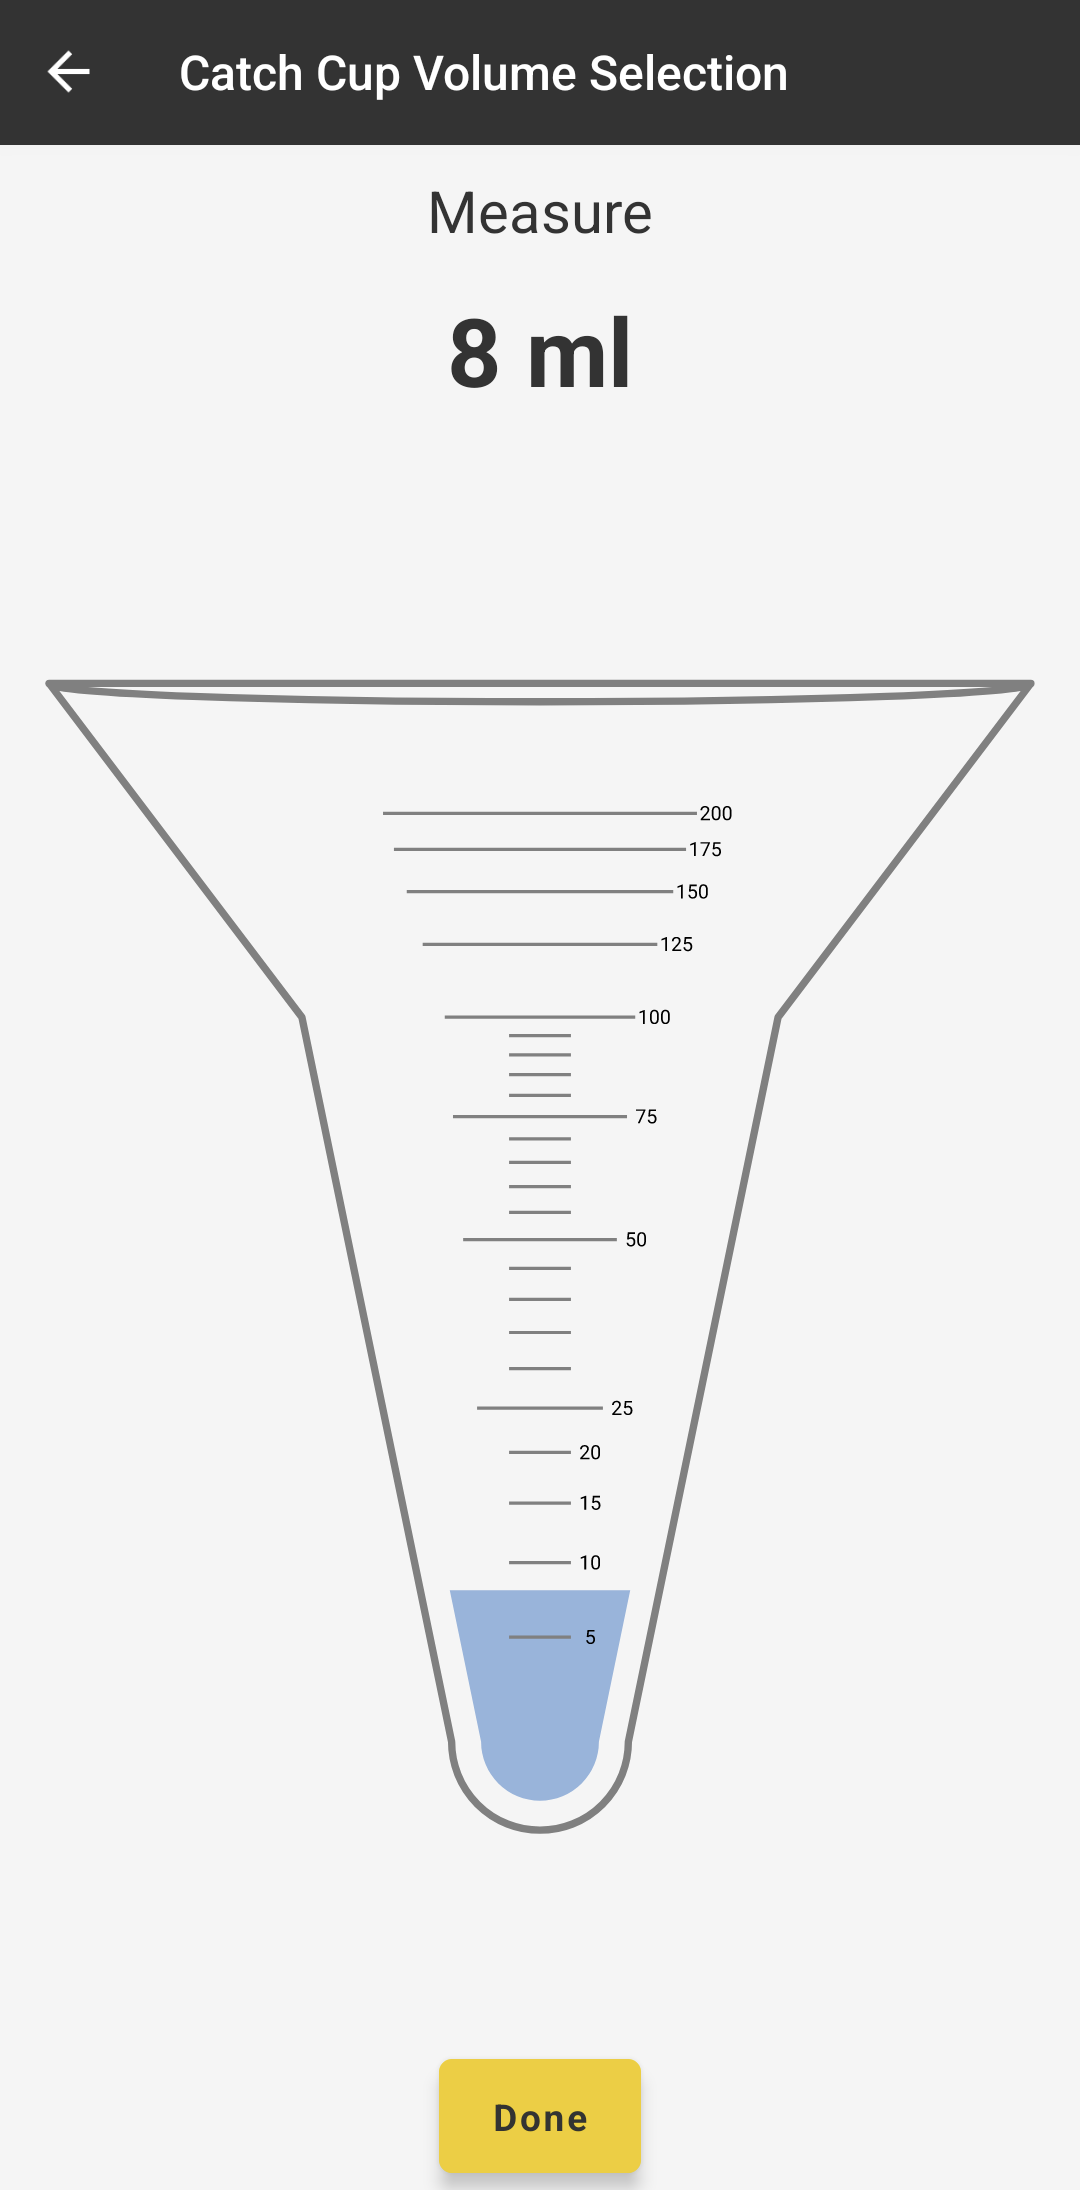
Catch cup test
This menu item has no direct influence on the B-hyve system. It contains a test that can be used to determine the precipitation rate and the uniformity of irrigation and, as a result, reveal potential for improvement in terms of uniform irrigation. Suitable collecting containers are required to carry out the test. How the test works is explained in detail in the app.
Catch cup test
In order for the Smart Watering to work, it now only needs to be activated:
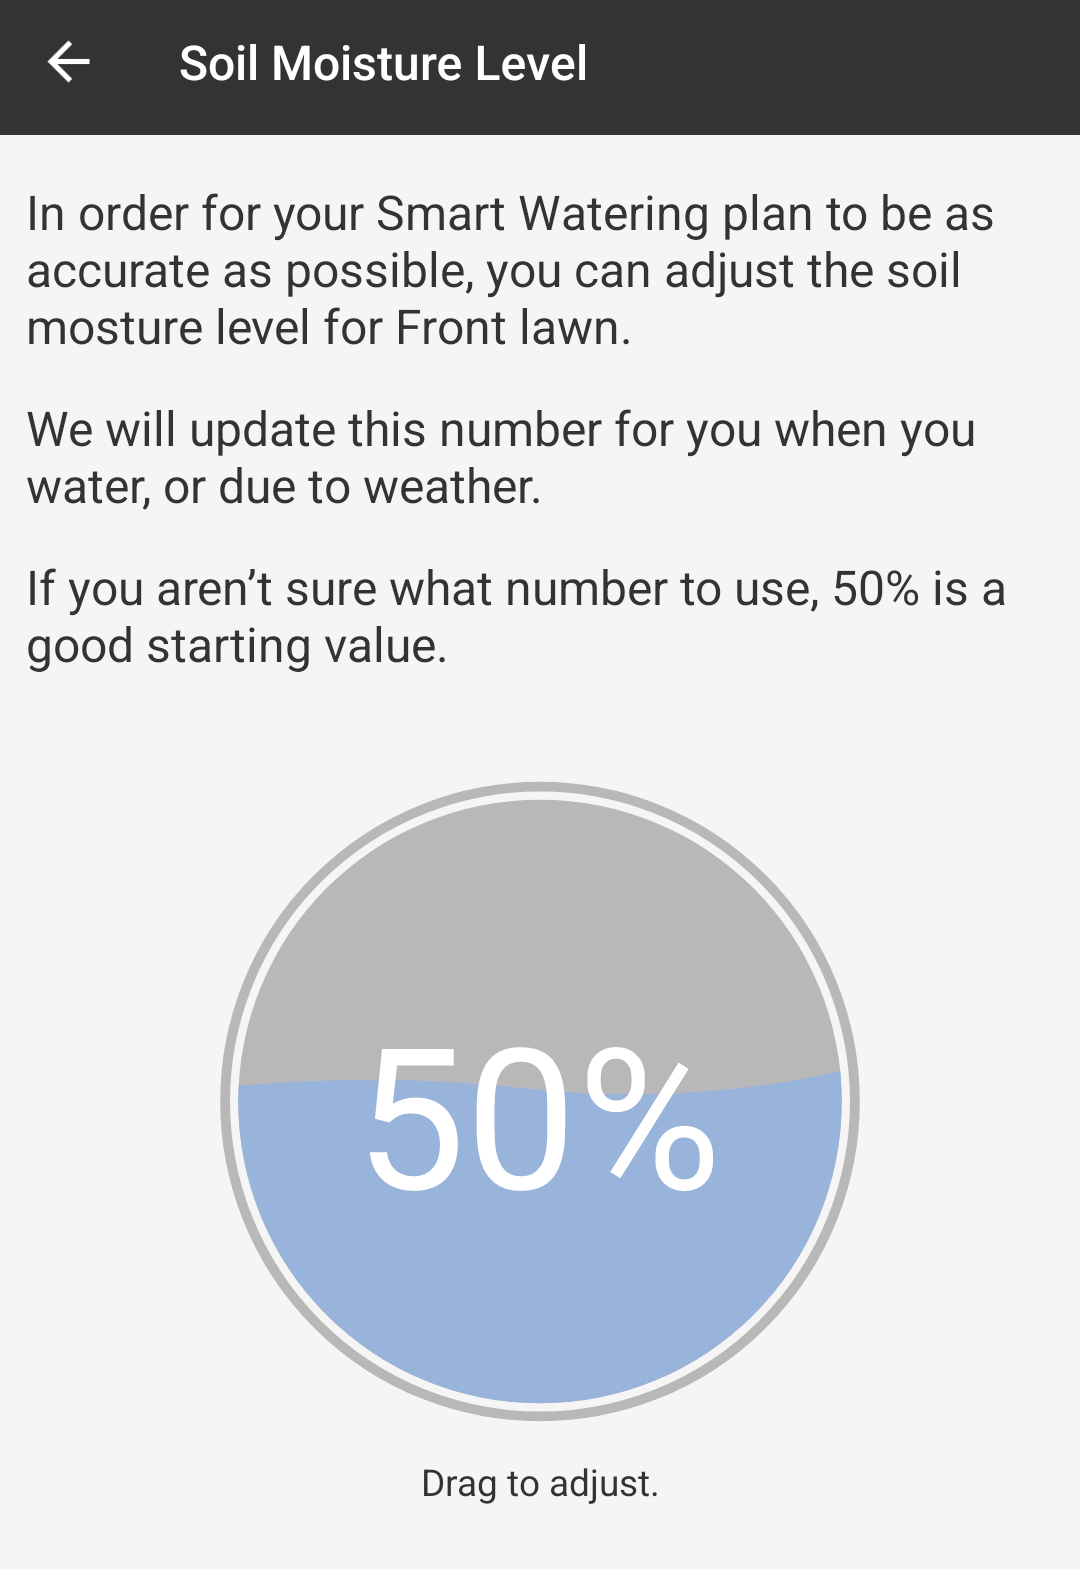
In order to have the most correct starting point possible for planning the irrigation runs, the current soil moisture level in the zone must finally be estimated. In my experience, you would have around 80 to 90% if the soil was completely moistened up to the root zone after an extensive irrigation run or rain shower, and only 20 or 30% if the soil had not received any water for a few days. If you are unsure, 50% is probably a good compromise.
Define initial soil moisture level
Set restrictions for smart watering
If you activate Smart Watering for a zone, the system basically decides independently on which day and at what time watering runs are carried out. That can work for you. Or not, if, for example, you are subject to certain restrictions in the garden on which days you can water or you consciously want to have the watering carried out at certain times or days. Or you might want to exclude certain days or times because you want to use the garden on those days.
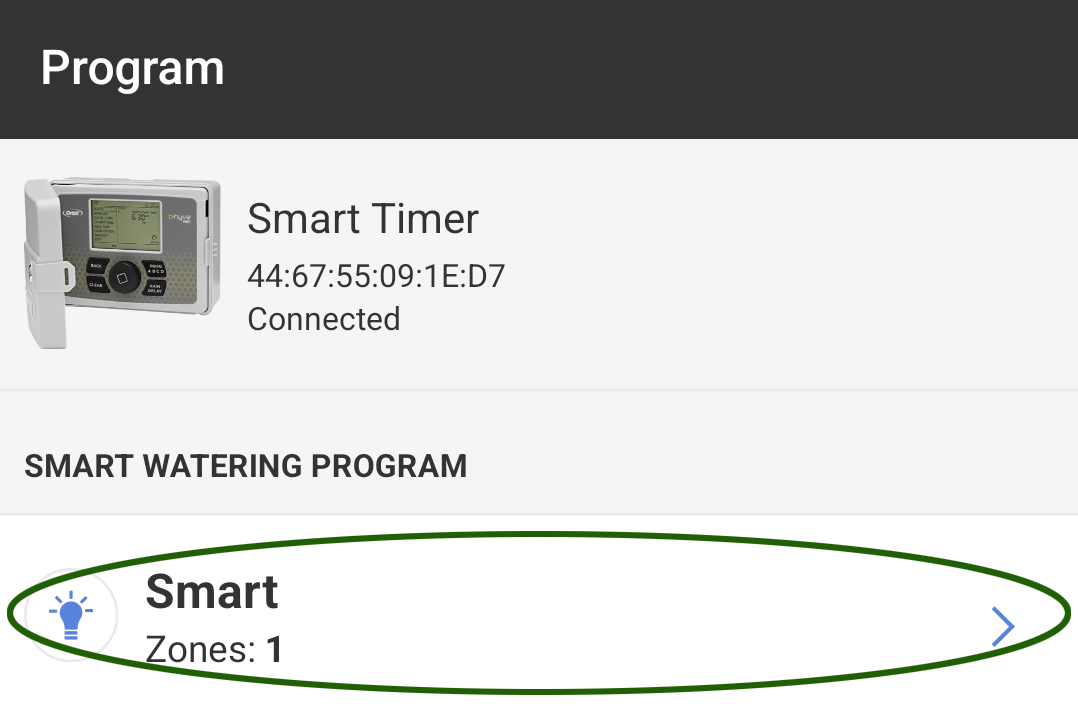
B-hyve gives you the opportunity to restrict the automatic system according to your wishes. These options are hidden in the program menu under the “Smart” menu item:
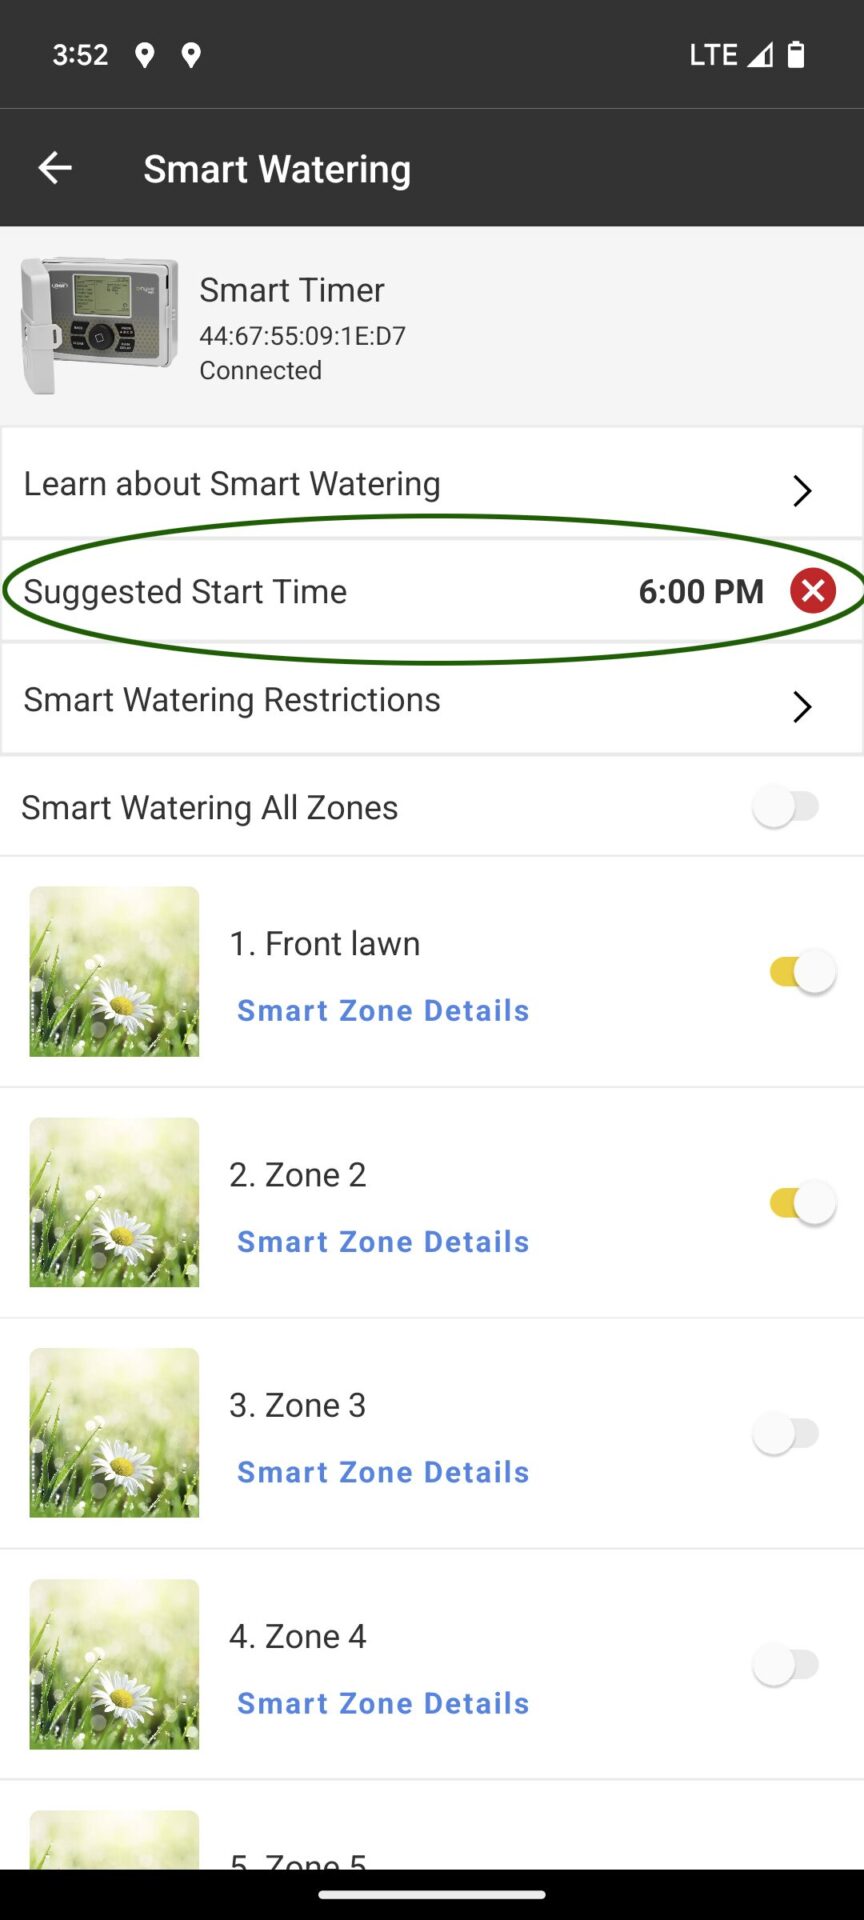
Clicking on it takes you to a page that shows you which zones are currently being watered with Smart Watering and where you can set a preferred start time for the automatic system:
Define preferred start time
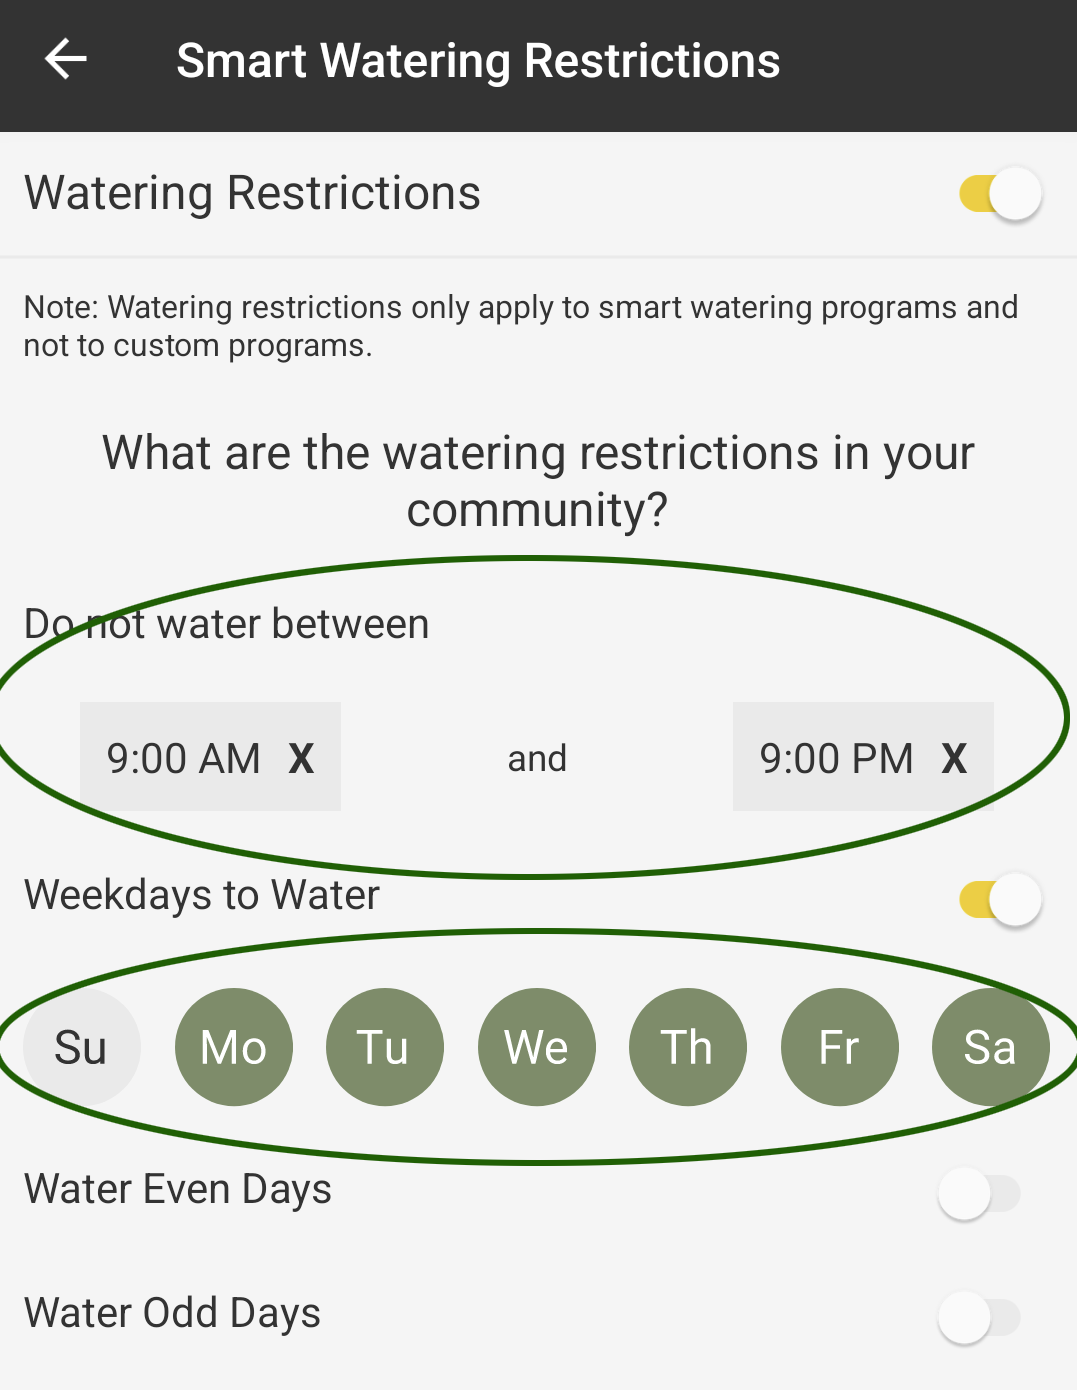
The system will – as far as the automatic system allows – orientate itself to this preferred start time, but is not guaranteed to adhere to it. If you want to be absolutely sure that irrigation runs are not carried out on certain days or at certain times of the day, then these values must be stored as restrictions. This is done by clicking on the “Smart Watering restrictions” link:
In the following mask, a certain from/to period can be excluded from irrigation and it can be precisely defined on which days irrigation can take place and on which not. In my example, I have excluded watering for the period from 9 a.m. to 9 p.m. and specified that watering is not allowed on Sundays:
Defined restrictions on times and days
Fine tuning of the Smart Watering events that suspend watering
This important setting can be found quite hidden in the My B-hyve menu under Devices and Weather Adjustmens. In Smart Watering mode, the B-hyve system monitors rainfall, wind and temperature and decides based on this whether a planned irrigation run takes place or is cancelled. This works with the limit values and probabilities listed here in the settings. Irrigation is suspended if the following applies:
If there is a 30% chance that it will rain and at least 0.16 inches (4 mm) of precipitation is expected.
If the forecast wind speed exceeds 20 mph (32 km/h)
If the forecast temperature is below 37 degrees Fahrenheit (3 degrees Celsius)
Criteria for suspending irrigation
If one of these events occurs, the suspension of the run is stored and announced in the home menu. If you want, the suspension can also be canceled so that the irrigation run takes place as planned.
If these standard probabilities and limit values turn out to be unsuitable for your own practice, you can adapt them here according to your own ideas. They influence the Smart Watering mode and do not interfere with manually created programs. Even with manually created programs, however, if one of the events occurs, you will be shown on your cell phone an option to suspend the planned watering run at the push of a button.
Choosing a weather station
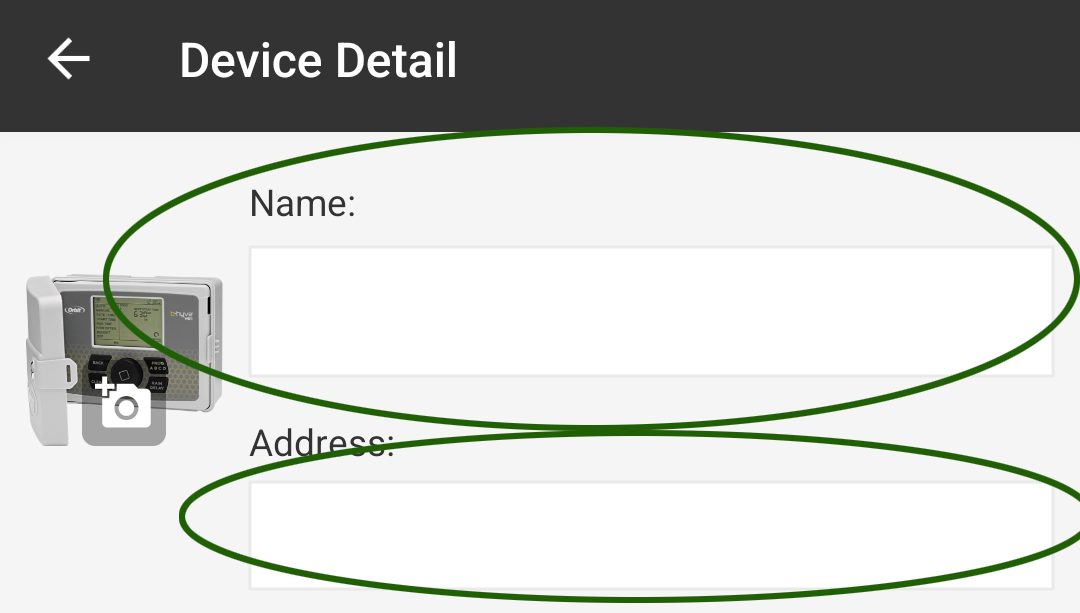
The B-hyve system automatically selects a weather station near the user’s address from which the current weather data is obtained for smart irrigation control. In order for the station selection to work, the address where the irrigation computer is used must be entered in advance in the My B-hyve menu under the device details and a name for the irrigation computer must be specified. The program doesn’t indicate this anywhere, so you may only come across it if the smart irrigation doesn’t work.
Determination of the device name and the address where irrigation takes place
To set the address, simply click in the address field and the system can then determine the current position using the GPS function of the cell phone.
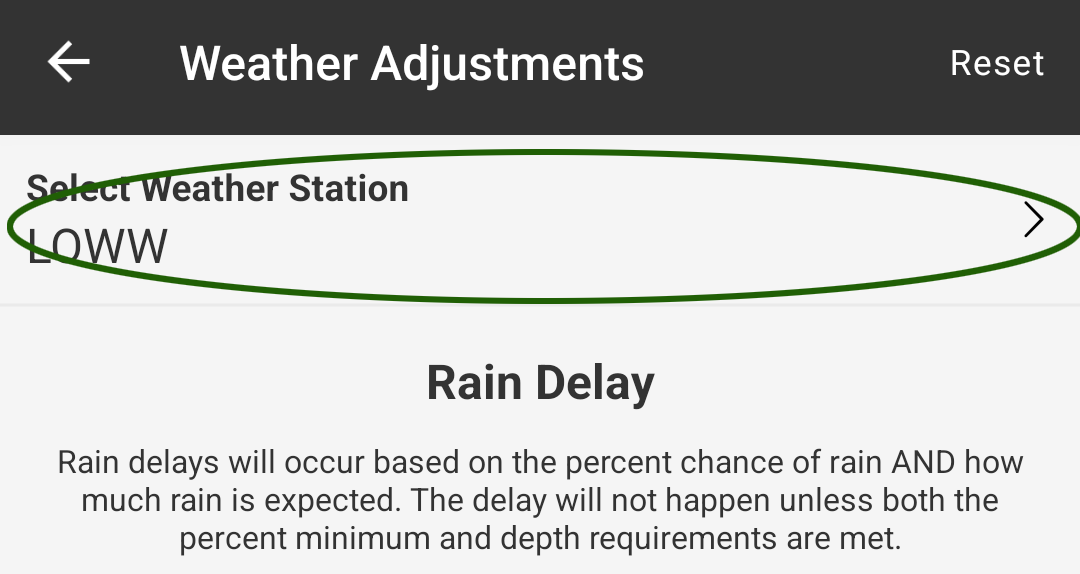
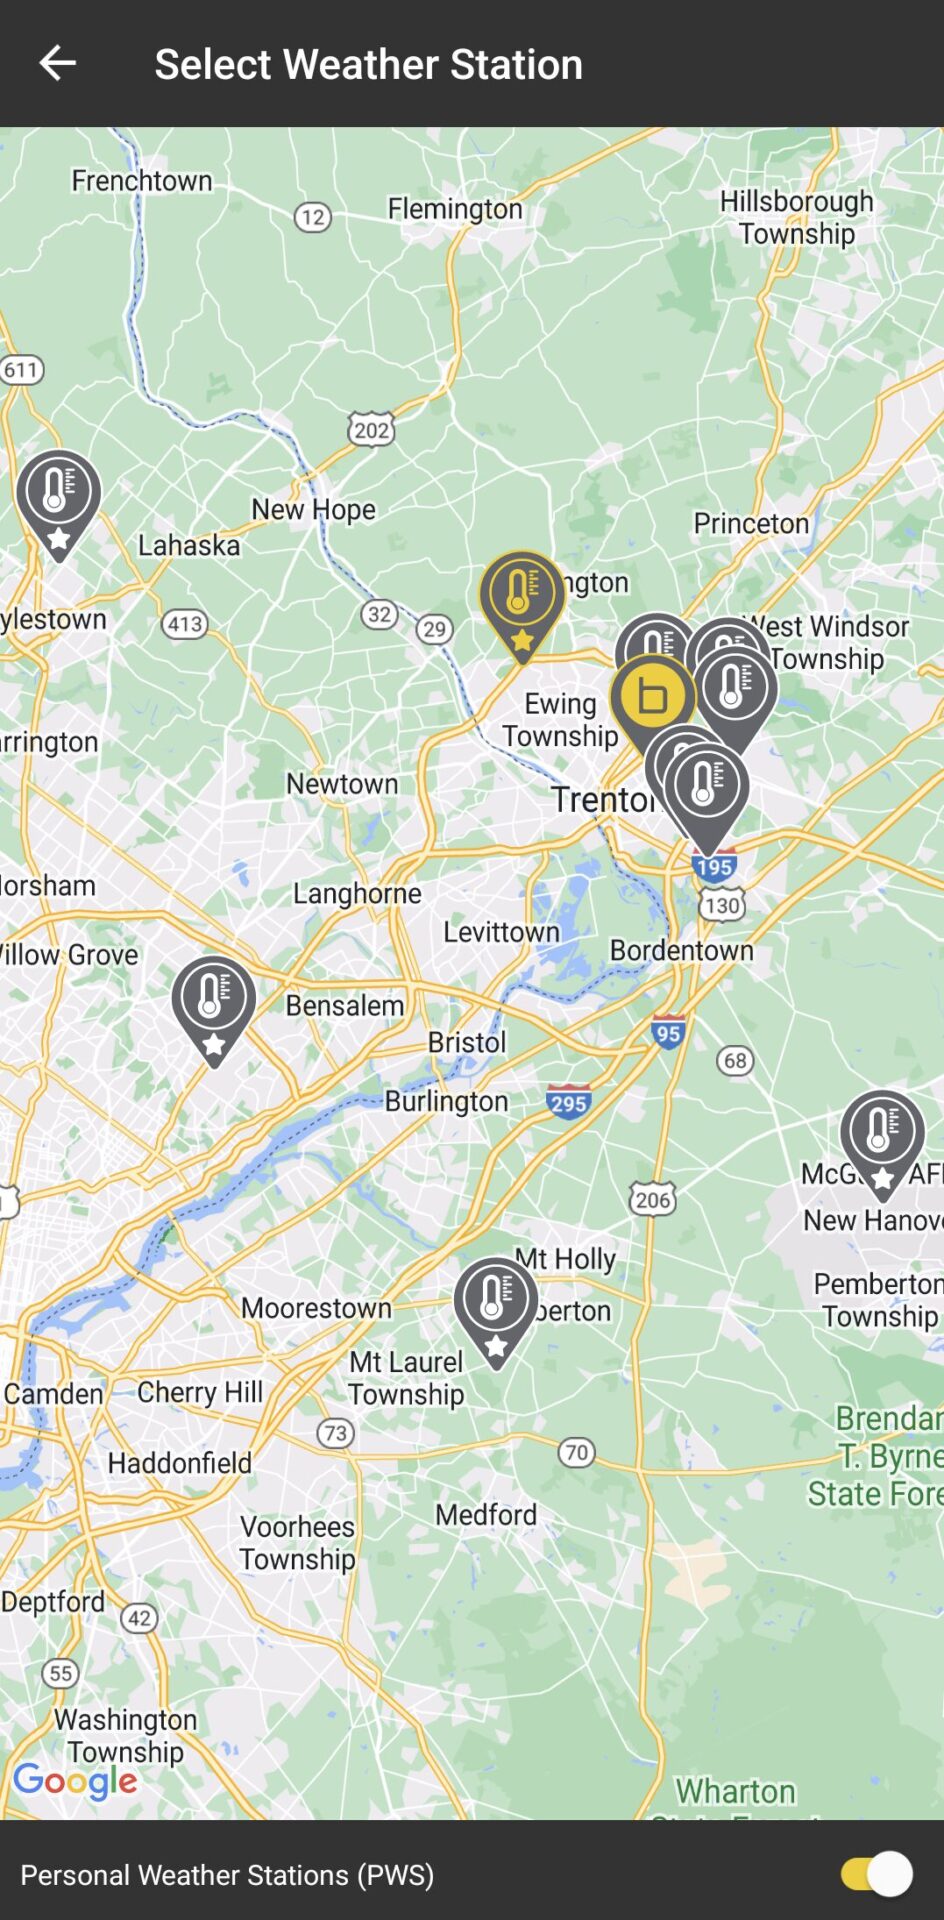
The weather station selected by the system can be changed to another station by the user in the device details in the Weather Adjustments sub-item.
Click on “Select Weather Station”:
A Google map section around the specified address is displayed. The station marked with the B-hyve logo is the weather station closest to the address automatically selected by the system. Alternatively, another public weather station can be selected. If you activate the slider under “Personal Weather Stations”, private weather stations registered with PWSWeather.com will also be available for selection.
Selection of the weather station
In this way it would also be possible to use your own personal weather station in B-hyve. To do this, it must be created in advance on the PWSWeather.com website in order to be available for selection here. Unlike the Hydrawise software, there are no additional costs for using your personal weather station.
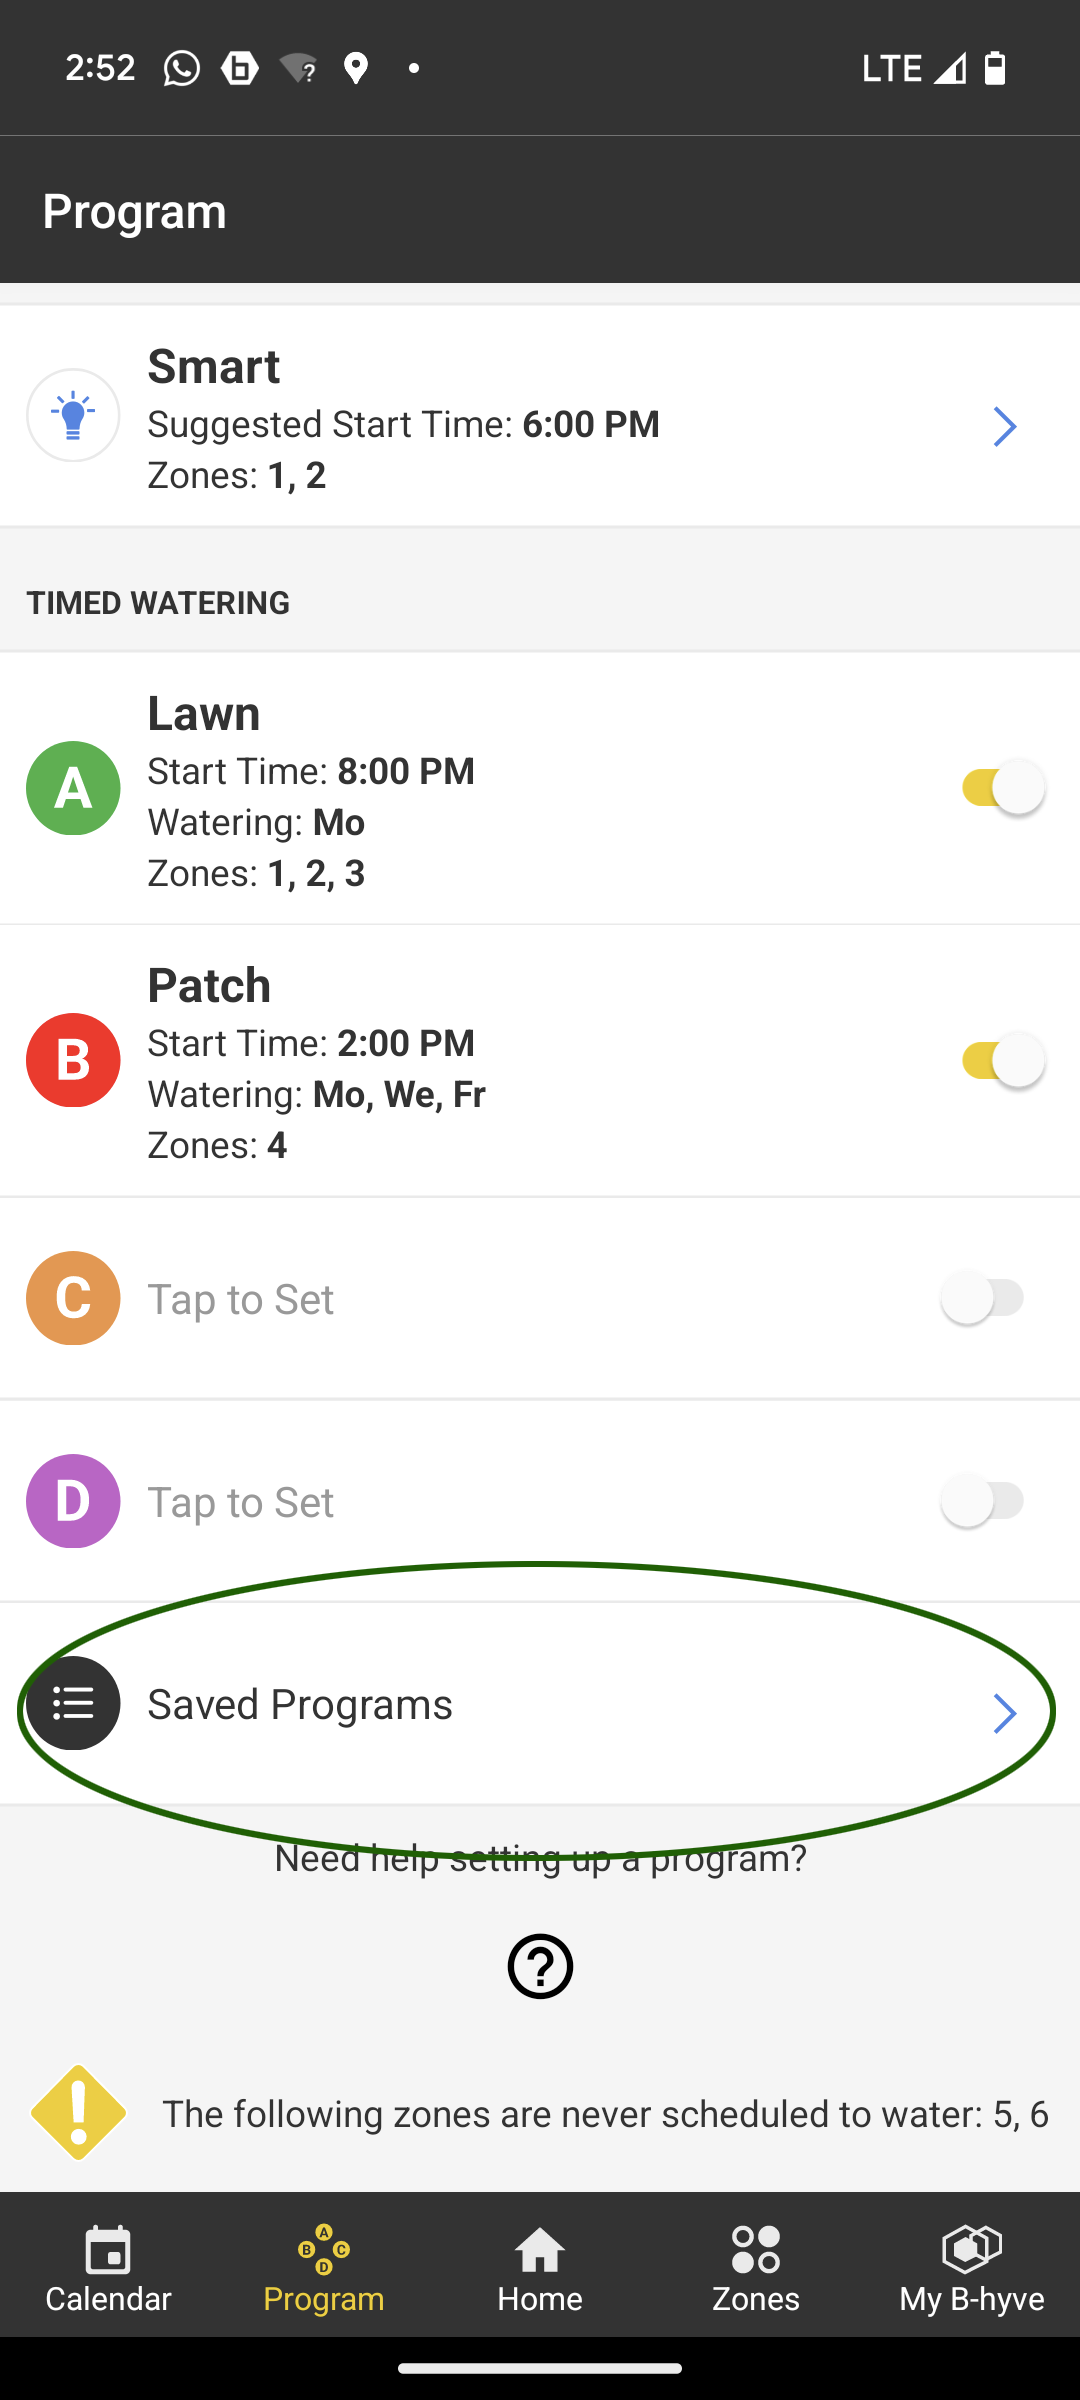
Set up programs
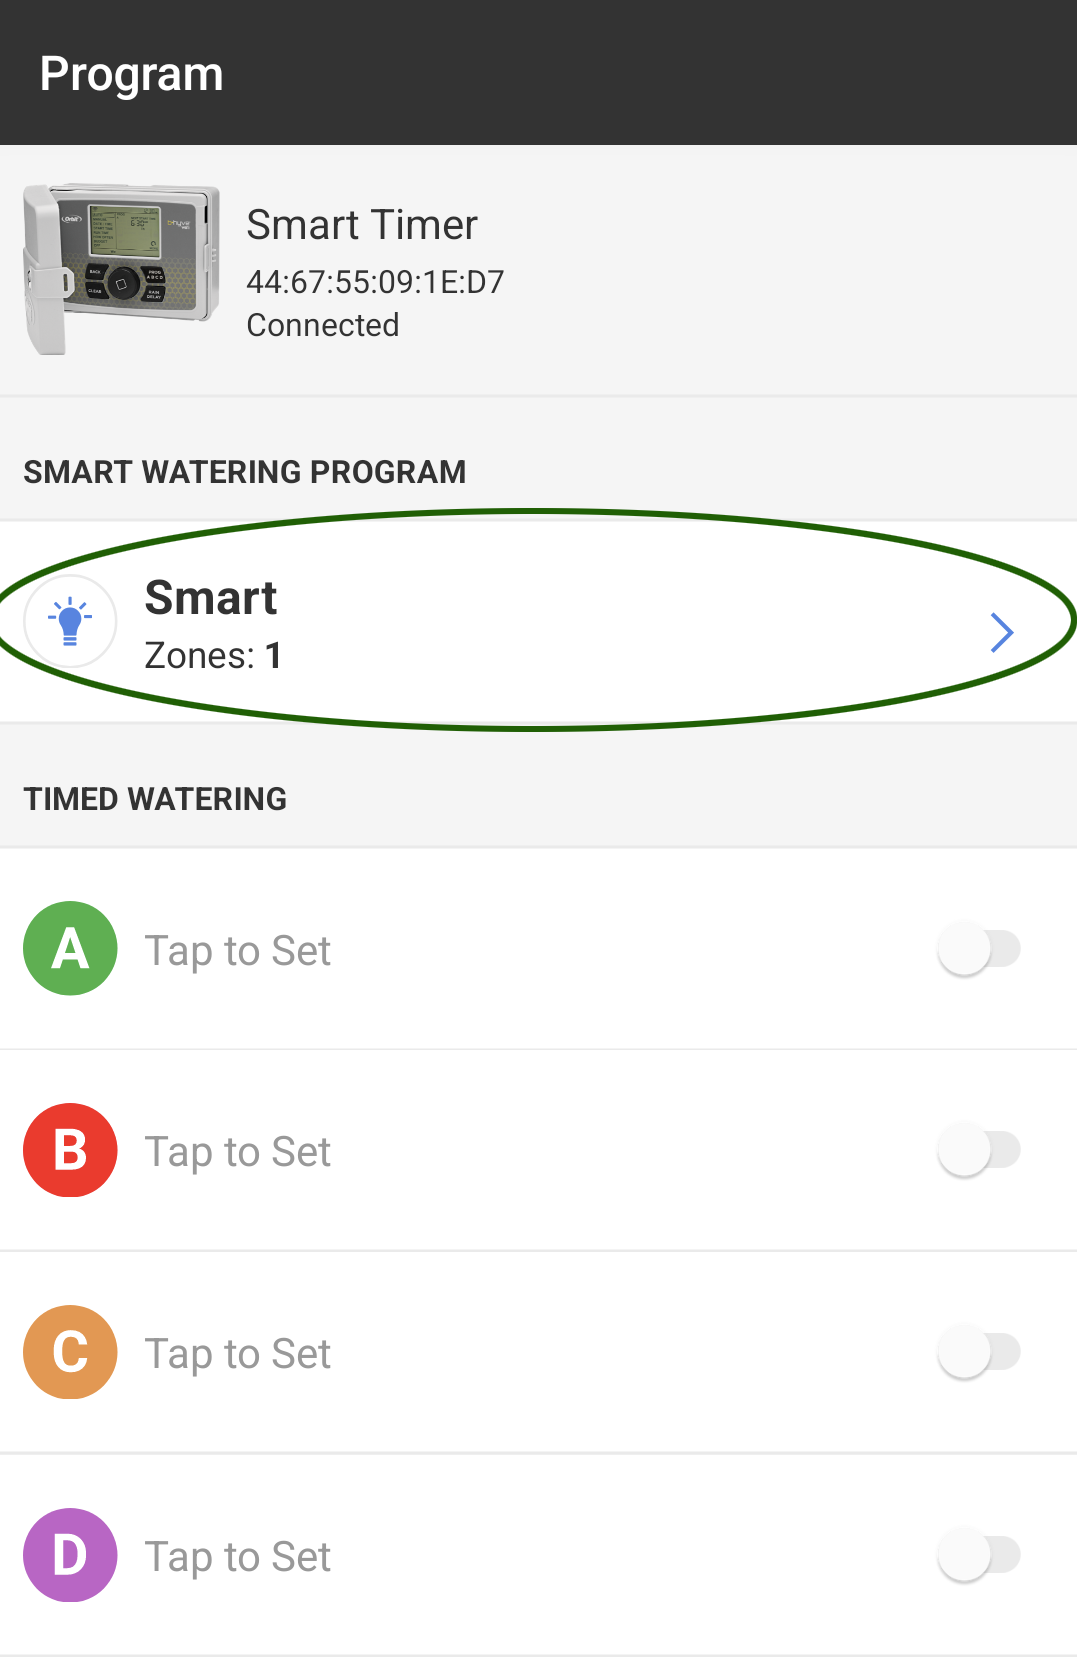
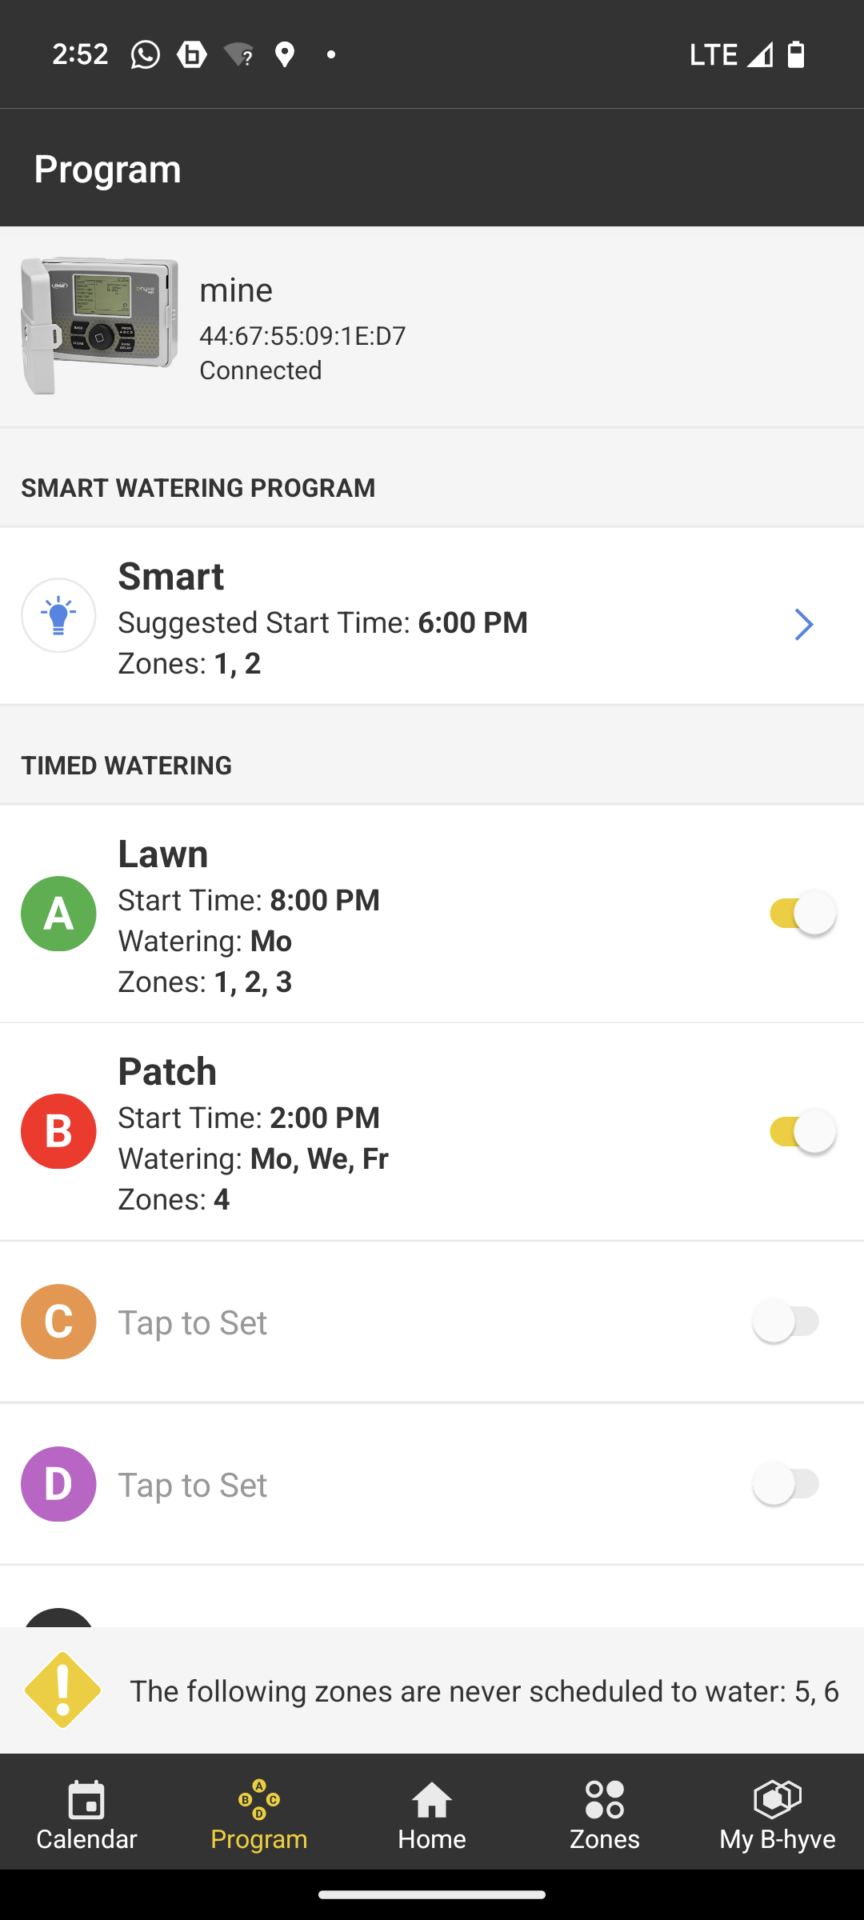
The prerequisite for setting up a program is the prior creation of at least one zone. If the zone is already watered automatically with Smart Watering, then no additional program needs to be created. But you can of course have some of the zones watered automatically with Smart Watering and store a manually created program for the other part. If Smart Watering is in use for at least one of the zones, then this will be displayed at the top of the program menu:
Display of Smart Watering in the program menu
A program can be imagined as similar to a washing program in a washing machine. In this, different phases are run through one after the other (washing, rinsing, spinning); instead in the irrigation program, selected zones are processed from the specified start time. All zones directly one after the other and for the time period specified for this zone. A program could, for example, consist of:
50 minutes Zone 1 (lawn part 1)
50 minutes Zone 2 (lawn part 2)
35 minutes Zone 3 (shady lawn)
120 minutes Zone 4 (hedge)
The program requires one or more start times and one or more days of the week on which it should run. For example, if you set Monday as the day of the week for the above program and 6:00 a.m. as the start time, then the watering of zone 1 would begin on Monday at 6:00 a.m. and the program would end up 4 hours and 15 minutes later at 10:15 a.m.
B-hyve offers 4 programs A, B, C and D. Only when using the Orbit B-hyve Smart Hose Timer only 3 programs are possible for reasons I cannot understand. However, I saw in older videos on the web that other B-hyve models, for which 4 programs are now possible, were previously limited to 3 programs too. The B-hyve hose timer so may also be increased to 4 programs in the future.
Up to 4 start times can be defined for each of the programs. An additional start time means that the same program is carried out a second time on the same day. This is usually not an issue when watering the lawn. On the contrary, the principle applies: water less frequently but water properly! But when reseeding a lawn it is usually necessary. Since the lawn seeds can dry out very quickly, it is recommended to water up to 4 times a day for a few minutes in the first few weeks so that the seeds always remain slightly moist. Even sensitive potted plants in exposed locations may need to be watered several times a day.
A program is activated by tapping on the program slot. You then get to the program settings menu.
4 available program slots
Program settings
The following settings must be made:
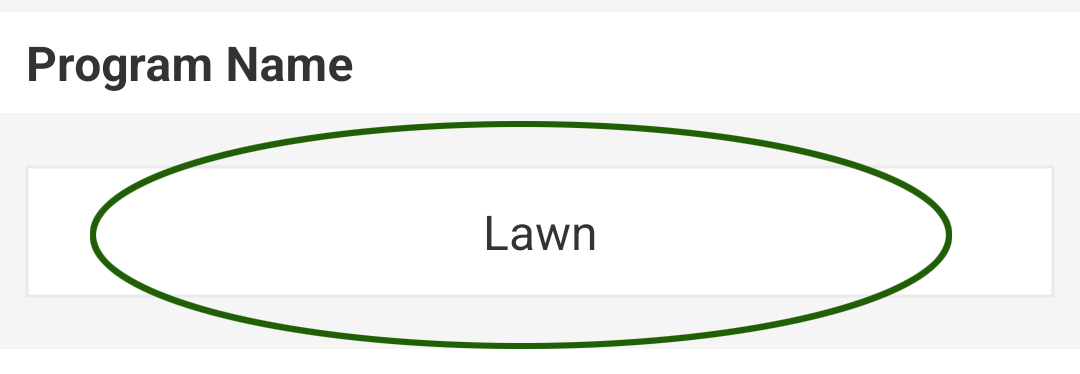
Program name:
A name that is as descriptive as possible helps you to distinguish between the programs when you create several programs. In this case, I create the “Lawn” program, which should contain the zones defined as lawns:
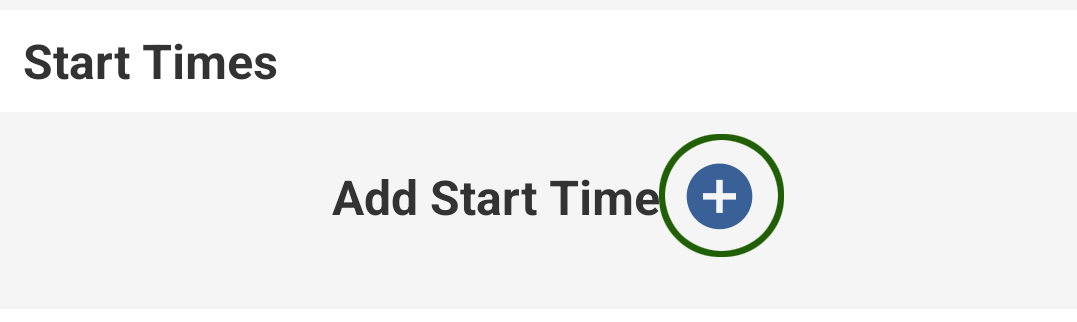
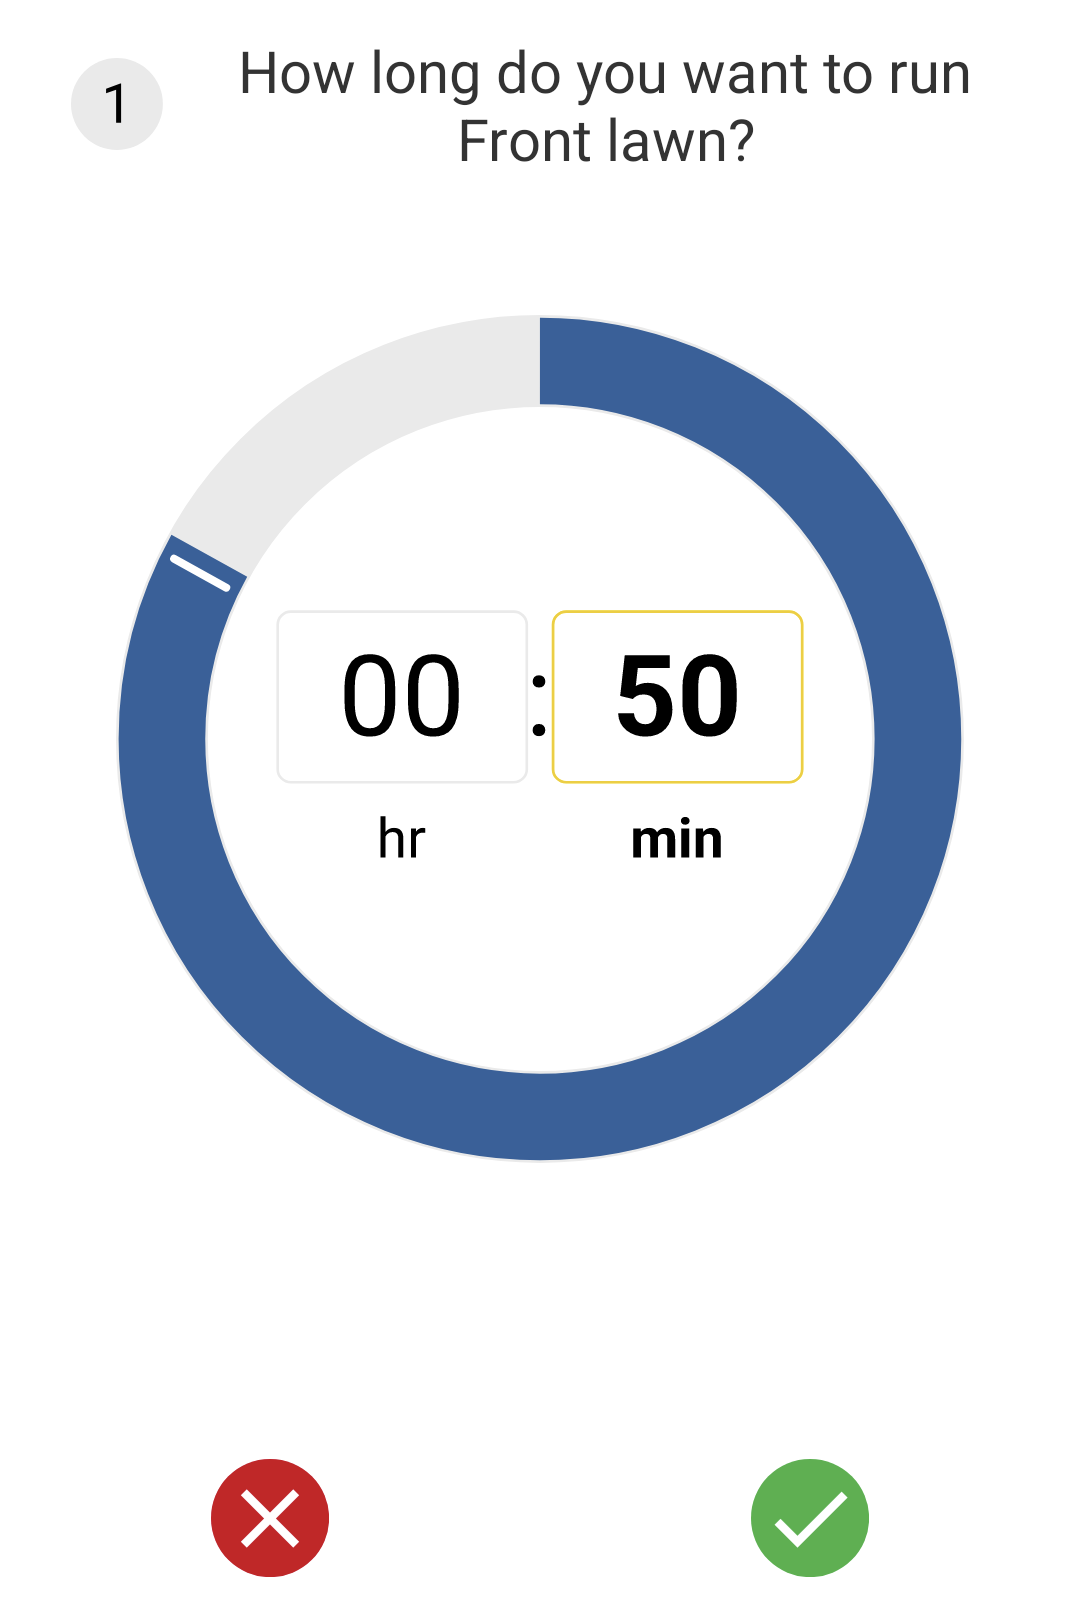
Start time:
A program requires a mandatory start time at which it begins to run. At the start of the start time, the program begins with the first zone assigned to the program and then all other assigned zones are processed in the defined order without interruption. A maximum of 4 start times can be defined. In my example of watering normal lawns, one start time is enough for me. Click on Add start time:
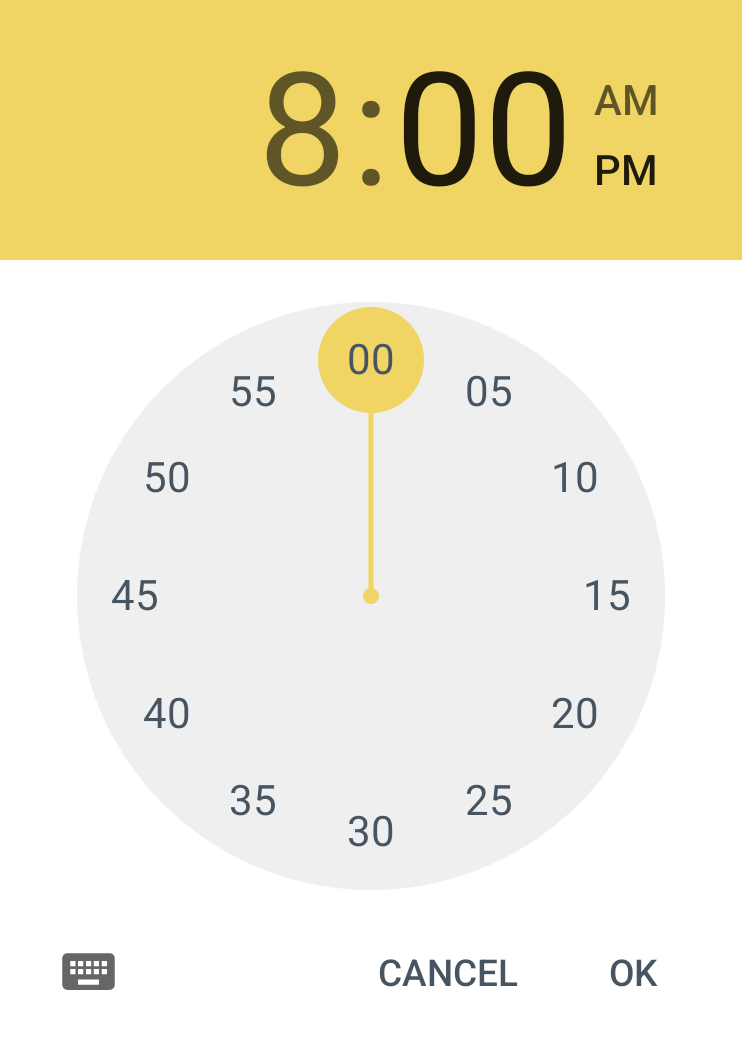
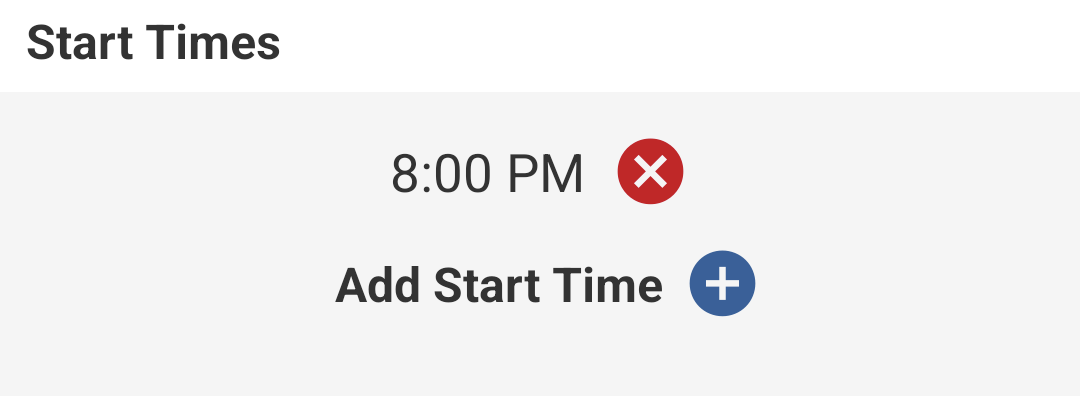
Select start time:
By clicking OK the start time is added:
Zones:
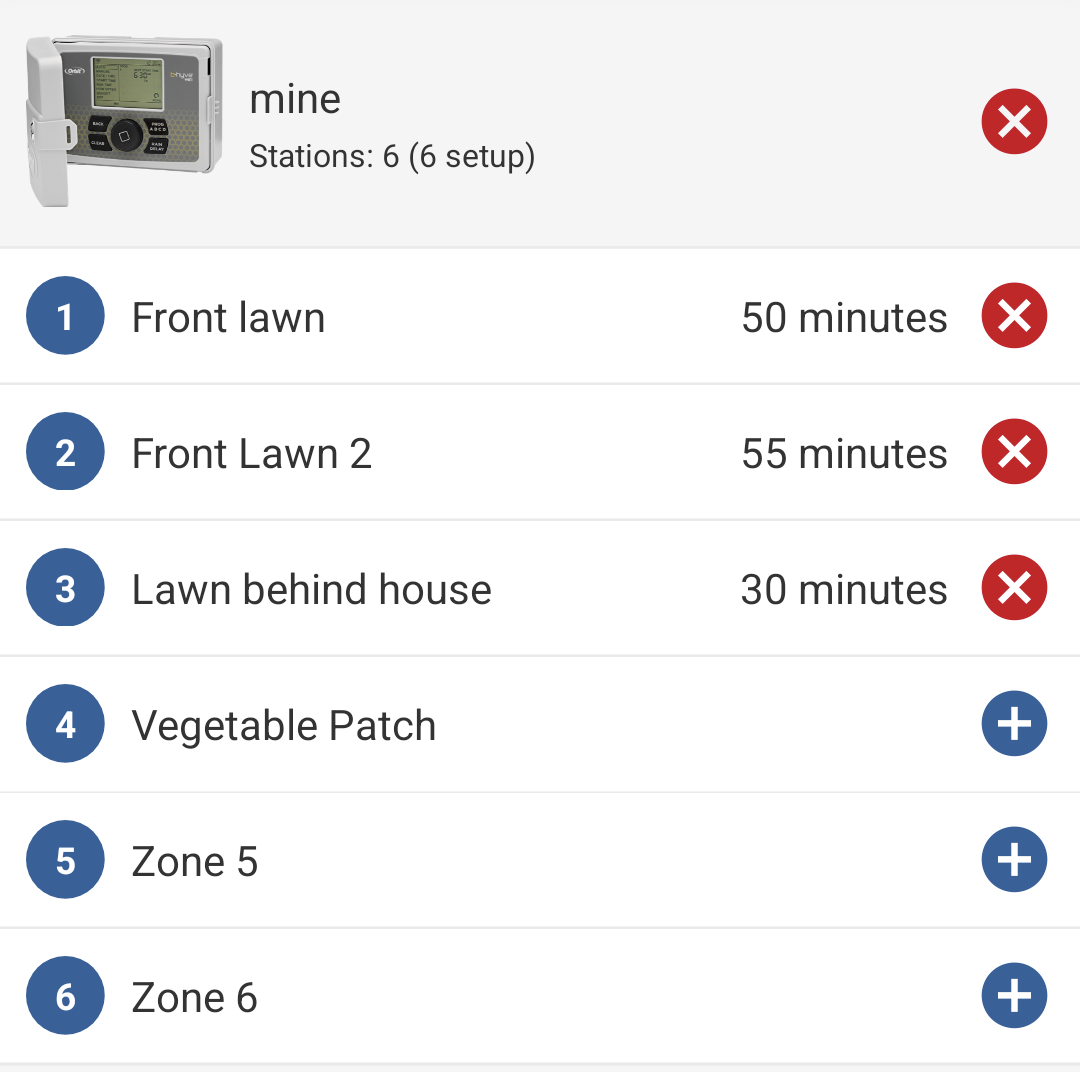
Here you define which zones in the program should be irrigated. At least one zone must be selected, the maximum possible is the number of zones present in the irrigation system, whereby each zone can only be selected once within a program. It is therefore not possible for example to water zone 1 at the very beginning and then again at the end of the program. In my case, I select the lawn zones for my lawn program. I water the two sunny areas for 50 and 55 minutes, and 30 minutes is enough for the shadier zone. The maximum possible runtime of the system is 4 hours, the shortest possible 1 minute.
Click on Change/Add Zone:
Select the desired zone:
Set the zone’s run time:
After repeating this process for the two additional lawn zones, a total of 3 zones are added to my irrigation program:
Watering days
Here you can either select one or more days of the week or set it to rain every other day on odd or even days. The third alternative is to freely specify the watering interval. Here you can choose between every 1 day (= daily) to every 32 days. In my case, watering once a week on Monday is enough for me. Select the desired day(s):
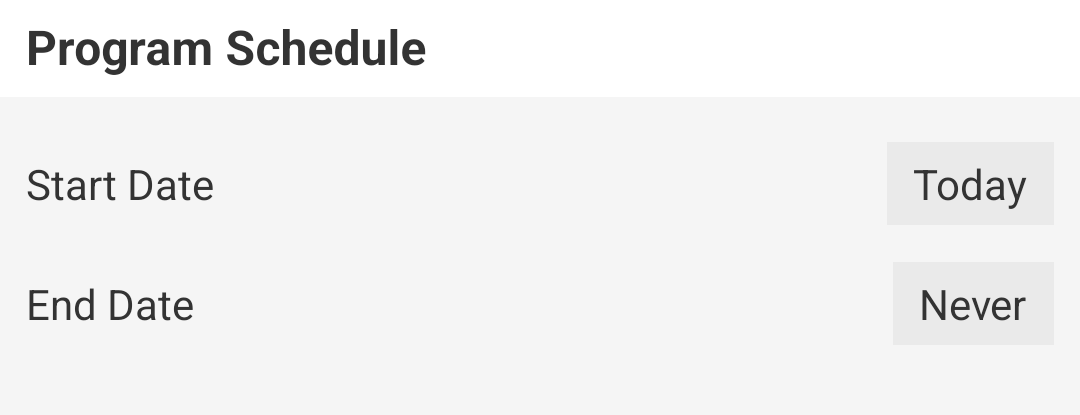
Program schedule
Normally you will not need this and you can leave the setting unchanged (= without a time limit). In special cases, e.g. a growth program for a freshly sown lawn, it can be helpful to limit the program to a specific date. Both the day on which it should start and the day on which it should end can be freely selected. In my case, I leave the setting unlimited:
Seasonal adjustment
This point is called “Watering Budget” in the B-hyve system. Without prior knowledge, you won’t be able to figure out what you can set here. It is used to be able to adjust the irrigation duration very quickly without having to change the program.
By default, the budget is set to 100%, which means that the water will be irrigated for exactly as long as defined in point 3. Normally you set this running time for the hottest time of the year, so my set 55 minute running time would be for mid-summer. However, not all months are as hot as in midsummer and in March or April, for example, it is enough to water the lawn for less time.
In my example, if you only want to water zone C for 15 minutes instead of 30 minutes, then you can change the irrigation budget from 100% to 50%. If you want to water twice as long, change from 100% to 200%. Settings between 10% and 200% are possible. In my case, I leave the budget at 100% at the moment.
The lawn program is now created. Up to 3 additional programs can be defined. In my case, I let the fourth zone, the vegetable patch, run in its own separate program because it has to be watered at a different rhythm than the lawn zones. After creating this additional program, two finished programs will finally be displayed in the program menu:
Stored irrigation programs
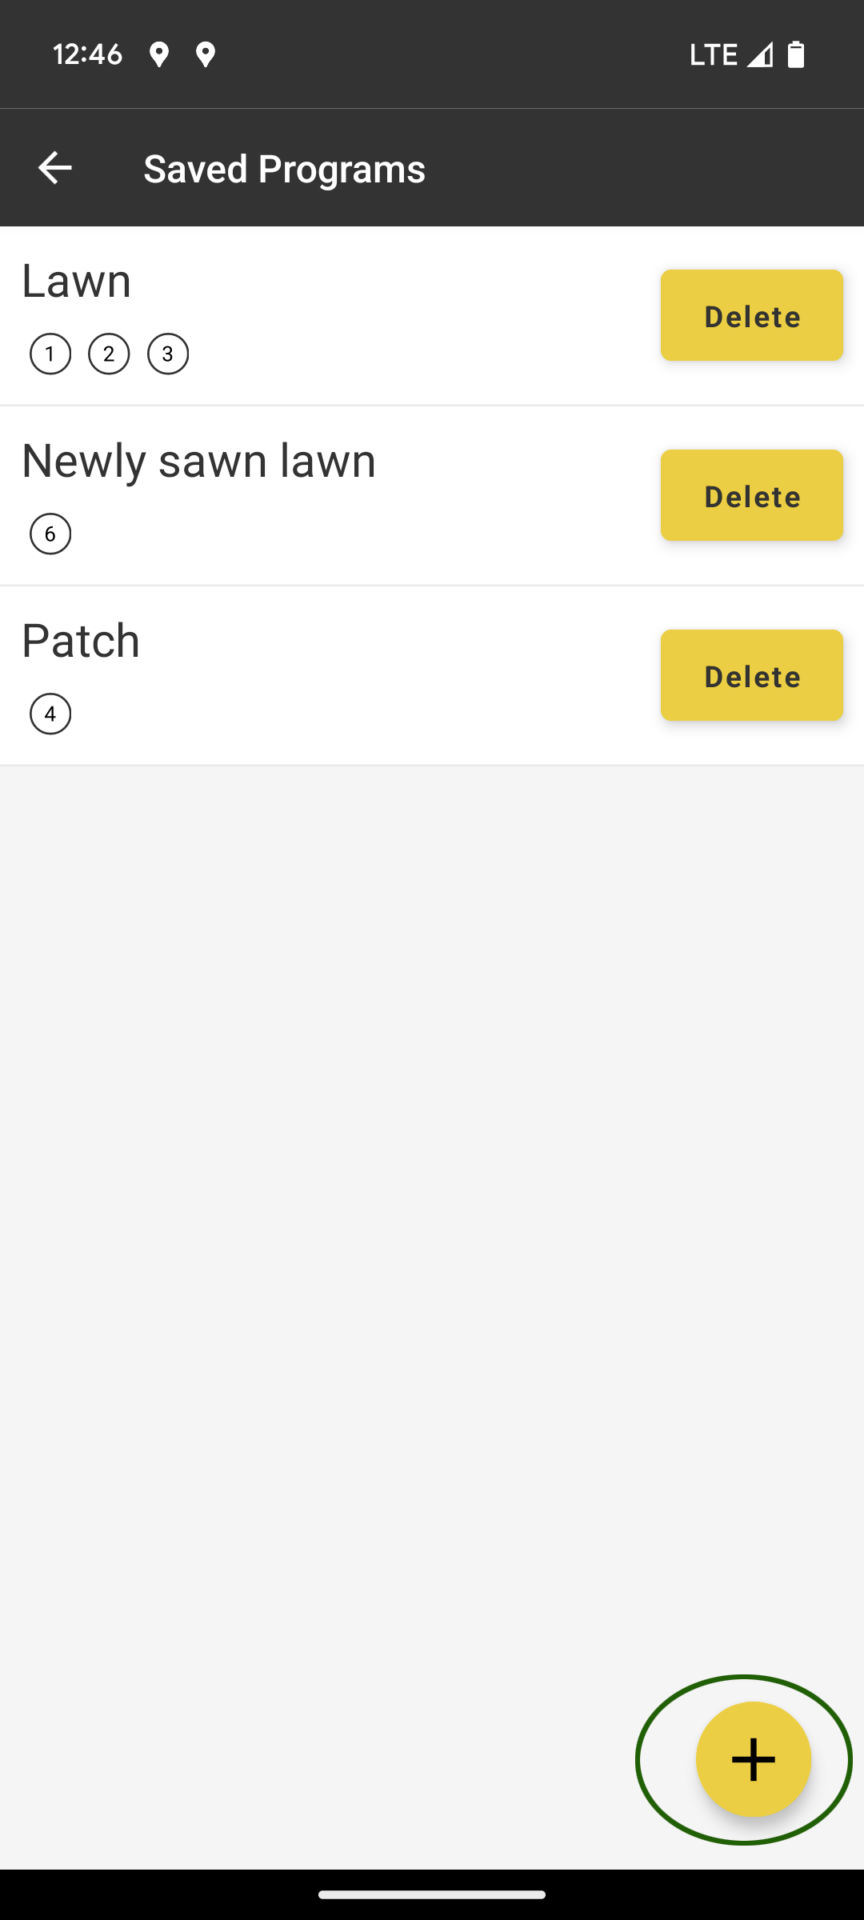
Save program templates
B-hyve offers the ability to save templates for programs for later use.
To do this, select the menu item “Saved Programs” in the program menu. All previously created templates will now be displayed. These also include the two previously created programs, which were automatically saved as a template, and an additional program template that I defined for newly created lawns. By clicking on the plus symbol you can create another template. The system works in the same way as described previously when creating a program.
Switch to the template menu
The existing templates are displayed. A new one is added by clicking on Plus.
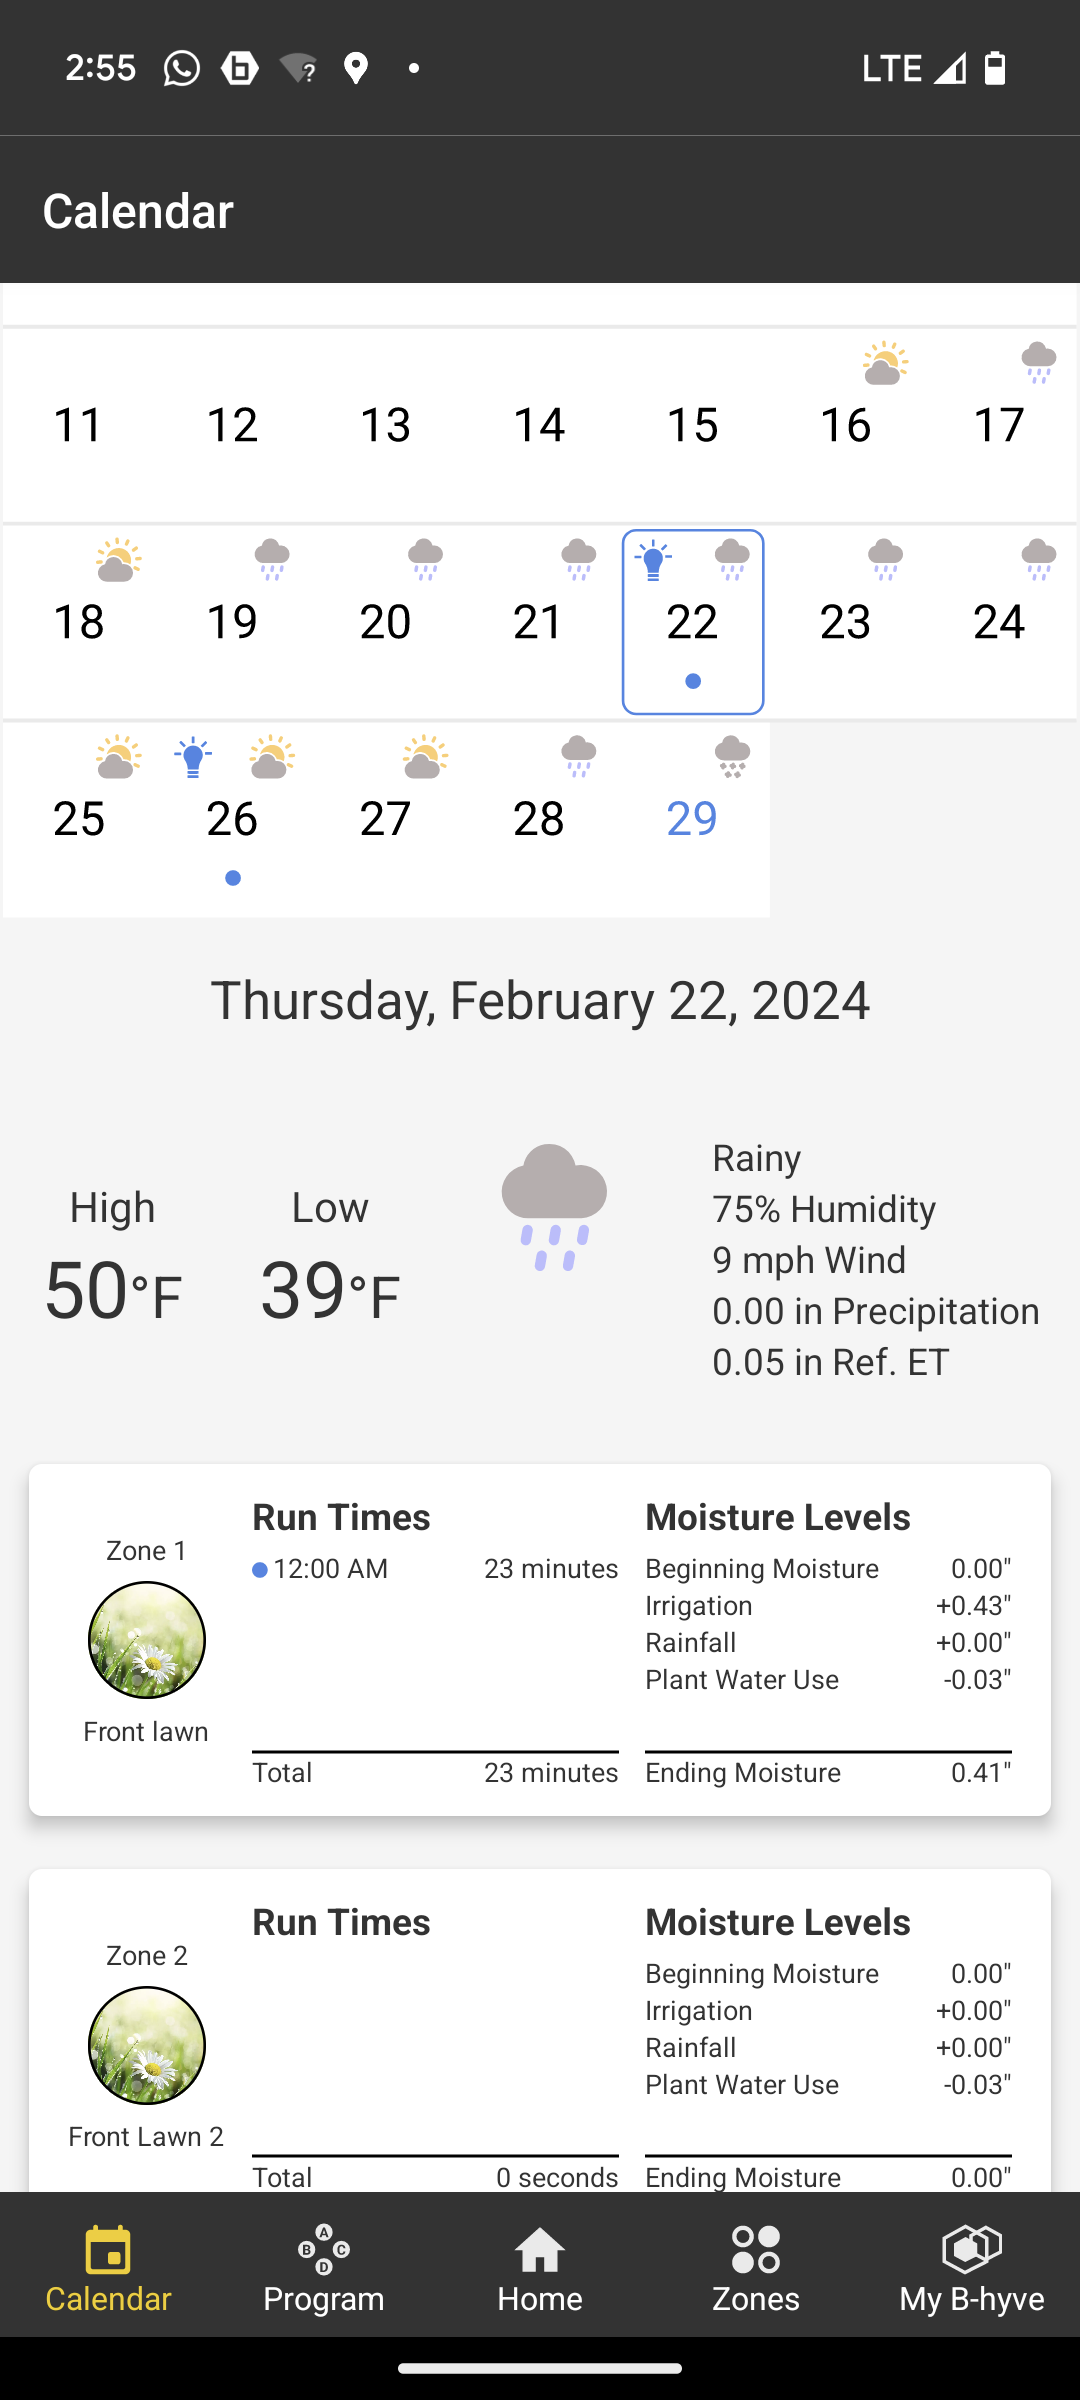
Irrigation calendar
The Calendar menu shows a monthly overview of when the next irrigation programs will take place and on which days in the past they took place. The programs are displayed with the colors known from the program menu, so that you can easily see at a glance which program is running when. By clicking on a day, detailed information about the program such as start time, running time and zones included are displayed.
Calendar view with program details
Irrigation history
This menu item can be found under My B-hyve. Here you can track the number of minutes that were watered on a daily, weekly, monthly or yearly basis. This makes it easy to compare whether you have saved water or not compared to the previous year or month and see which programs or zones use the most water.
Diagrams showing irrigation runtime or water consumption
If the Orbit irrigation computer you are using has an integrated water flow meter, as is the case with the Orbit B-hyve Smart Hose Timer (Amazon Link), then the actual water consumption in gallons or liters is also displayed. For the other B-Hyve models that do not have an integrated flow meter, Orbit offers an option to integrate a flow meter by coupling it to a Flume account. Flume is a provider of a smart flow sensor.
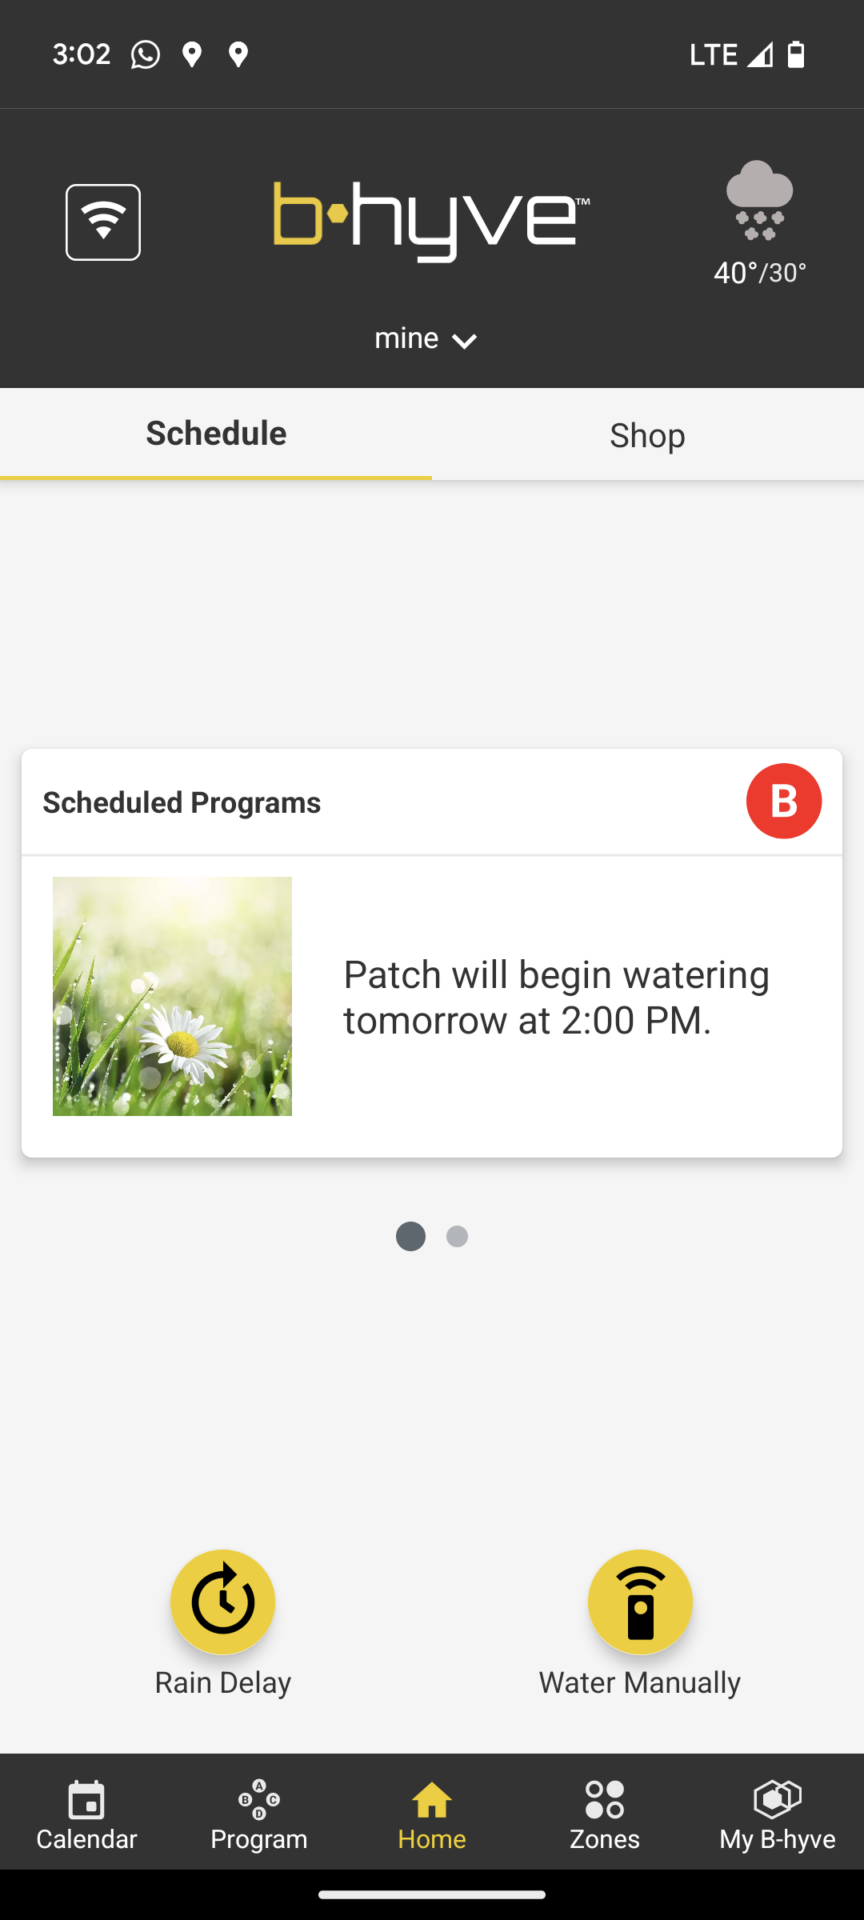
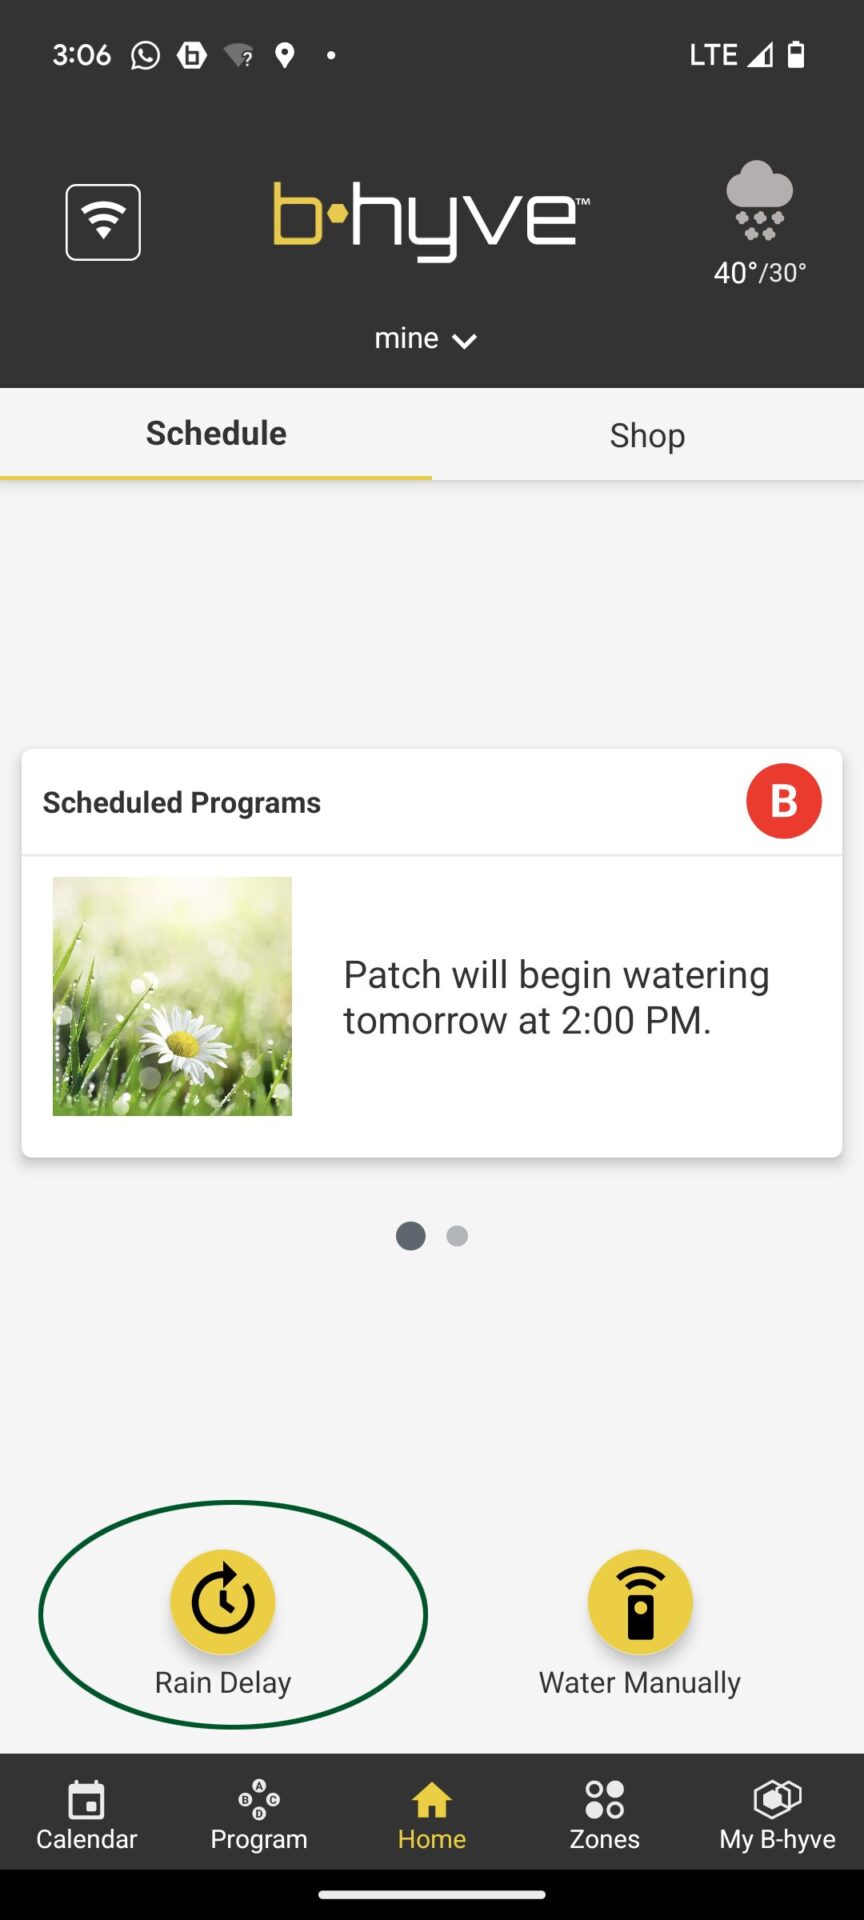
Home page
When you open the app, the home menu is automatically started. The next planned program run is displayed here.
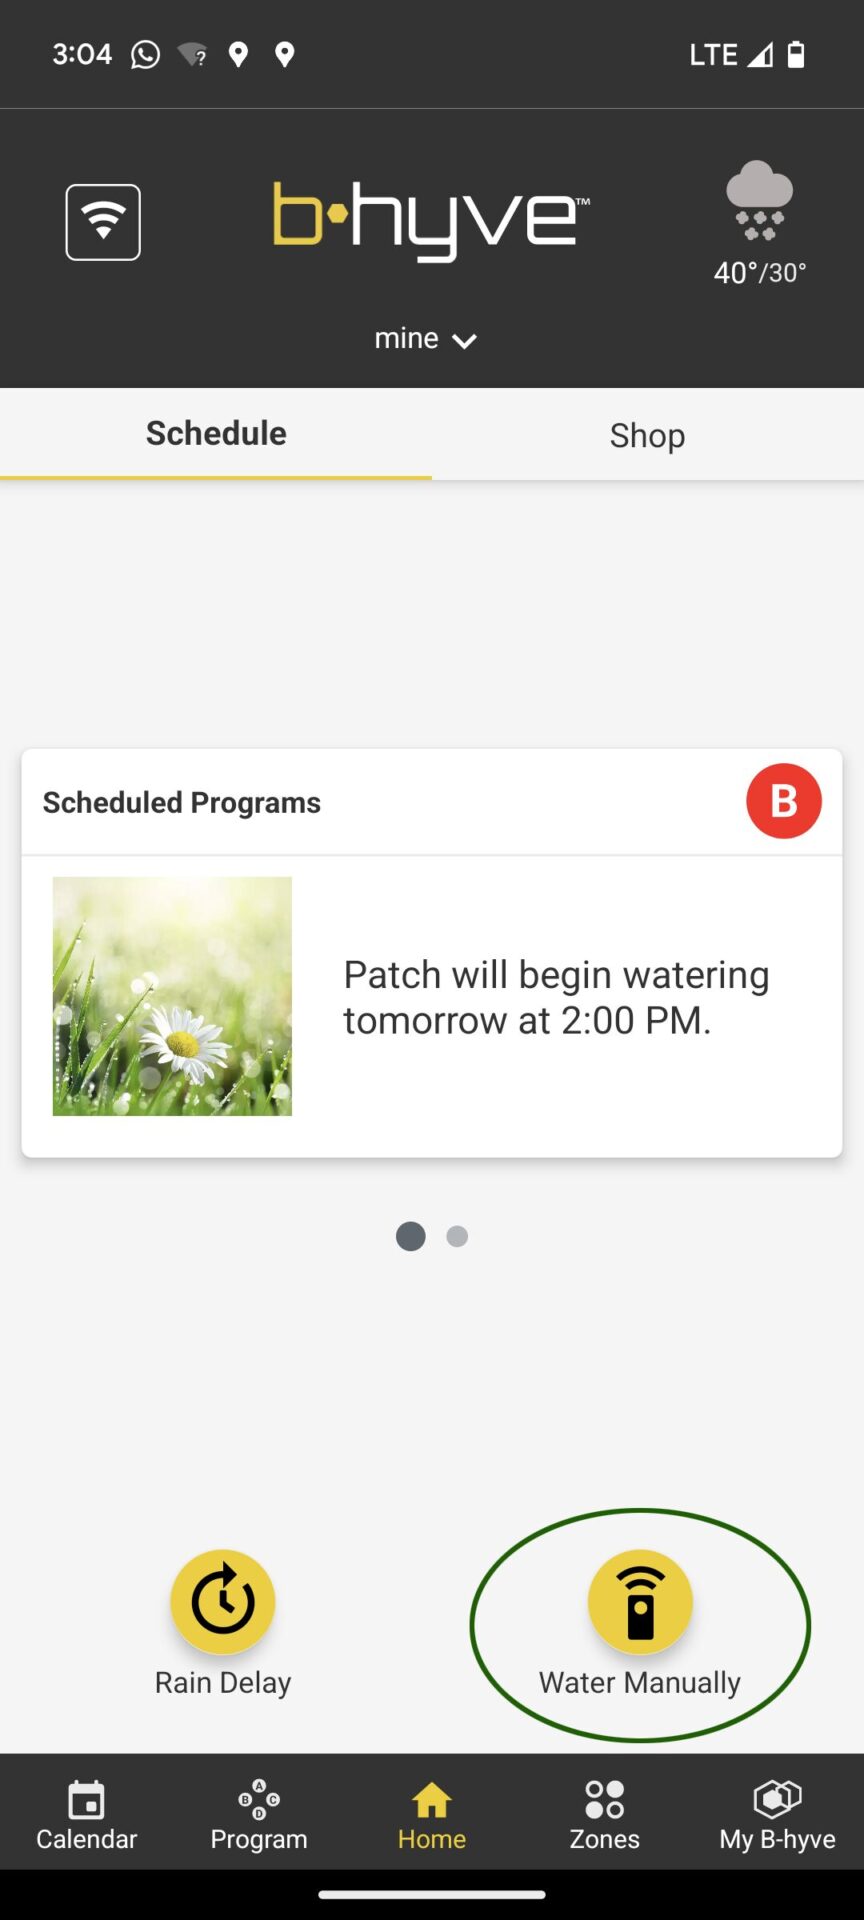
In addition, the home menu contains the menu items “Rain Delay” and “Water Manually”. I will describe their functionality below.
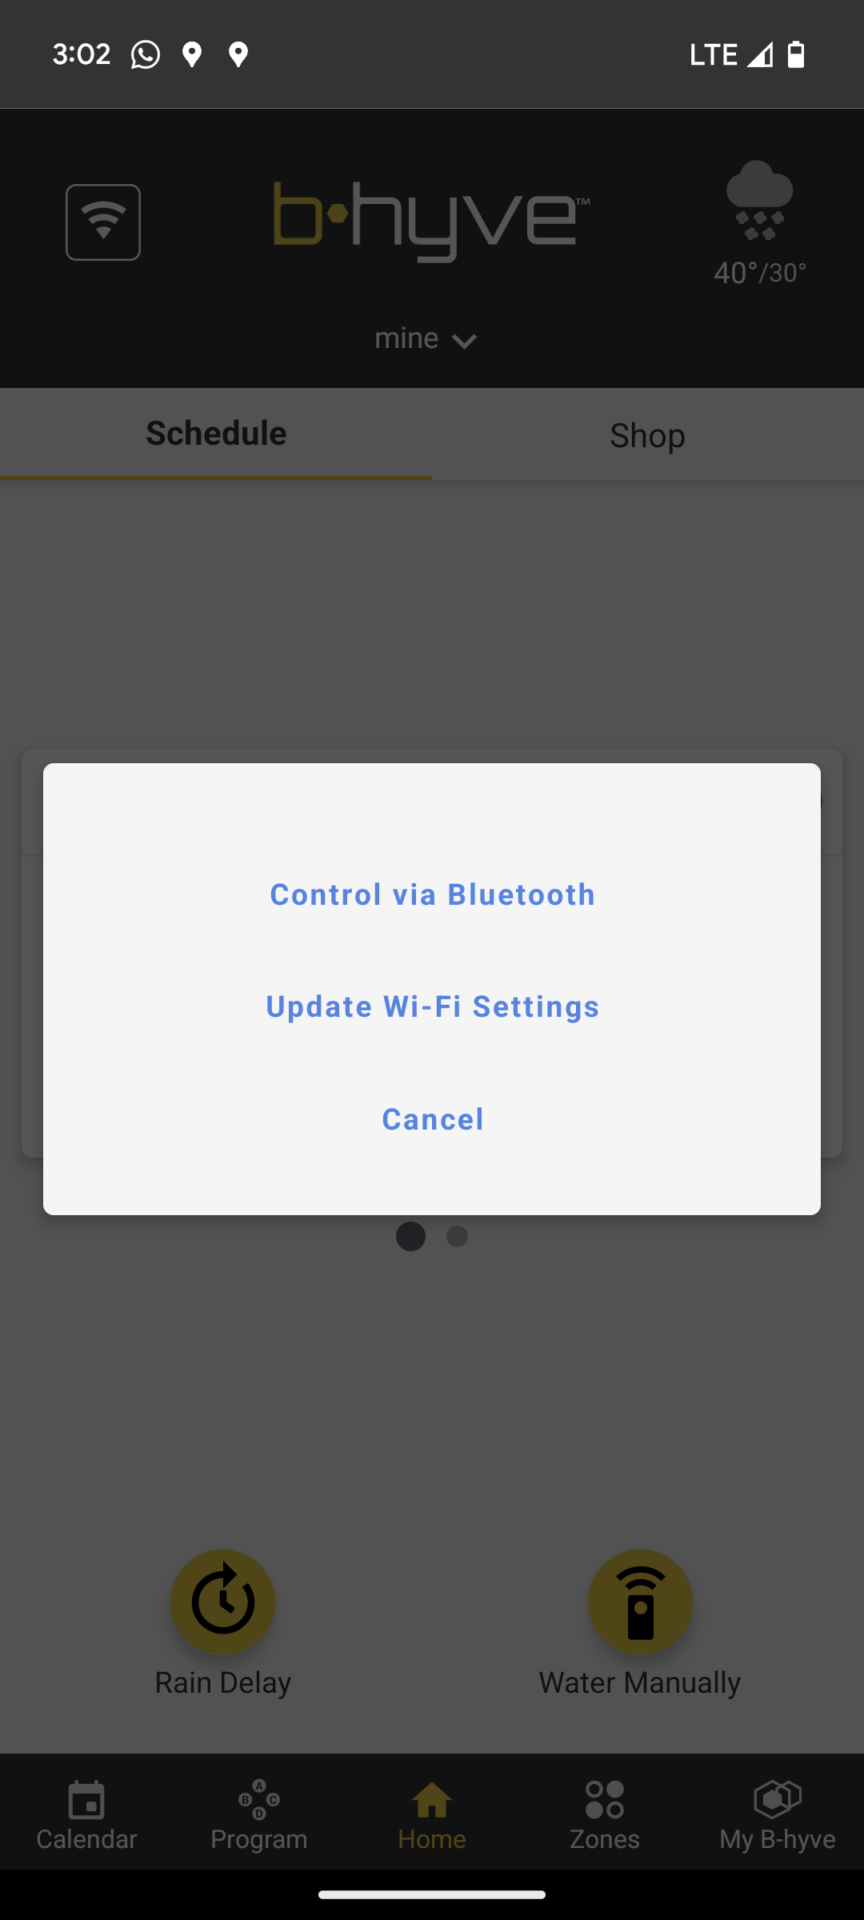
There are two options hidden behind the WiFi symbol at the top left:
Control the irrigation computer via Bluetooth
Adjust the Wi-Fi settings
The first might be necessary if you don’t have Wi-Fi reception. Then you can operate the B-hyve Computer via Bluetooth instead. For this to work, you have to be in close proximity to the computer. Adjusting the Wi-Fi settings becomes necessary, for example, if you change your Wi-Fi provider or change your Wi-Fi password.
At the top right there is also a symbol for the current weather as well as the daily high and low temperature.
Home menue
Details about the planned irrigation run (after clicking on the program)
By clicking on the icon at the top left you can access the WiFi settings and the option to control via Bluetooth
Selection of the WLAN network and setting of the password
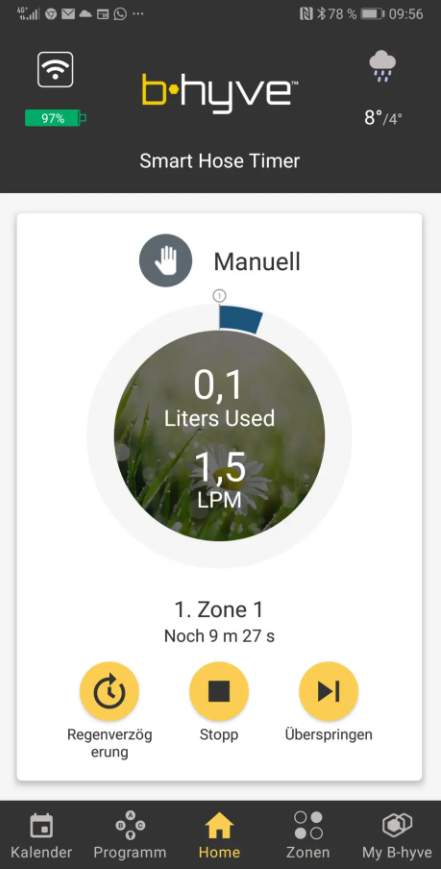
Start manual watering run
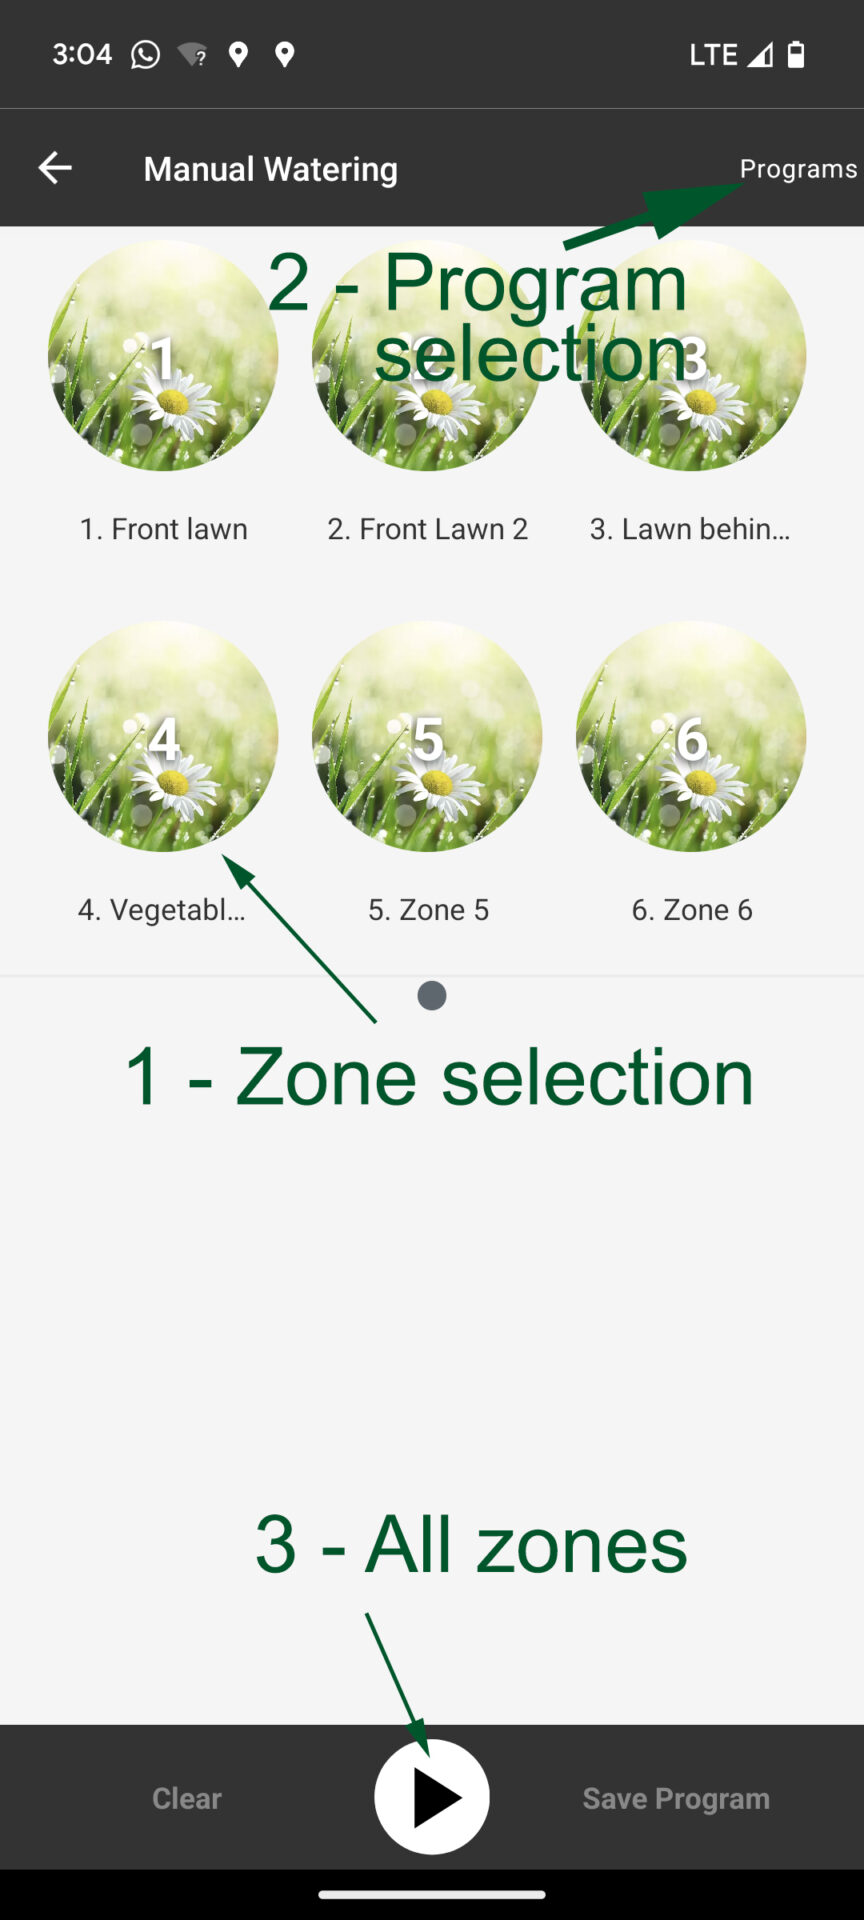
By clicking on the “Water Manually” menu item in the home menu, a spontaneous watering run can be started regardless of the programming. There are 3 options to choose from:
Water one or more zones
Water all zones
Run a program
To water a single zone, simply click on the zone name and then set the watering duration. If you then click on the play icon, the irrigation will be carried out. If you click on the tick icon instead, the zone with the specified time period will only be selected in the first step and you can add further zones. By clicking on the play icon at the bottom, watering will be carried out for all selected zones for the specified period of time. When using a B-hyve Smart Hose Timer with an integrated water flow meter, the system will show you how many gallons or liters of water it will use before the irrigation run starts.
To run a program, click on the “Programs” link at the top right and select the desired program. The program is played in the length specified in the program and with the assigned zones.
Once a manual irrigation has been started, it can be stopped at any time by clicking on the stop button. When watering manually, you can also set a watering suspension for a desired number of days for the irrigated zone by clicking on the rain delay button, so that it is not watered a second time by a scheduled program.
Menu item for executing a manual watering run
The three ways to start a manual watering run
Setting the desired time duration
Display of a currently running manual watering
Only when using a B-hyve Smart hose timer: When you click on the round flower area, the previous water consumption of the irrigation run is displayed
Suspend the irrigation run manually (rain delay)
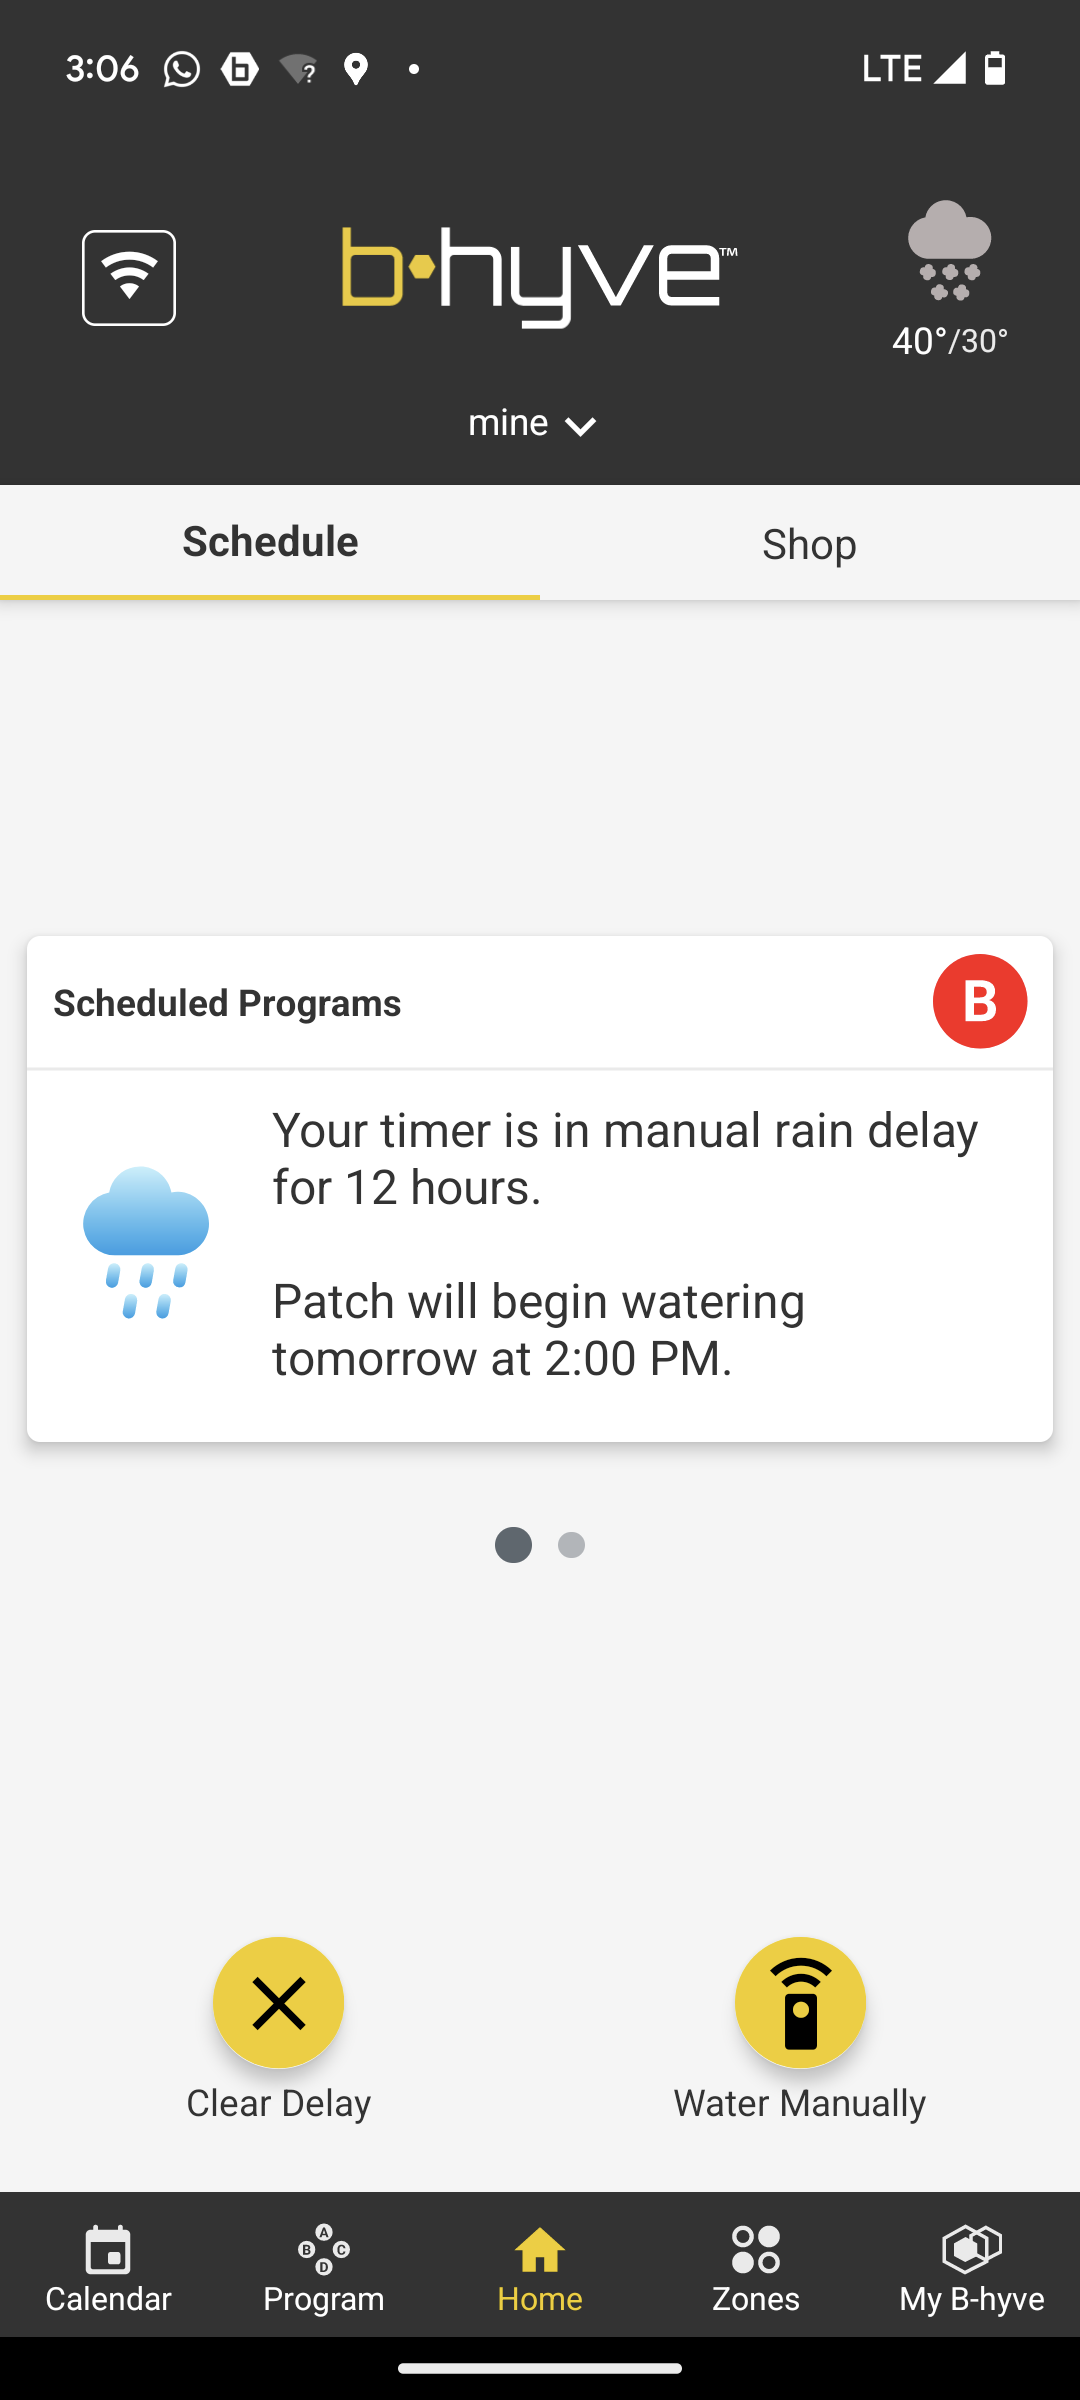
This option is practical if you do not want to carry out a scheduled watering run for certain reasons, for example because you did it manually as an exception. Or if, for some other reason, you absolutely want to prevent watering from being carried out in the next x hours or x days and you don’t want to change the programming specifically for this. To suspend irrigation, click on the Rain Delay menu item in the home menu and select the desired duration between 12 hours and 32 days.
Rain delay menu item
Selection of the time period (by clicking on “2+ days” a longer time period can be selected)
A currently active rain delay is displayed
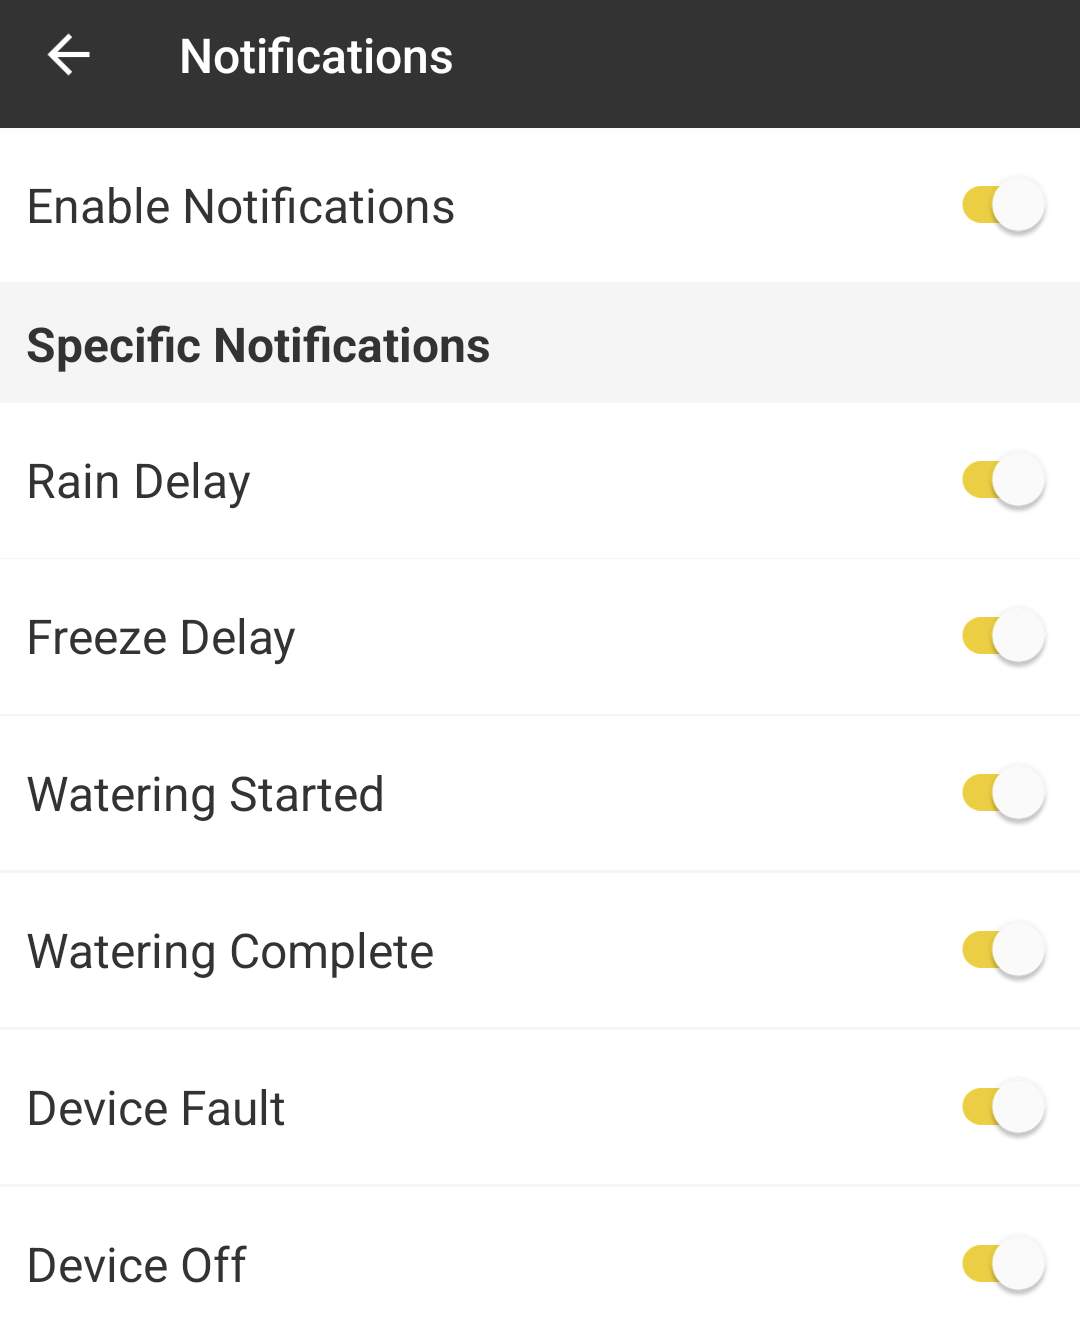
Enable/disable automatic notifications
The system offers the option of activating automatic notification for 4 events:
There is a rain delay (watering run is skipped)
An irrigation run has been completed
The irrigation computer cannot run a program due to an error (e.g. communication problems or damaged wires)
The irrigation computer has been turned off
The notifications are sent to the cell phone as push notifications. For this to work, the “Activate notifications” option must be activated in the Notifications menu item in the My B-hyve menu and the events you want to be notified about must also be activated:
Determine the events you want to be notified about
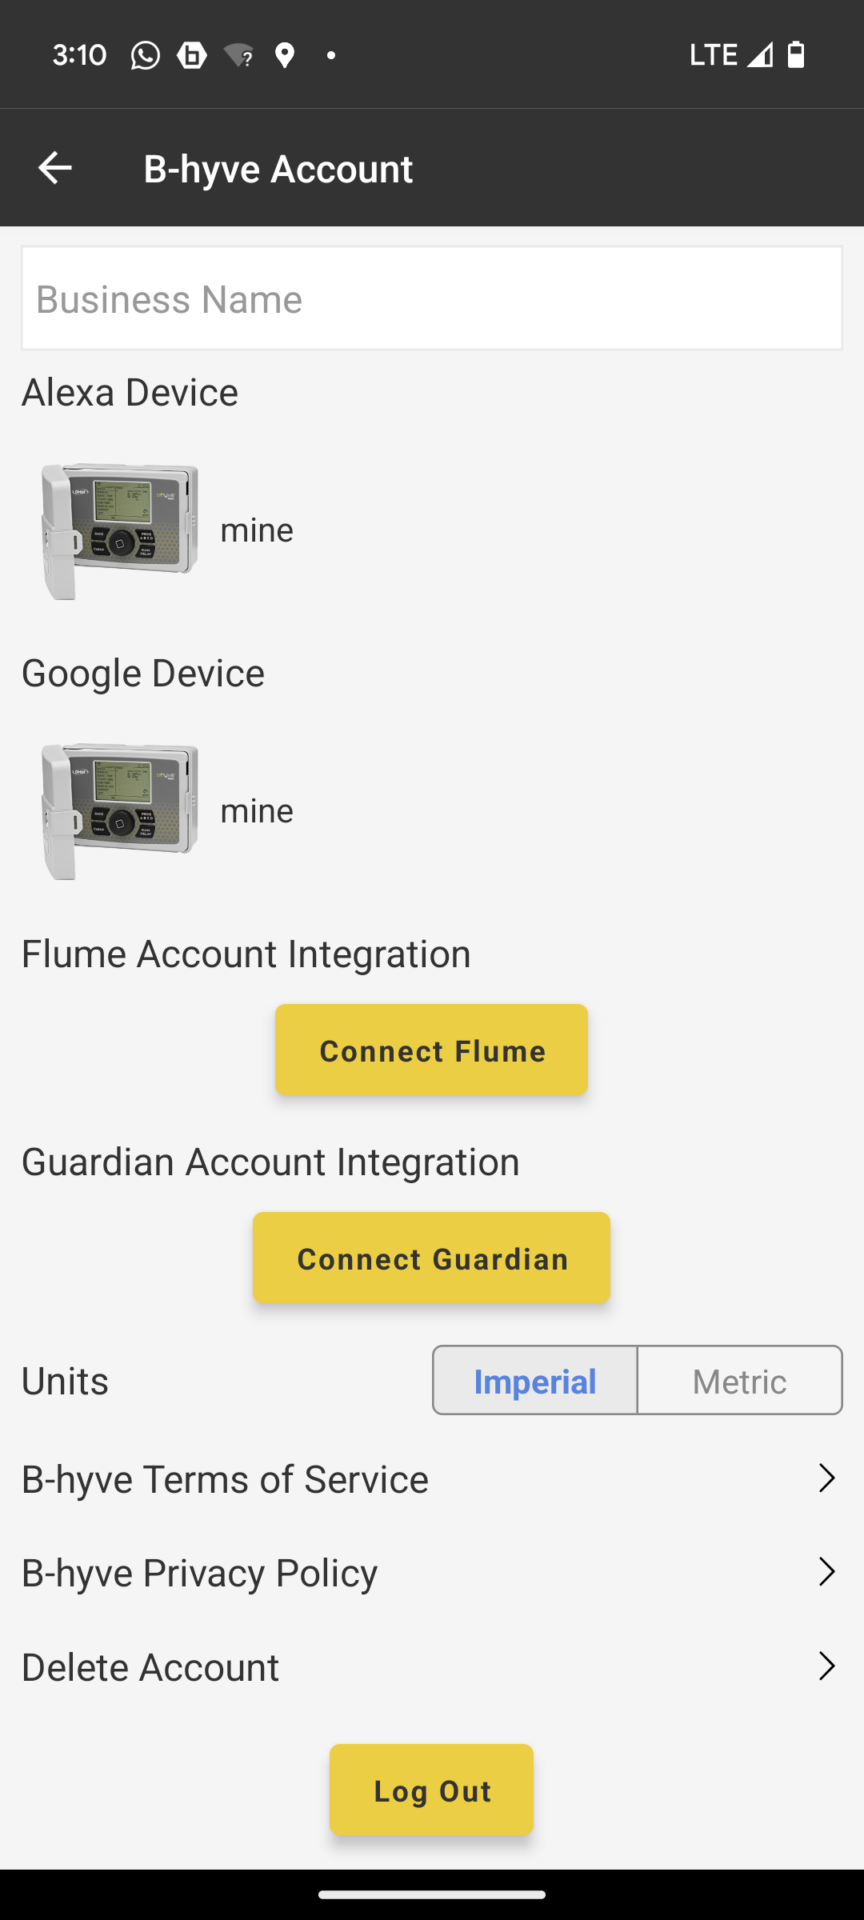
Change B-hyve account settings
The name and password stored in the system can be changed under My B-hyve/B-hyve account. It is also possible to change the units from the imperial to the metric system and vice versa. So if centimeters and liters are incorrectly displayed instead of inches and gallons, this can be changed here.
B-hyve can also be integrated into Google Home, Alexa and Flume here.
B-hyve account settings
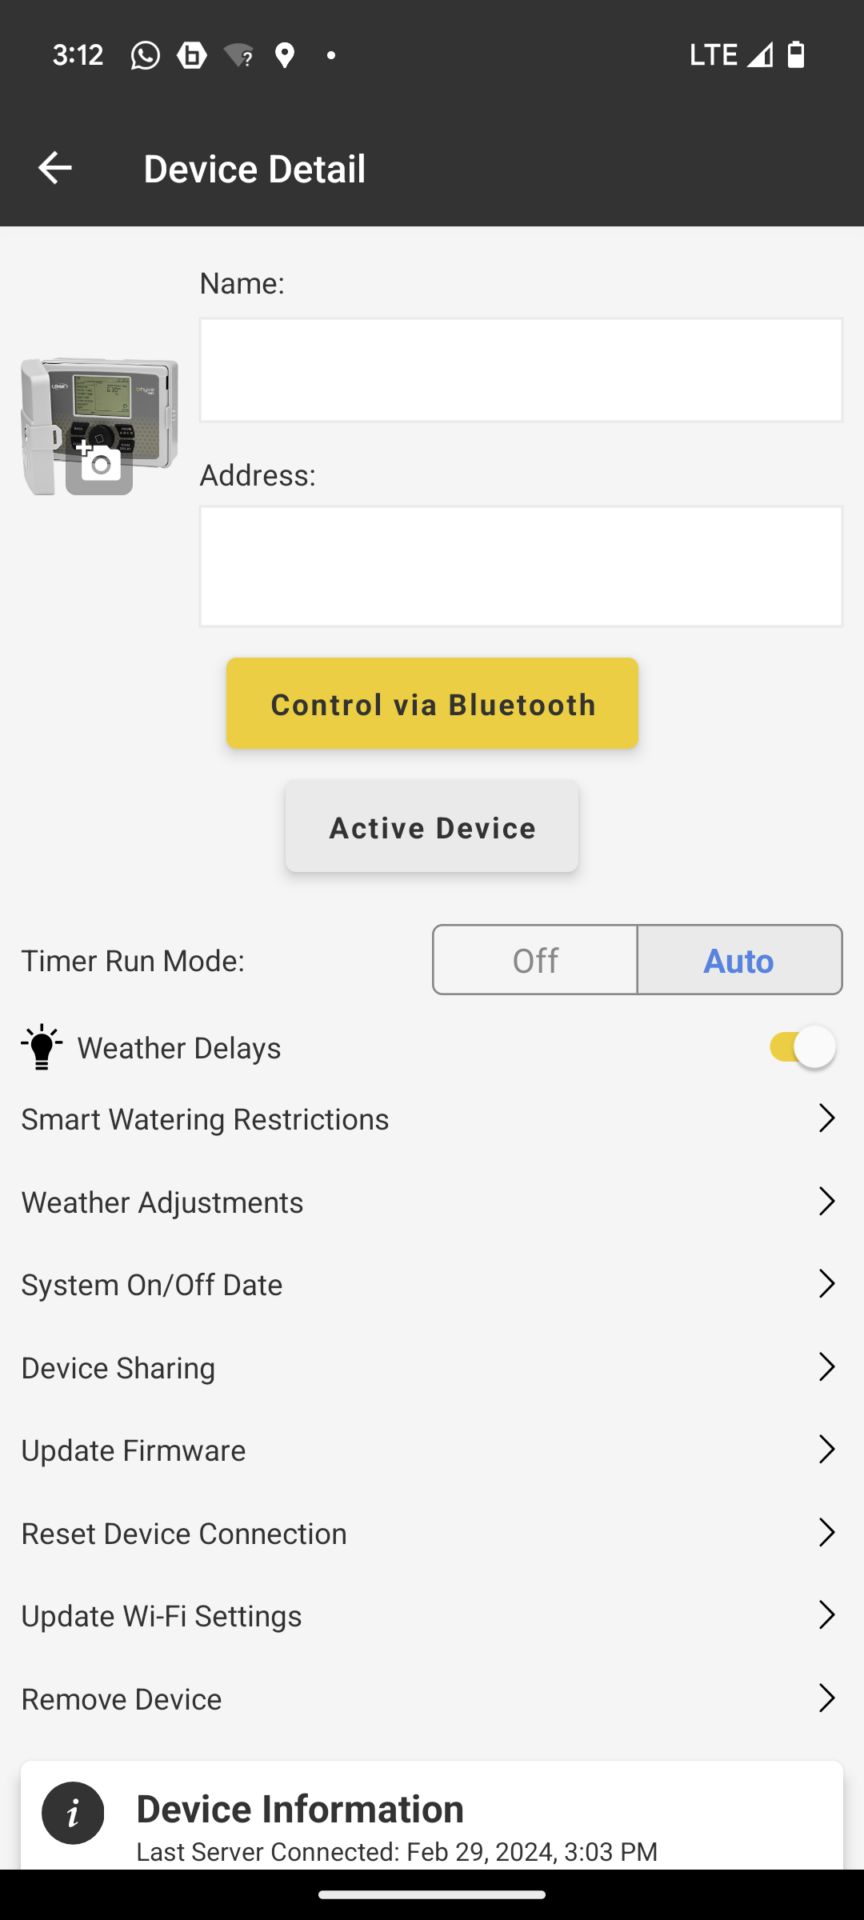
Change B-hyve device settings
I have already described the most important setting options hidden here under My B-hyve/Devices with the “Smart Watering Restrictions”, “Fine-tuning of Smart Watering Events” and “Selecting the Weather Station” earlier in the article. Apart from that, there are also the Wi-Fi settings and the ability to control via Bluetooth, both of which can also be carried out via the home menu and you can switch off the computer from here, initiate an update of the software on the device or remove the device from the app.
A function that makes sense in practice is to automatically switch the system on and off on a specific date. In this way you can ensure that the irrigation computer is switched off before winter and then automatically wakes up again in time for the start of the new season. You only need to define the switch-on and switch-off date once and you can then have it repeated every year on the same date.
The device sharing function is also important here, as it allows you to give other people access to the irrigation computer. For this purpose, an access code can be generated for managers (have extensive rights) or guests (can only carry out operating functions) and passed on to the desired person. By entering this code into the app, the person then gains access to the irrigation computer.
Device settings
When using a B-hyve smart hose timer with an integrated water flow meter, the menu item “Preset running time” is additionally displayed. This can be used to determine how long the irrigation will run if it is not started via the software but directly on the irrigation computer by pressing the on/off button. By default, 10 minutes are stored here.
Conclusion and comparison
At first glance, the B-hyve software seems quite unspectacular with its five menu items and seems limited to the essential functions. However, this first impression is deceptive, as the submenu items contain a lot of functionality that gives you numerous customization options.
You don’t have to use these options: If you want, you can easily save a classic irrigation program. And limit the smart functionality to the fact that you can start or cancel your irrigation from anywhere in the world and are always and everywhere informed about the current status of the irrigation. This means you can keep watering at home under control even when you’re on vacation.
If you want to exploit the possibilities of smart control, you can alternatively use the Smart Watering mode. In this case, you define the conditions at the location as precisely as possible and leave it to the artificial B-hyve intelligence to create the most effective program possible. The software then decides on which days and at what time the irrigation takes place, as well as how long the runs last and whether everything is done in one run or the run is divided into several shorter runs for better infiltration. This is referred to as cycle and soak phases. How the whole thing happens is basically a black box and can only be understood to a very limited extent.
Since this auto-logic will not produce perfectly usable results in all cases or because you would like to decide or at least limit certain things yourself, such as the time at which watering takes place, B-hyve offers a few options for intervening in the automatic system. So if the automatic processes do not work as expected, you can change the stored limit values that influence the auto-logic. So if the lawn turns brown because B-hyve skips too many irrigation runs, you can, for example, specify that irrigation runs will only be skipped when there is a higher probability of rain or when more rain is expected.
B-hyve’s Smart Watering mode is roughly equivalent to Hydrawise’s Smart (ET) schedule mode, although B-hyve even has a small advantage here, as you can enter more parameters for irrigation and the plants, giving the system a finer basis for decision-making. If you don’t want to worry too much about your watering and want to let the system do it yourself, then this is the ideal mode.
The B-hyve software itself generally makes a good impression, the interface is designed to be quite user-friendly and you can tell from the range of functions that many thousands of developer hours have gone into it. However, some things still seem a bit half-baked and in some places the functionalities are very poorly explained, so that even with extensive prior knowledge of the subject you can only guess what exactly they are supposed to do. You also sometimes get the impression that the programmers have already built in things that people in marketing and product design haven’t even noticed about, and some functionality can be found in places where you wouldn’t have expected it. This is better in the Hydrawise system, which has been established on the market for a long time, where everything is described in great detail and appears comparatively structured.
In my opinion, a significant shortcoming compared to Hunter Hydrawise is that you cannot use the smart functionality for independently created programs. With Hydrawise you can create your program and define a series of rules that either suspend irrigation completely or adjust its length or run it more often or less often. With a little observation of your own watering and tinkering, you can find the perfect setting for you over time. In the B-hyve system you have to decide between storing the program yourself or Smart Watering mode. A solution that includes both like Hydrawise is not offered. At least when using your own programs, you will be given recommendations for suspending irrigation runs if the weather forecast turns out accordingly. In my opinion, Hydrawise is ahead here and offers more options for those who want to go into detail when setting up the irrigation solution.
Orbit also lacks the very useful options for integrating sensors like Hydrawise. Hydrawise makes it possible to define sensors yourself and, if necessary, to connect a flow meter to the sensor input.
I see B-hyve as having a clear advantage compared to the Rain Bird Smart Watering System, which primarily includes the ability to control irrigation remotely, but only offers very limited smart functionality. Here the B-hyve system is much more ambitious in comparison and contains much more functionality. And all at a comparatively lower price.
B-hyve also has a clear advantage over the Gardena Smart System, which currently only allows control depending on weather events to a very limited extent.
The LinkTap system used in the LinkTap G2 irrigation computer is functionally completely different, but not bad in comparison. It is less detailed, but its functionality allows for sensible weather control and, compared to B-hyve, it has advantages in terms of automatic notifications, of which LinkTap offers significantly more types. For example, the very useful point of water flow monitoring, which warns you if water is escaping uncontrollably or if no water is available.
Ultimately, Hunter Hydrawise remains my personal favorite because it allows even more detailed control of irrigation based on weather data and, in my opinion, this control is more transparent than with B-hyve. In Hydrawise you can react directly to the weather data with certain rules, in B-hyve you first define the situation at the irrigation site and B-hyve derives the appropriate program from the system perspective in its black box and runs on autopilot. Whether you like it that way is a matter of taste, I prefer to be able to tell the system clearly what it has to do in which situation. If you want to be less involved, you might like the other approach more. That’s why Hydrawise offers both options in the system. Hydrawise also seems more mature and stable; you can tell that most of the teething problems have already been eliminated. B-hyve started the software later and has not yet completed this stage.
However, there are also important arguments in favor of the B-hyve solution. First of all, there is the price: The B-hyve computers cost a lot less than the competitor products! Rain Bird and LinkTap are easily 50% more expensive, Gardena costs more than twice as much since you have to buy an expensive gateway, and the premium solution Hydrawise has an even higher price for its quality. With Hydrawise you can argue that with the performance it offers, I think LinkTap is equivalent, but in my opinion the smart software from Gardena and Rain Bird is currently inferior to the Orbit software. So if you’re looking for a decent smart computer at a very fair price, then you can’t go wrong with a B-hyve computer! And if the B-hyve development team maintains its current pace, then you can expect further improvements and the elimination of the remaining weak points soon.
I am an enthusiastic do-it-yourselfer and have been running this blog on the subject of garden irrigation for more than 6 years now. In over 150 specialist articles, I share my own experiences and know-how from years of research and numerous product tests. -> More about me


")


