In this post, I describe the functionality of the RainPoint Tuya app for RainPoint water timers with web connectivity. RainPoint currently offers three different apps for its water timers, although not all RainPoint timers work with every app. I describe the two other RainPoint apps, HomGar and RainPoint Home, in the following two blog posts:
All RainPoint TTV water timer models can be controlled with the RainPoint Tuya app. These are the orange models and the white TTV102B water timer. The app works the same for all of these models, although the TTV102B water timer does not include a water flow sensor and therefore does not have the associated functionality.
In this post, I describe the individual features in detail and conclude by discussing how the RainPoint app compares to the two other RainPoint apps and to competitor water timer apps.
Product overview of RainPoint models with the RainPoint Tuya app
Before, an overview of all RainPoint models that use the RainPoint Tuya software presented here. The screenshots shown were taken using a TTV203WRF with two outputs; however, the models with one output essentially have the same functionality, except that, logically, only one output can be programmed.
Optionally available for an additional charge of approximately $15 to $25 with brass threads instead of plastic threads at the inlet or at the inlet and outlet.
Optionally available for an additional charge of approximately $15 to $25 with brass threads instead of plastic threads at the inlet or at the inlet and outlet.
Optionally available for an additional charge of approximately $15 to $25 with brass threads instead of plastic threads at the inlet or at the inlet and outlet.
Optionally available for an additional charge of approximately $15 to $25 with brass threads instead of plastic threads at the inlet or at the inlet and outlet.
When you start the app, the following overview is displayed, from which you can navigate to the individual functions:
RainPoint Tuya
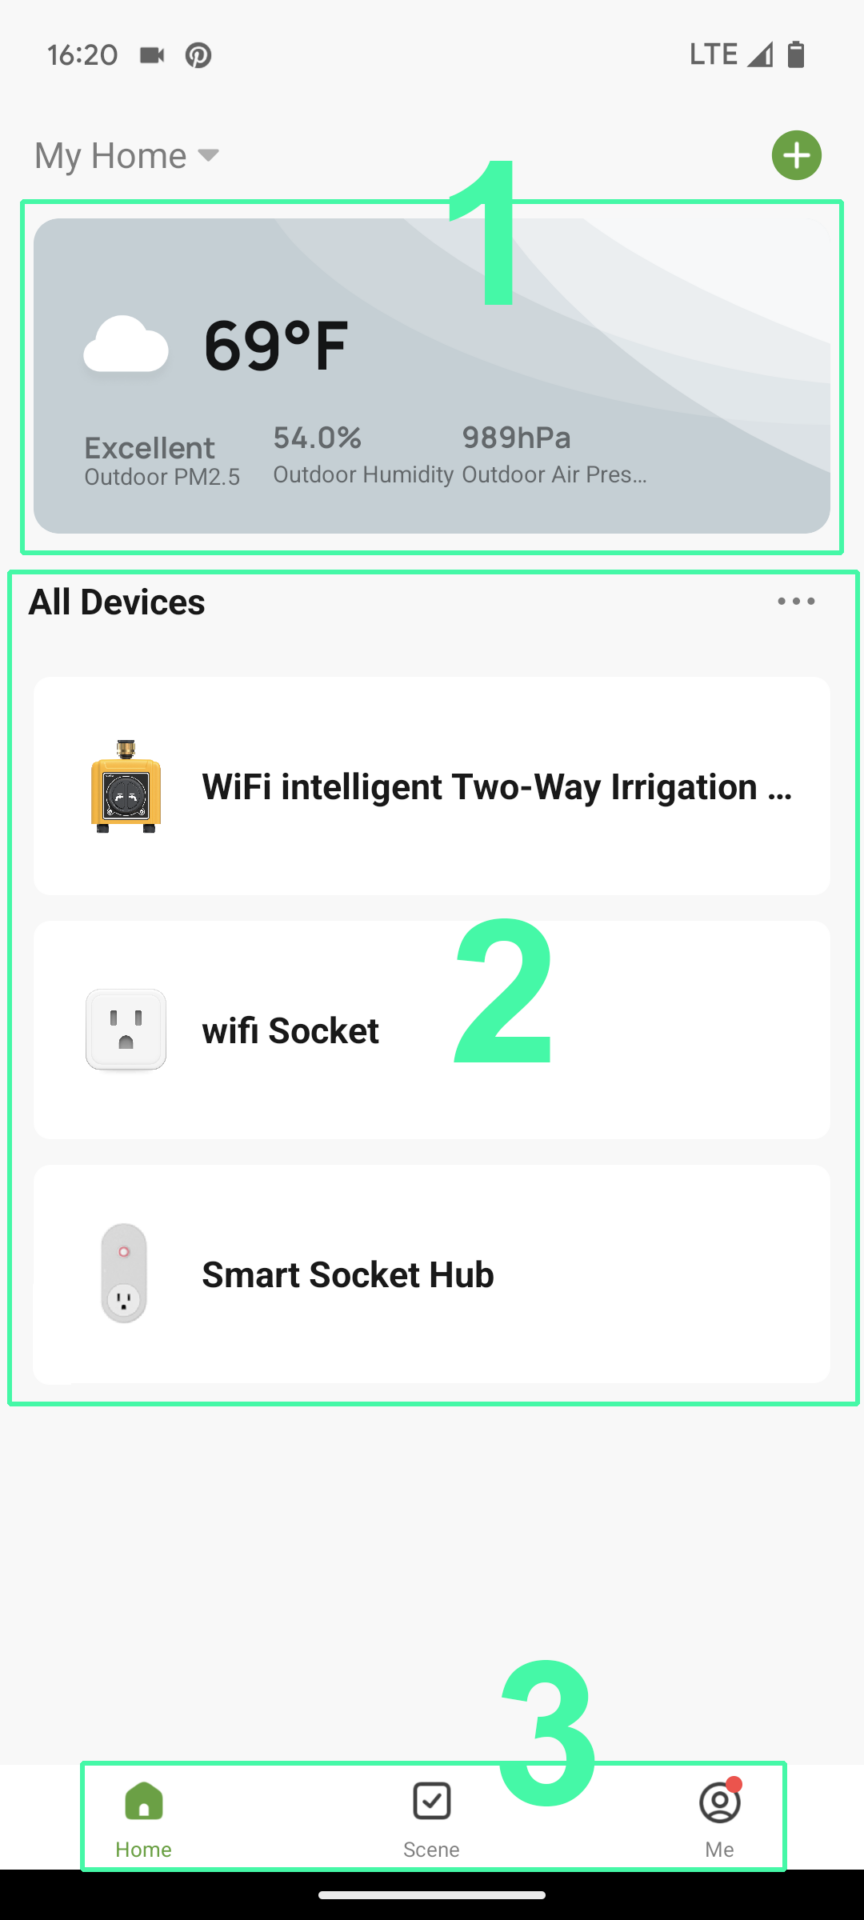
This view appears quite clear at first glance. It contains the following key areas:
Current Weather
Overview of the connected devices
Main Menu
In the following screenshot, I have visually highlighted the three areas:
The first area displays the weather for the selected location. The data displayed here is also used for control via weather data, and you can, of course, also use it manually as a basis for a manual irrigation pause. In addition to the displayed values, you can also display the wind speed by clicking on this area. However, only the current weather is displayed, not forecasts or historical values.
The second area shows which smart devices are currently stored in the software. In my case, this is the irrigation computer and the associated hub (gateway). The socket included in the hub is also displayed separately. If you were using the additional soil moisture sensor, it would also be displayed here.
The third section is the actual main menu with three menu items, which always automatically starts with “Home.”
Setting options for the irrigation computer
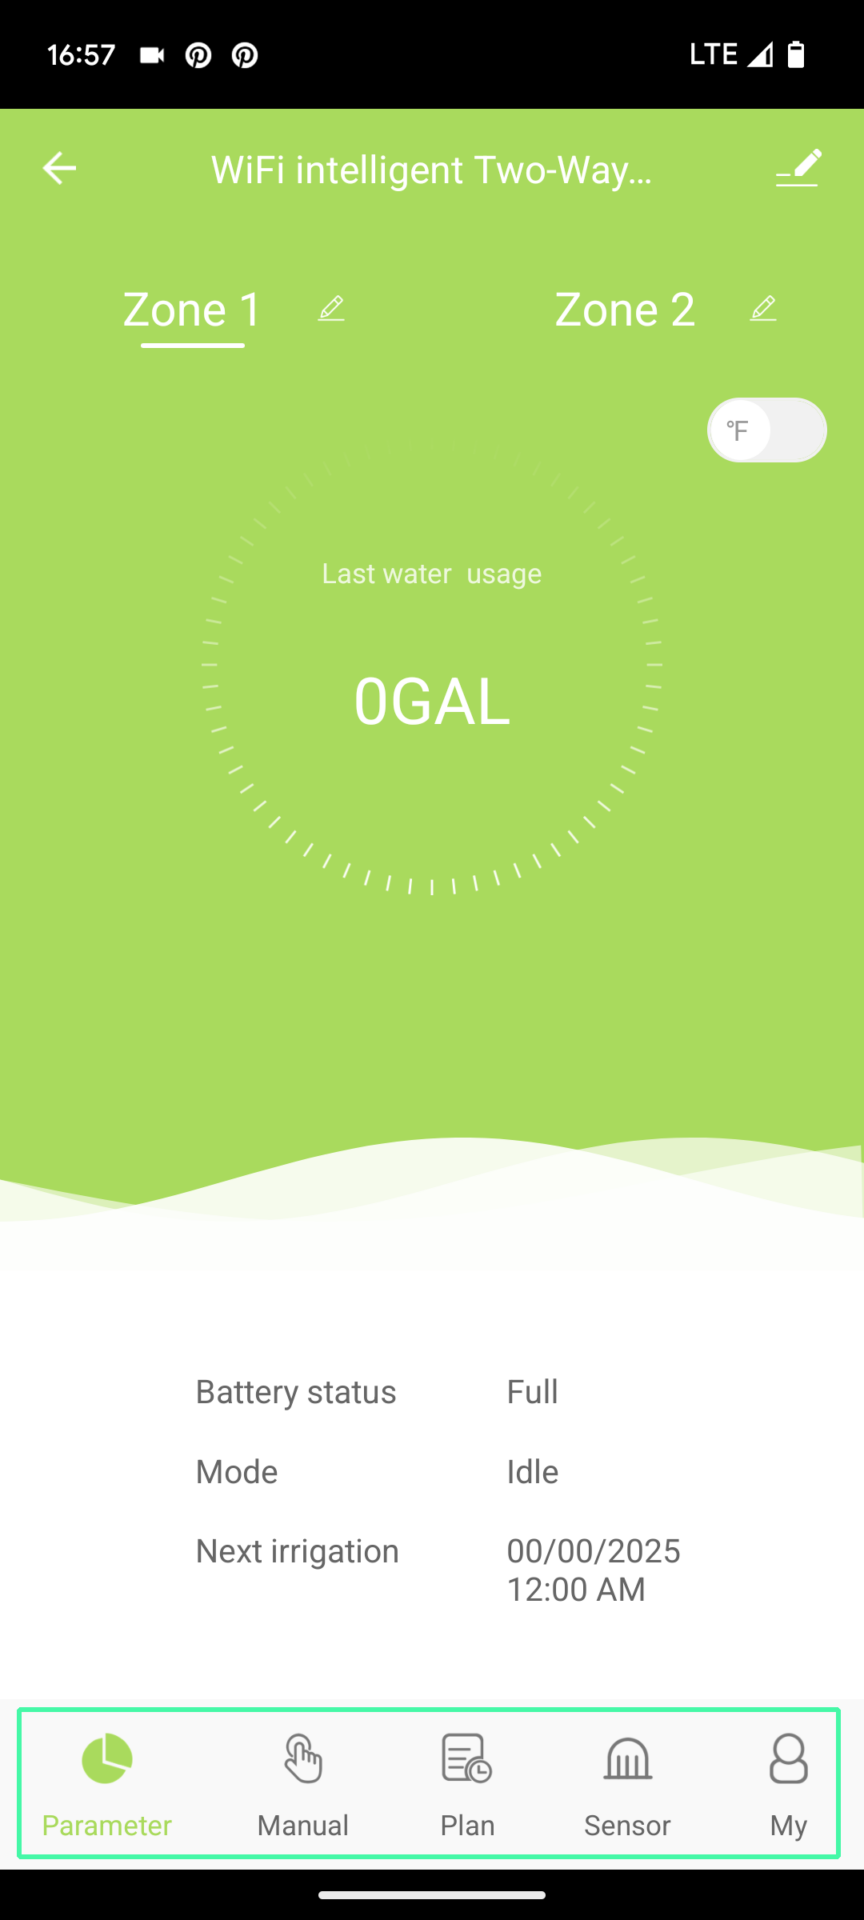
In the first part, I’ll show you the setting options available after clicking on the irrigation computer. You’ll be taken to a dedicated irrigation computer homepage, which in turn contains its own menu:
Home page of the irrigation computer menu
Here you can see an overview of the most recent and next scheduled watering cycles, as well as a separate menu with the following items:
Parameter (this is the irrigation computer start screen just shown)
Manual
Plan
Sensor
My
I’ll describe these items below.
The option to switch directly from degrees Celsius to Fahrenheit in the menu is rather unnecessary. However, this system runs through the entire app. Settings like these, which you either never or very rarely need, belong in the basic settings and not directly in the functions. This only makes the display confusing.
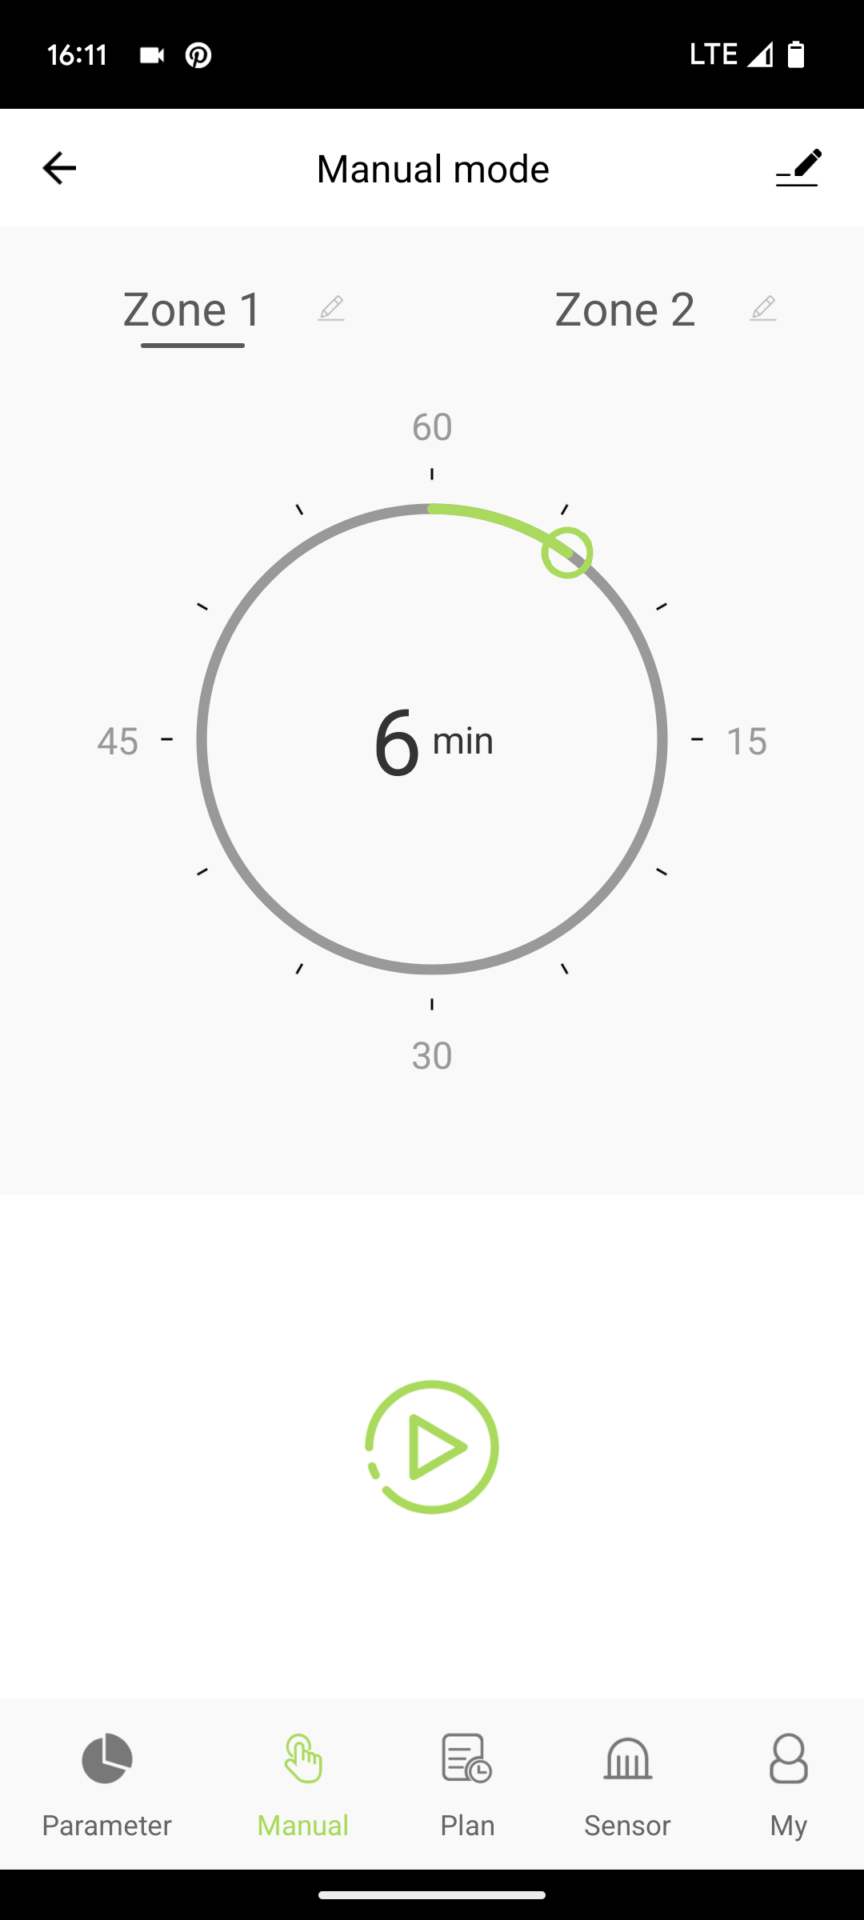
Manually start an irrigation run
This function is very simple: You set the duration in a circle (up to 60 minutes is possible), and clicking the play icon starts manual watering. Clicking it again allows you to stop it early. In my case, the water computer has two outputs, so the cycle can be started separately for Zone 1 and Zone 2.
Starting manual irrigation
Setting up an irrigation program
This is done in the Plan menu and at this point you will first see a program overview:
Irrigation plans are created from here
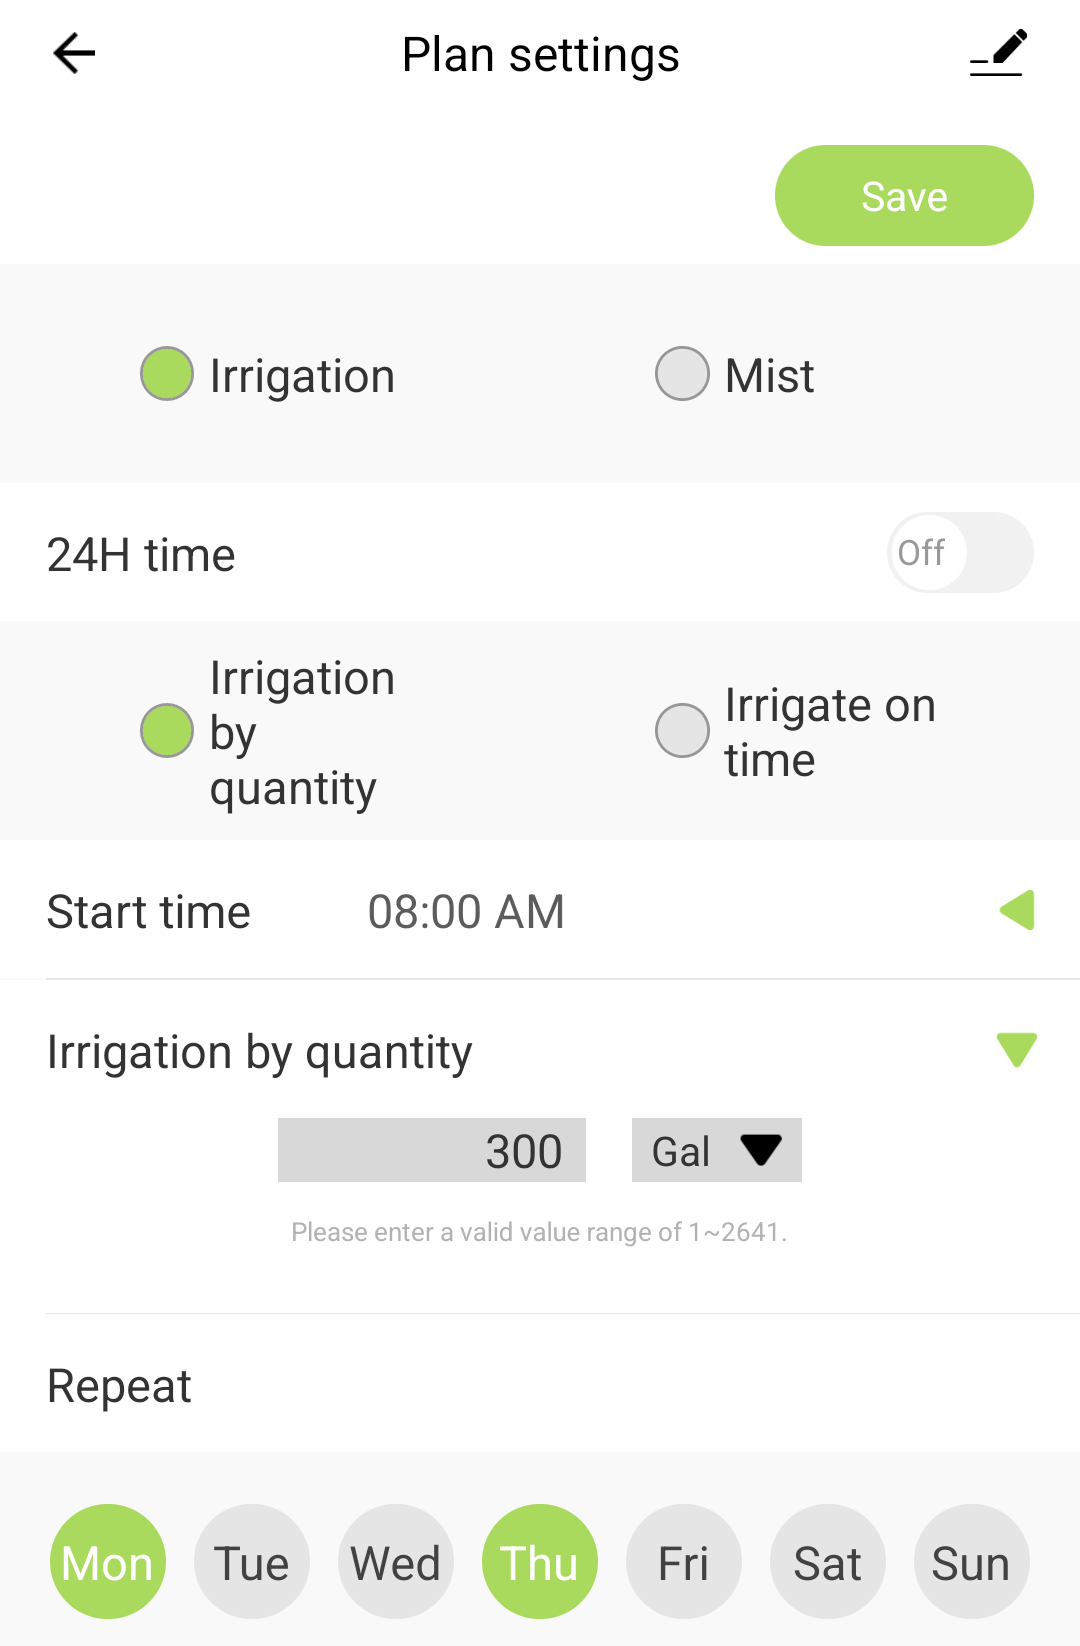
In this screenshot, no irrigation program has been created yet. To add one, click on Plan A, B, or C. The following options will open:
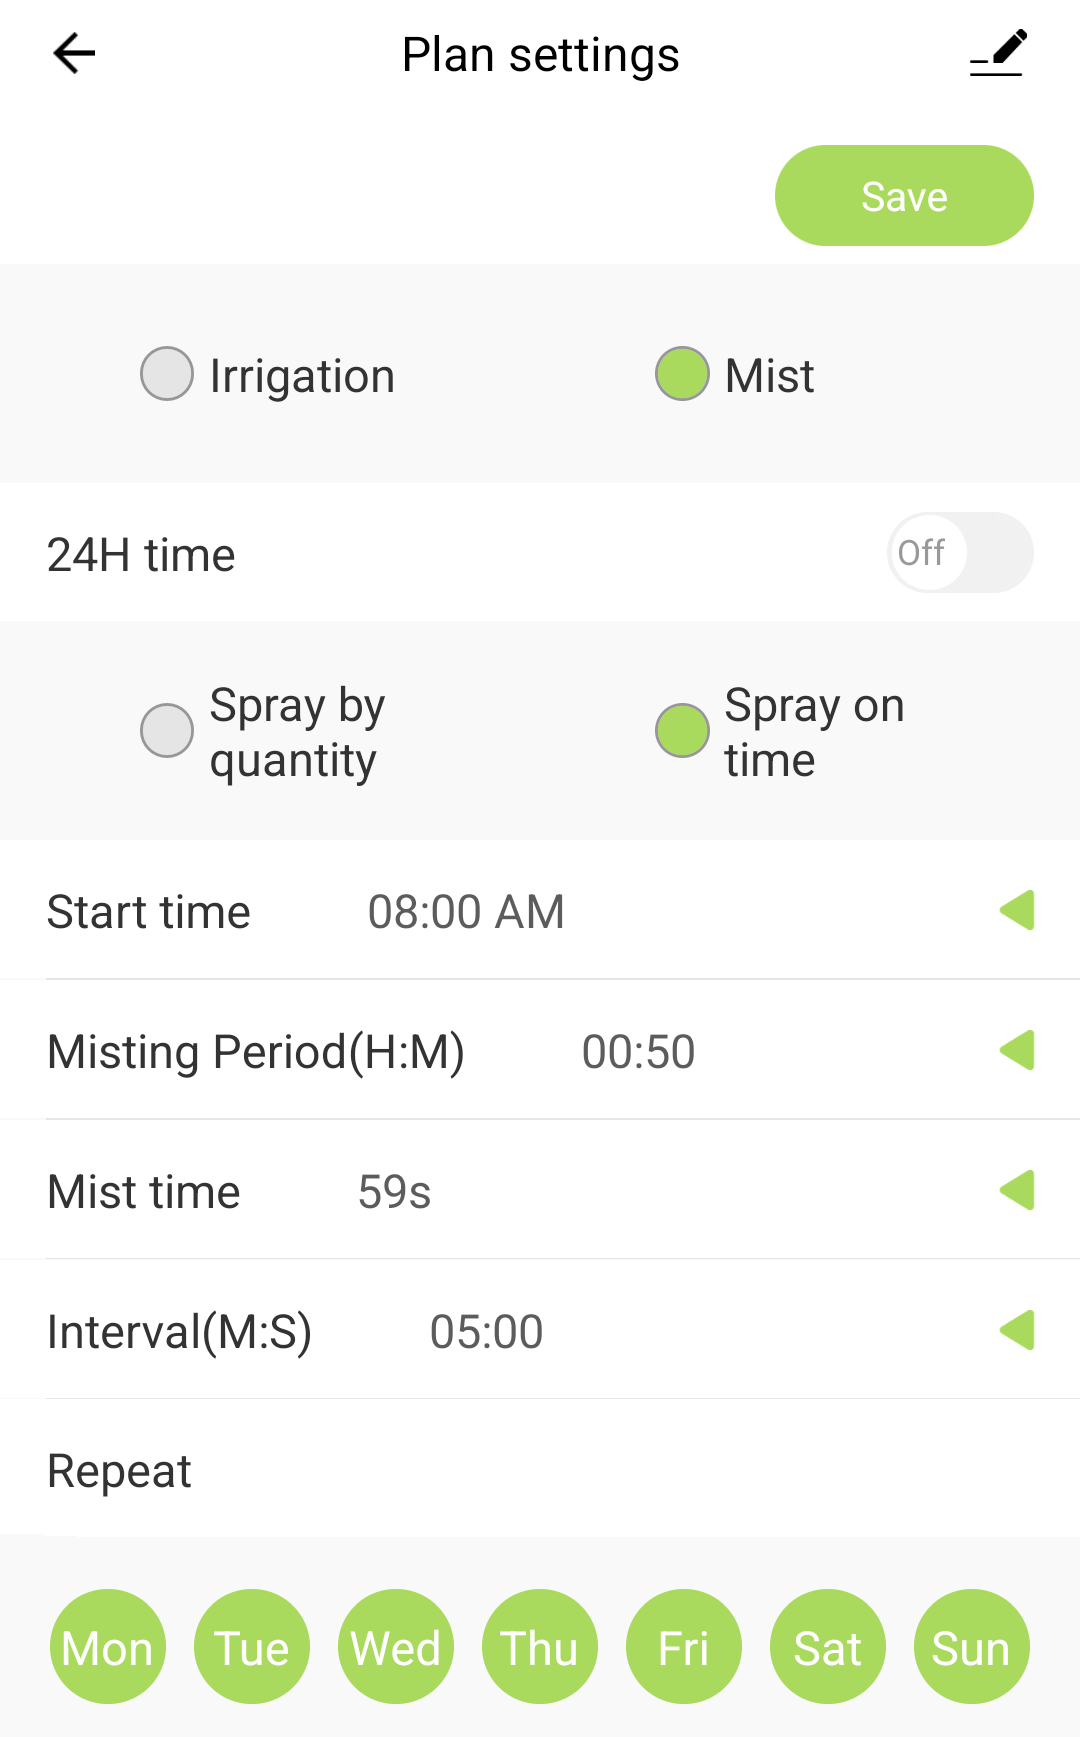
Mist settings
There are essentially four options here:
A regular irrigation schedule that waters at a specific start time on specific days for a specific duration.
The same, but without a specified duration. Instead, a specific number of gallons or liters is defined to be watered.
A cooling misting schedule for a specific duration on specific days (cooling misting = short spray irrigation intervals interspersed with breaks).
The same, but with a specific, specified amount of water.
The mist mode can be used for the typical cooling mist found in some coffee house gardens.
Mist settings
In addition to the start time, the three values of misting time, mist time, and interval must be defined. The misting time determines the length of time the cooling mist program should run; up to 12 hours is possible. The mist time determines how long the cooling mist should be generated continuously; up to 59 seconds is possible. And the interval defines how long to wait after a cooling mist is generated until the next cooling mist is generated. A maximum of 16 minutes is possible here.
A cycle and soak function, as known from other irrigation timers, which allows you to divide irrigation runs into multiple intervals to give the precipitation time to seep in, cannot be implemented with this option. The definable values are too narrow for this; an irrigation phase of a maximum of 59 seconds makes no sense for a typical application.
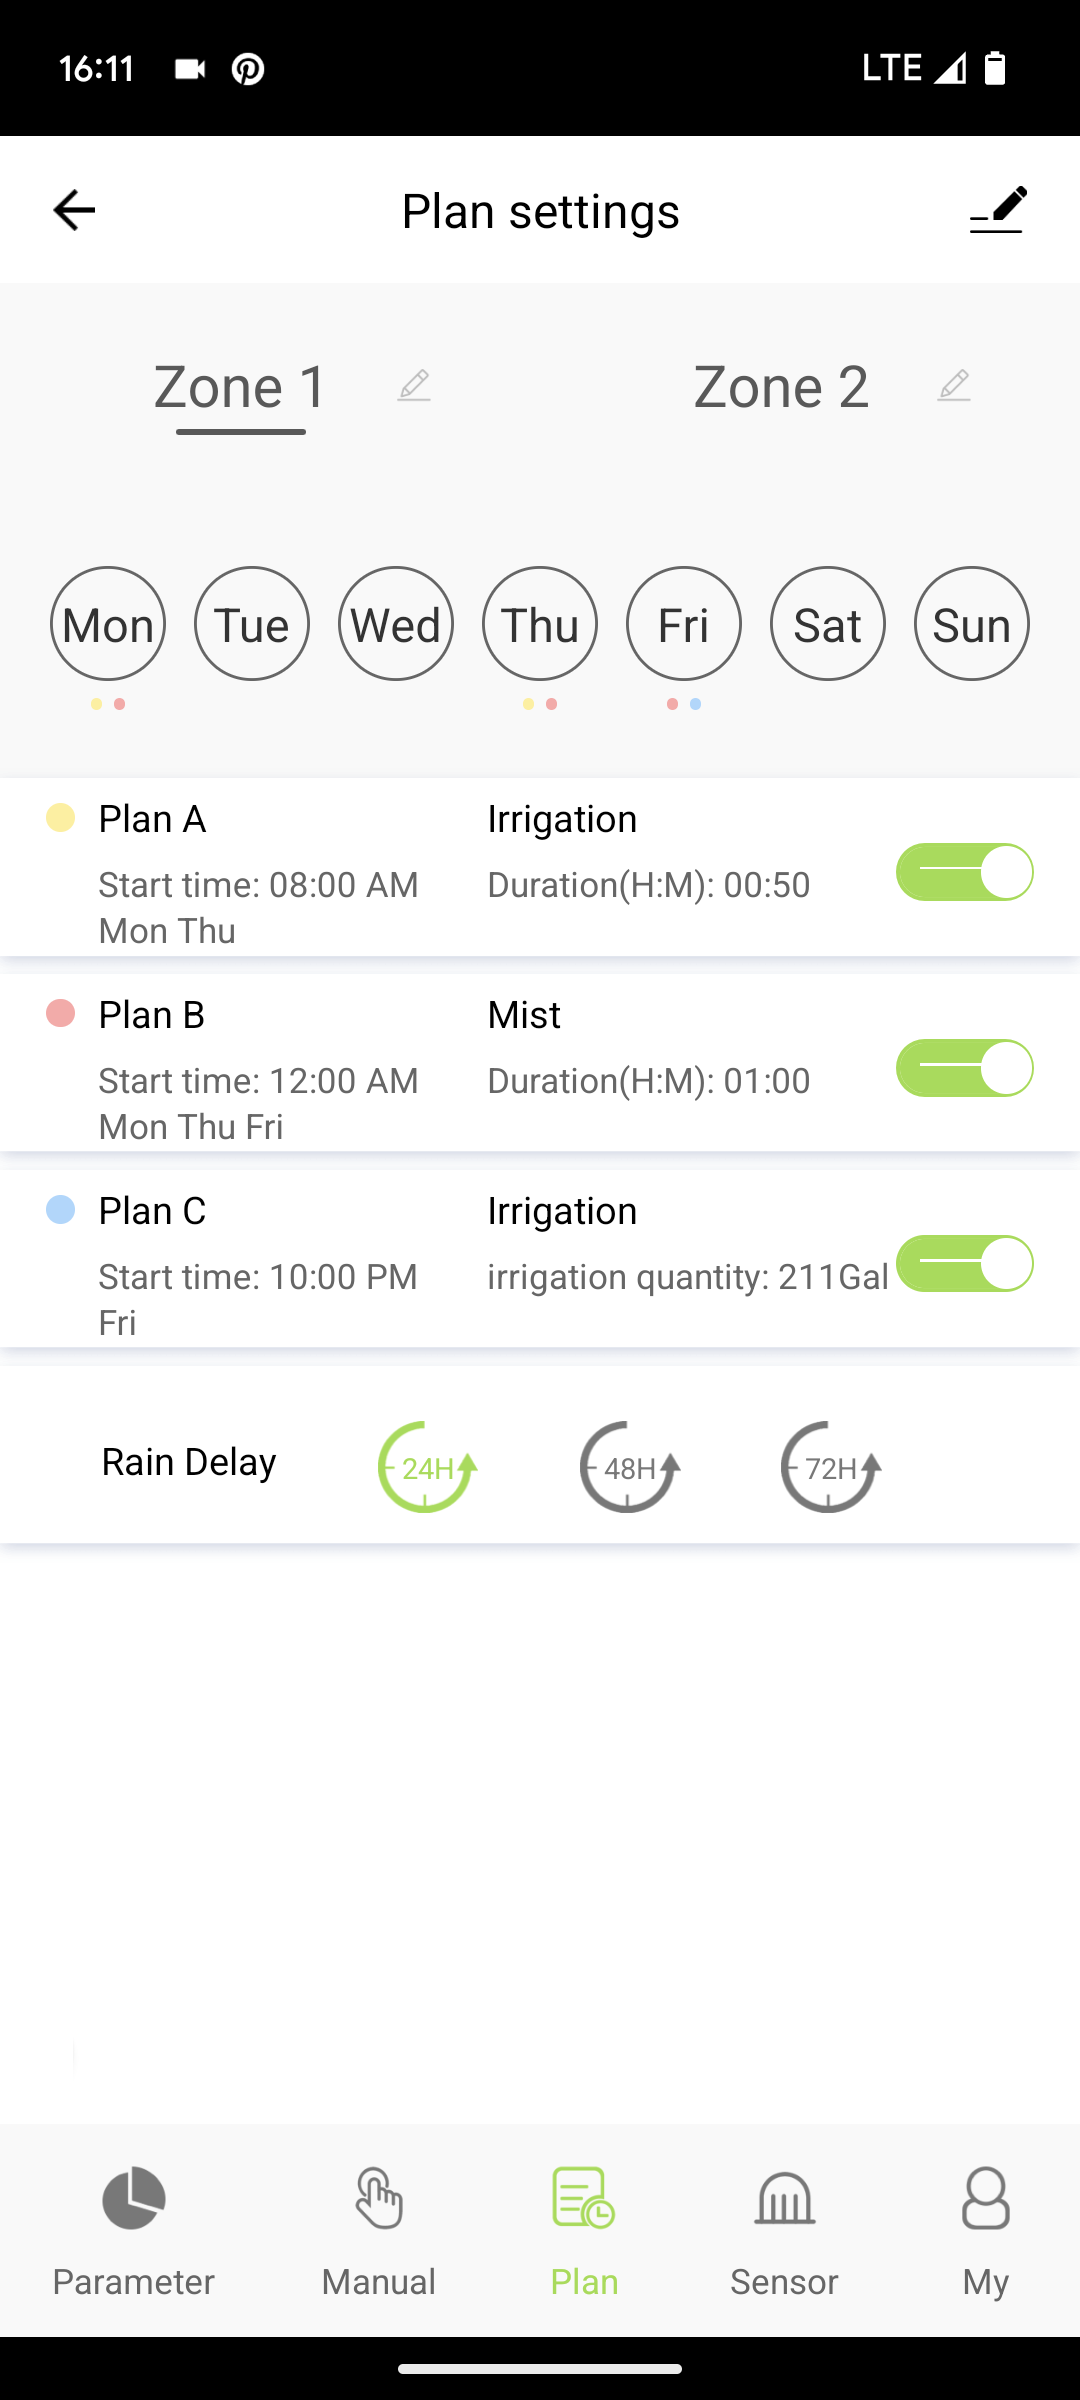
A plan overview with three created programs would then look like this, for example. The days on which the programs run are marked here with dots in the program color, the key data for the programs is listed and the green activated control indicates that the program is active.
Plan overview with 3 activated programs
Note: A limit of three programs is already very limited! Especially since these programs are relatively inflexible! Within a program, it’s not possible, for example, to set different start times or run times for different days of the week. Instead, you can only run the same program in the same way every day. And with only one start time per program! This is very limited compared to the competition and significantly limits your program design!
Rain Delay
In the schedule settings, you can also set a 24, 48, or 72-hour irrigation pause. This applies to all programs; it is not possible to set a separate time for each program.
Sensor
Under the “Sensor” menu item, you can activate an optionally available soil moisture sensor and view the soil moisture sensor’s measured values. Optionally, you can switch to water flow to see the amount of water applied.
Sensor menu
With the sensor activated, you also have additional options in the automation area (“Scene”) described below.
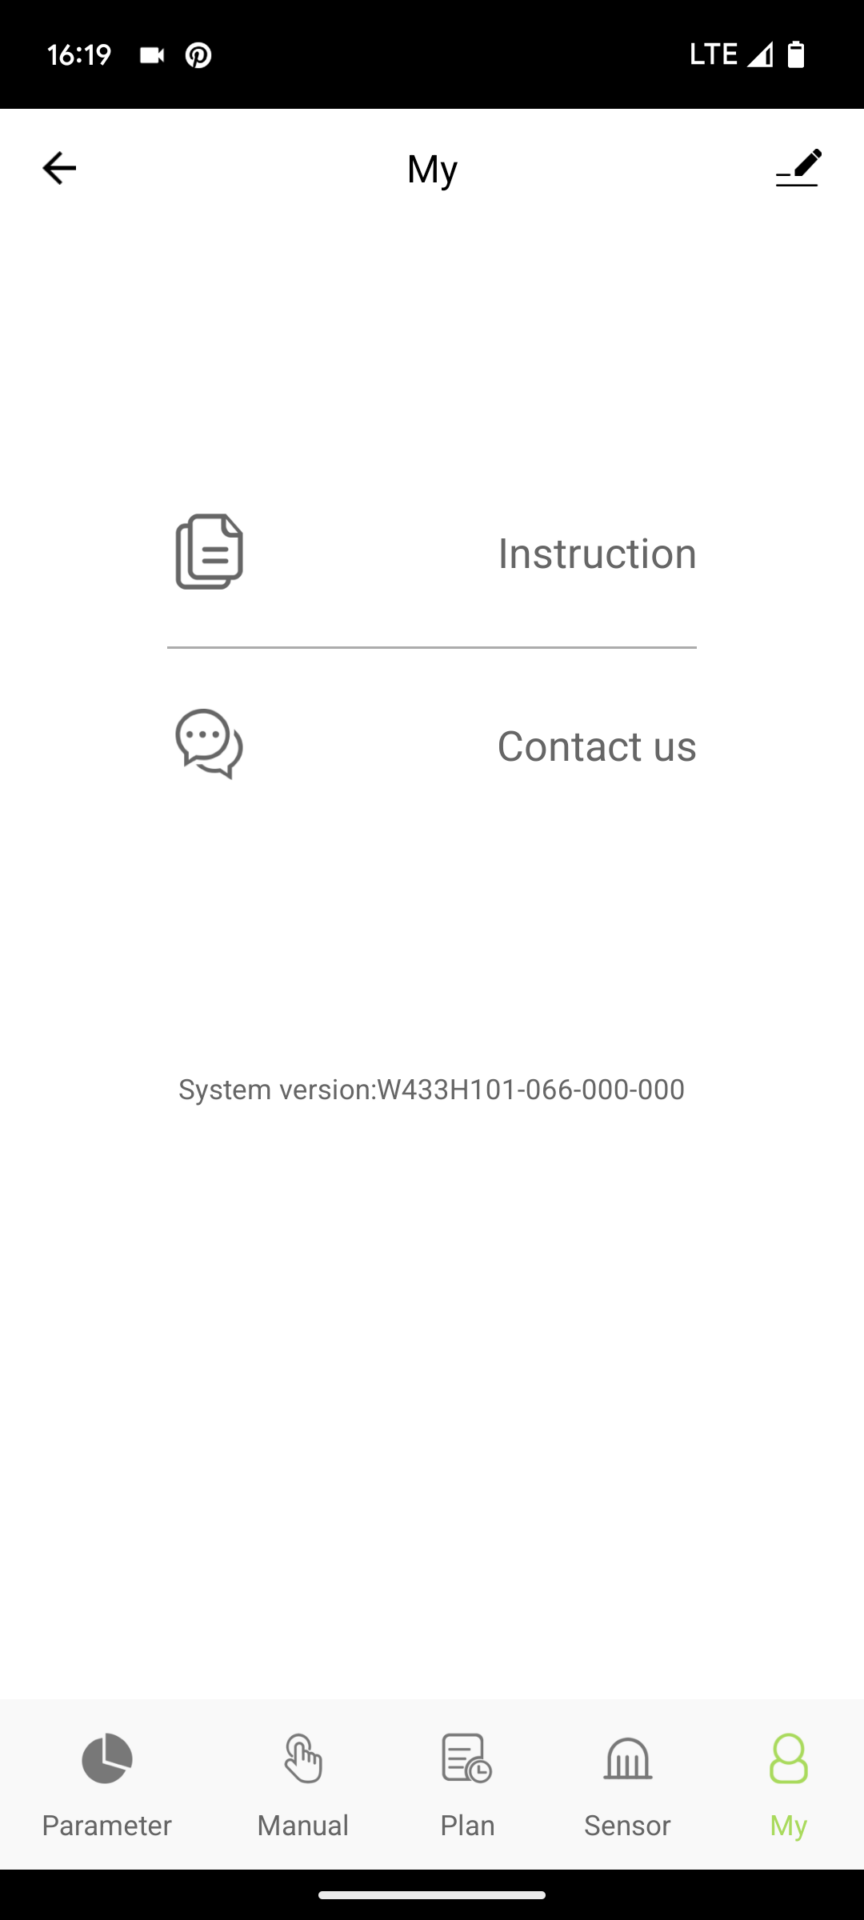
My
The last menu item in the irrigation computer menu doesn’t offer much insight at first glance: “Instruction” redirects you to product information on the RainPoint website, and “Contact us” redirects you to contact information on the RainPoint website. Both, however, are sloppily redirected to the Chinese language version, so you first have to find the correct language switch to get anything done.
My menu
You can access the essential settings by clicking on the pencil symbol in the top right corner:
And in this way calls up the following irrigation computer settings:
Irrigation computer settings
The following functions can be found here:
Connect with Amazon Alexa and Google Assistant
It’s also possible to control the watering computer via voice control using Amazon Alexa or Google Assistant. However, don’t expect miracles, as this is limited to the most essential functions. The connection itself is established via the Alexa or Google Assistant app. Detailed instructions on how to do this can be found under “Device Info.”
Device Information
Here you will only find a virtual ID of the device, which may be helpful in case of complaints or troubleshooting.
Automation
This button leads to the same automation options available in the Scene menu. Since I’ll describe these in detail below, and the Scene menu will usually be the place from which you access them, I won’t go into them further here.
Group devices
This can be useful if you have multiple devices stored in the app so that you can operate them all in a single step. However, in my example, with only one watering computer, this isn’t possible.
Give other people access
To grant another person access to the irrigation computer, they must first be added as a home member. This is done via an invitation in the global settings, see below.
Only after the person has accepted this invitation, also registered with RainPoint Tuya, and is added as a member of the home can they be granted access to the irrigation computer. To do this, simply enter the person’s account name and the name as it should appear in the app:
Give irrigation computer access to third parties
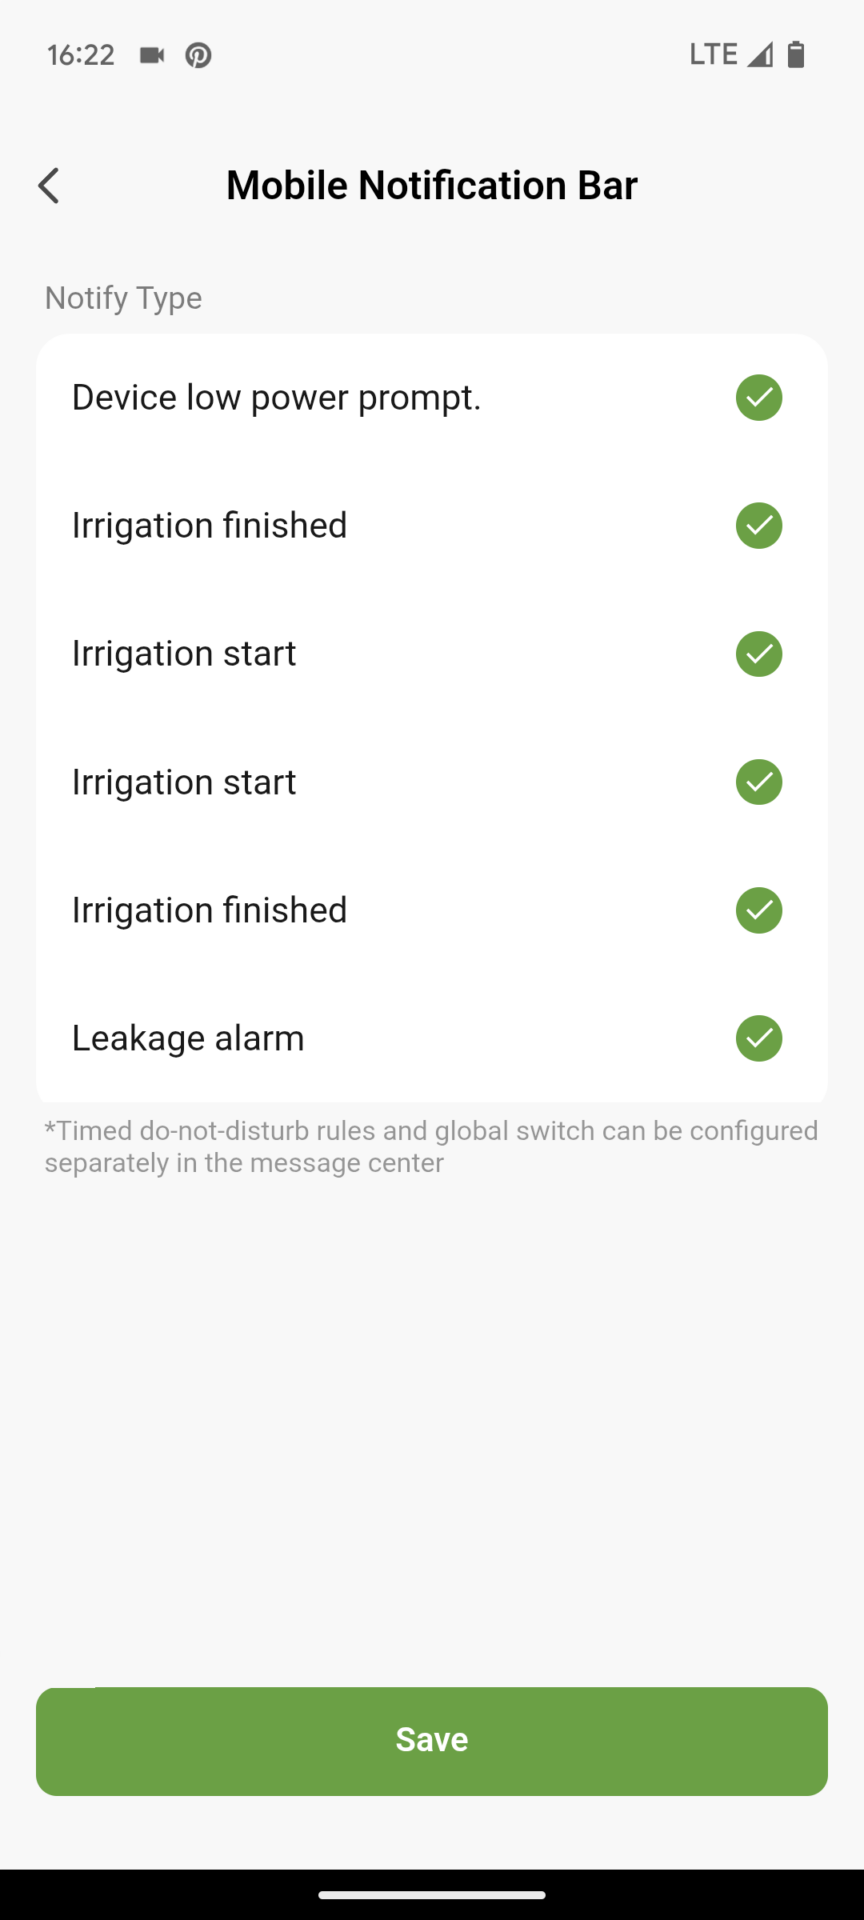
Automatic notifications
Automatic notifications can be activated for four events:
Low battery level
Irrigation has stopped
Irrigation has started
Leakage alarm
Unfortunately, there is no further information on how it works, which would be particularly relevant for the leakage alarm, which is supposed to notify you if the water computer doesn’t close properly.
Oddly, the software displays six different notification events instead of just four. Some of them are again poorly translated. This unfortunately confirms the very sloppy overall impression of the app.
Enable or disable notification for each event type
This activation/deactivation of notifications can be done independently for the app’s internal notification center, for push notifications on your mobile phone, and for SMS notifications. Unfortunately, SMS notifications are only available for an additional fee. Notification packages are offered within the app; for example, 200 SMS messages cost $12.99.
The real drawback: There is no notification option via email, which is usually standard in competitors’ apps!
Further automation of irrigation
“Further” because irrigation is already essentially automated with the system as an irrigation program. However, the “Scene” menu item also offers the option of making this automation dependent on additional conditions.
The automation menu appears to have been taken from the Tuya software, which is a very powerful, comprehensive automation software. This theoretically offers a multitude of possibilities, including in conjunction with other Thuya devices. However, this only works if these other devices are also stored in the app. Unfortunately, this multitude of theoretical possibilities makes the menu very confusing and unnecessarily complex for pure irrigation computer users who are not interested in comprehensive automation solutions.
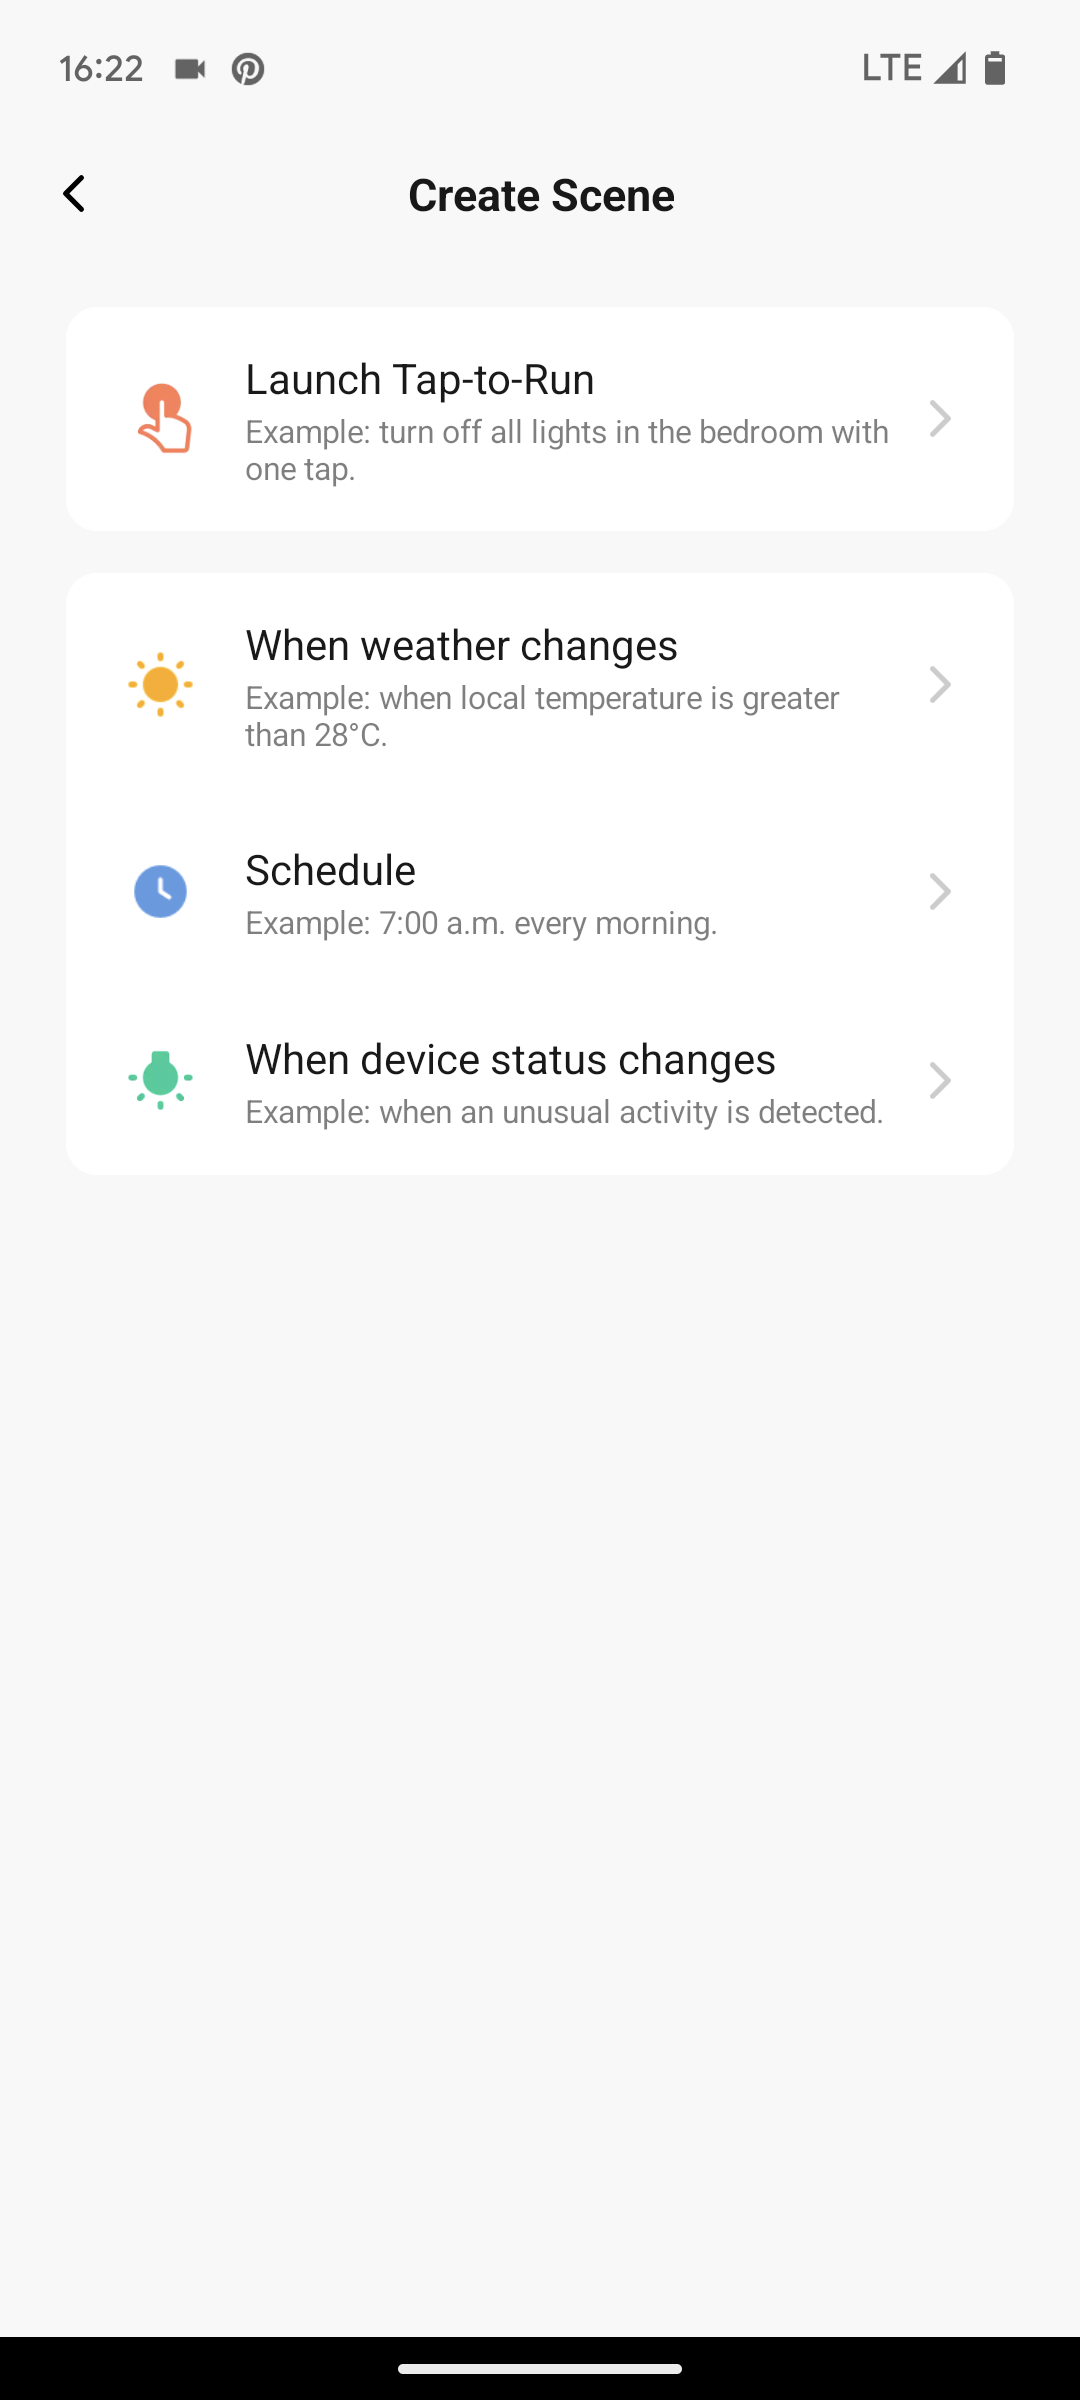
In terms of irrigation computer control, the weather control option is almost exclusively of interest. To use this, click on the plus symbol in the menu and then select the sub-item “When the weather changes.” You will then be asked which type of weather change should be taken into account:
Creating a scene
Select type of weather event
By selecting “Temperature,” you can define events based on the measured temperature (exceeding or falling below a certain temperature value). By selecting “Humidity,” you can define events based on the measured humidity (“Dry,” “Comfortable,” or “Humid”). By selecting “Weather,” you can define events based on the general weather situation (“Sunny,” “Cloudy,” “Rainy,” “Snowy,” or “Hazy”). By selecting “Wind Speed,” you can define events based on the measured wind speed (exceeding or falling below a certain value). By selecting “Sunset/Sunrise,” you can define events based on sunrise or sunset.
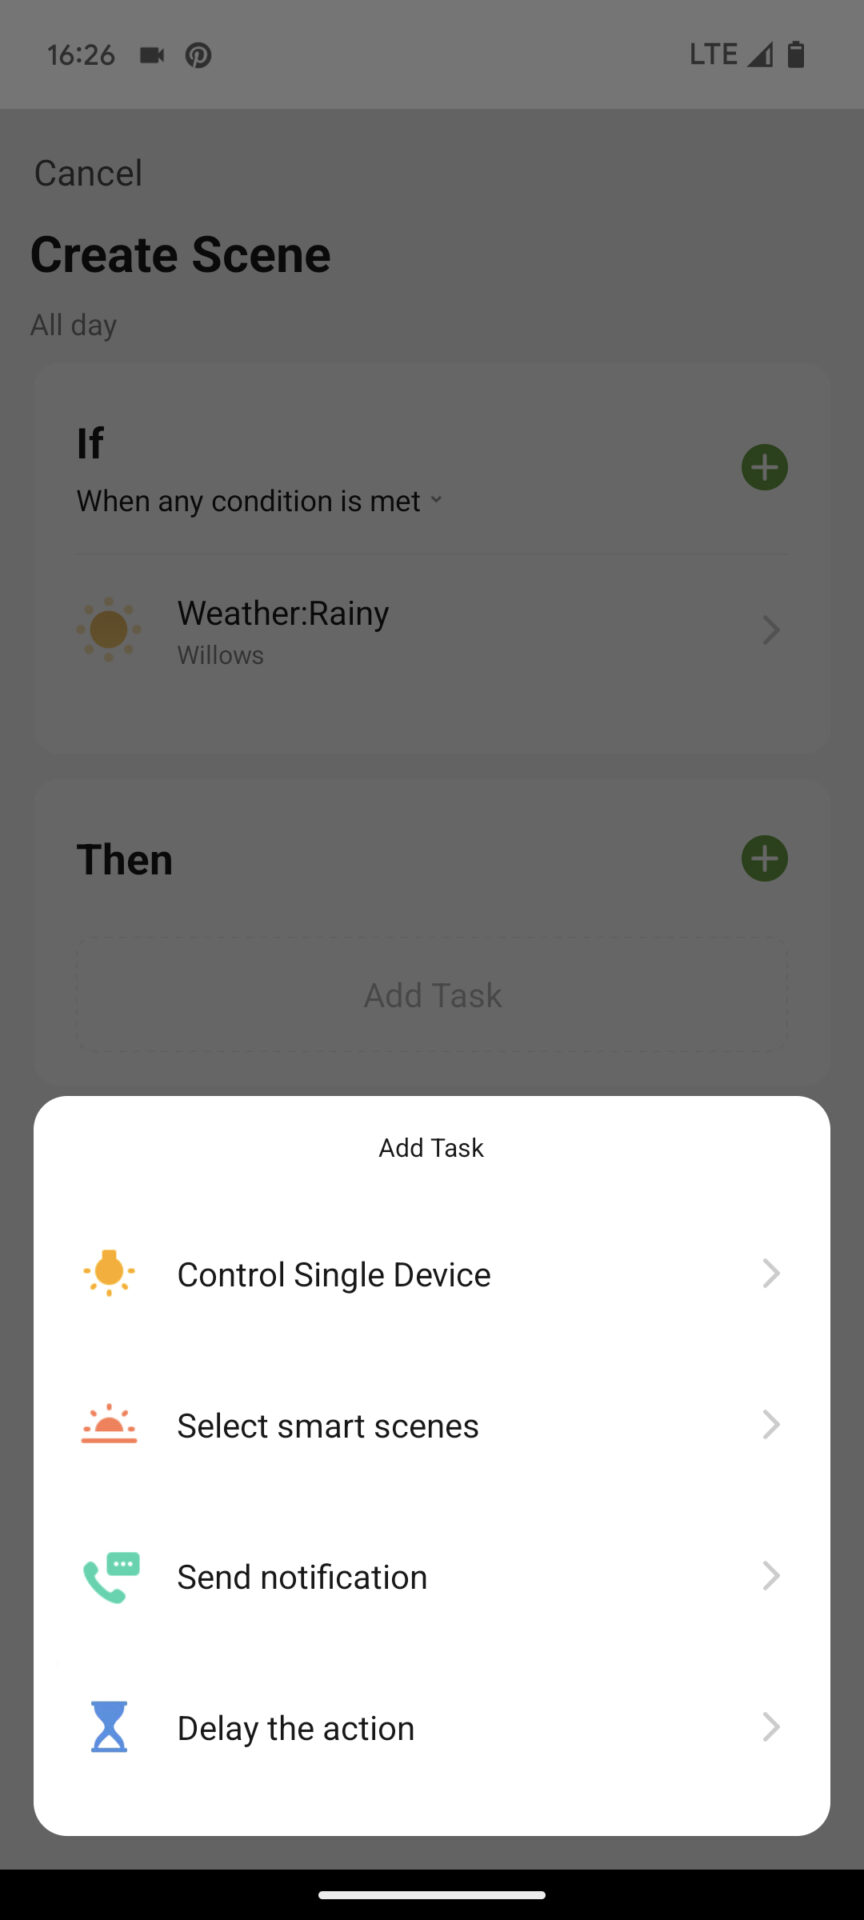
Once you have defined the condition—in this example, that the weather is rainy—you specify what should happen when the condition is met. To do this, click the plus symbol next to “Then”:
Determine what should happen when the condition is met
Now you can select the type of task you want to perform. For the average user, the “Control single device” option is particularly relevant, along with the “Send notification” option. The first option allows you to control the watering computer depending on the “If” condition; the second option allows you to receive a notification when the condition is met (either only in the app or via SMS, though SMS is only available for an additional fee). Below, I’ll show you the “Control single device” option:
Select task type
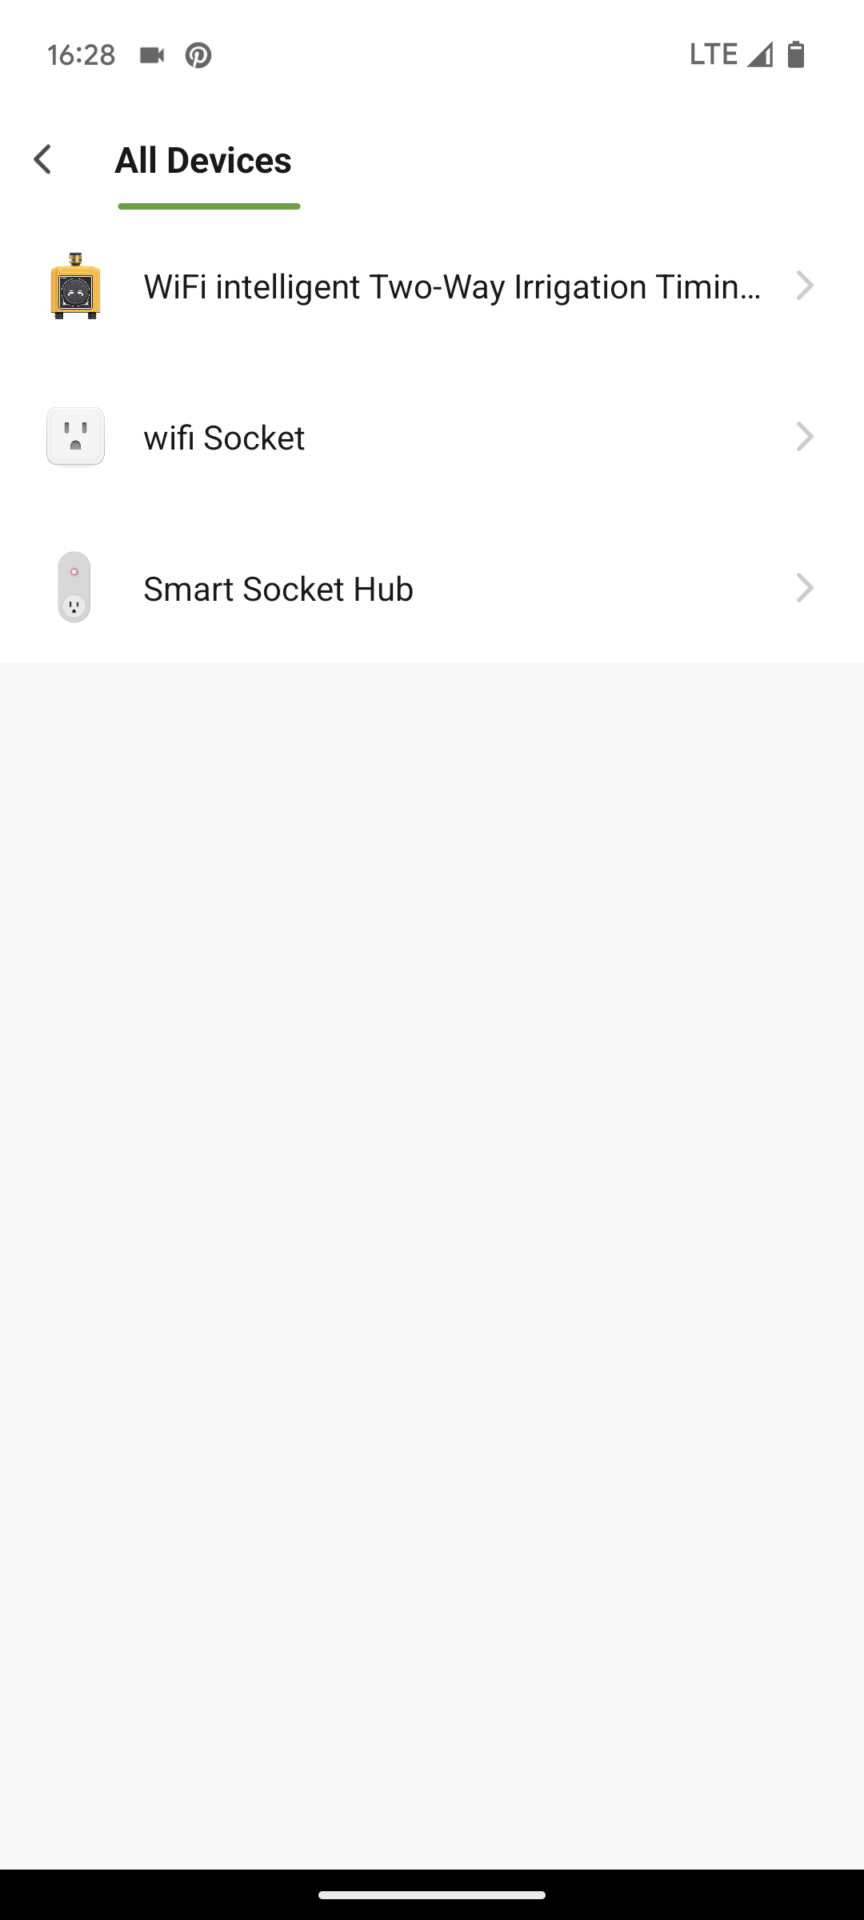
Select device for task
Selecting the device is trivial here, as there are hardly any options available. Actually, only the water computer itself is available, and theoretically, after selecting “Wifi Socket,” you could also turn the socket on the hub on or off in this way.
In this example, I select the water computer and am then given the option to choose from four control options:
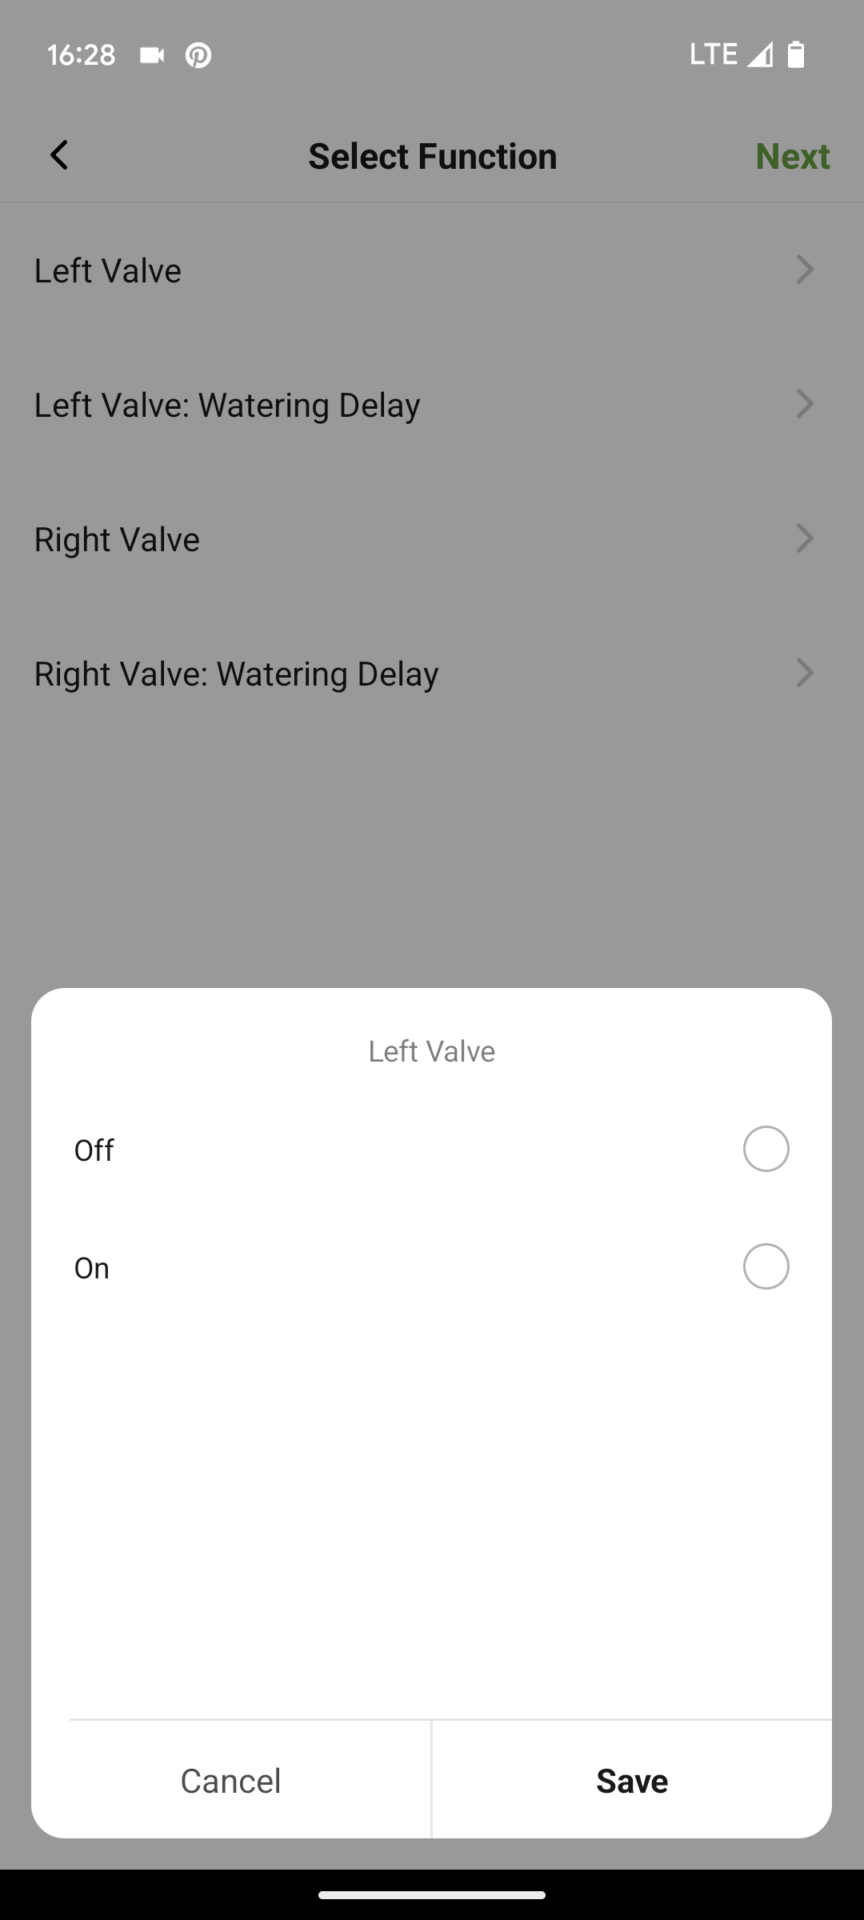
4 offered irrigation computer functionalities
Example: Turn the left valve on or off
Left Valve – Turns the left output of the computer on or off.
Left Valve: Watering Delay – Activates a 24, 48, or 72-hour watering pause for the left output of the computer.
Right Valve – Turns the right output of the computer on or off.
Right Valve: Watering Delay – Activates a 24, 48, or 72-hour watering pause for the right output.
Under the “Precondition” heading, you could now define additional conditions that must be met for the task to be executed. For example, you could specify that a certain weather situation must coincide with a certain temperature for watering to be stopped or postponed.
You can also specify that the condition is only checked at specific times; by default, it is checked throughout the day.
A created scene would then look like this. In my example, one scene was defined for temperature (watering should not occur if the temperature is below 41 degrees Fahrenheit) and one for rain (watering should be paused for 24 hours during rainy weather).
Created scenes
Global Settings
The global settings can be found in the “Me” menu item on the home page:
Me menu
Unfortunately, this is unnecessarily confusing, so it takes a while to get an overview of the possible settings. You can do the following essential things here:
Give another person access to your home control system
This is a prerequisite for this person to also have access to the irrigation computer (as described above). To do this, select “Home Management” and then “My Home.” Under the “Add Member” link, you can invite the desired person via email, WhatsApp, SMS, etc. They will then receive a message with a code that must be entered into the app.
Notification History
Under “Message Center” you can track the notifications you have already received.
The actual global settings are well hidden behind the gear icon in the top right:
After clicking on it, you will come to the following menu, which contains the actual setting options:
Global Settings
The most important functions are described below.
Personal Information, Account and Security
Here you can enter a profile picture and name, as well as change your email address and login password.
Changing the Language and Temperature Unit
RainPoint is inconsistent here. Some of the units used in the app can be changed directly on the display, as described above. However, this does not apply to the temperature unit and the language; these can be changed here in the basic settings if necessary.
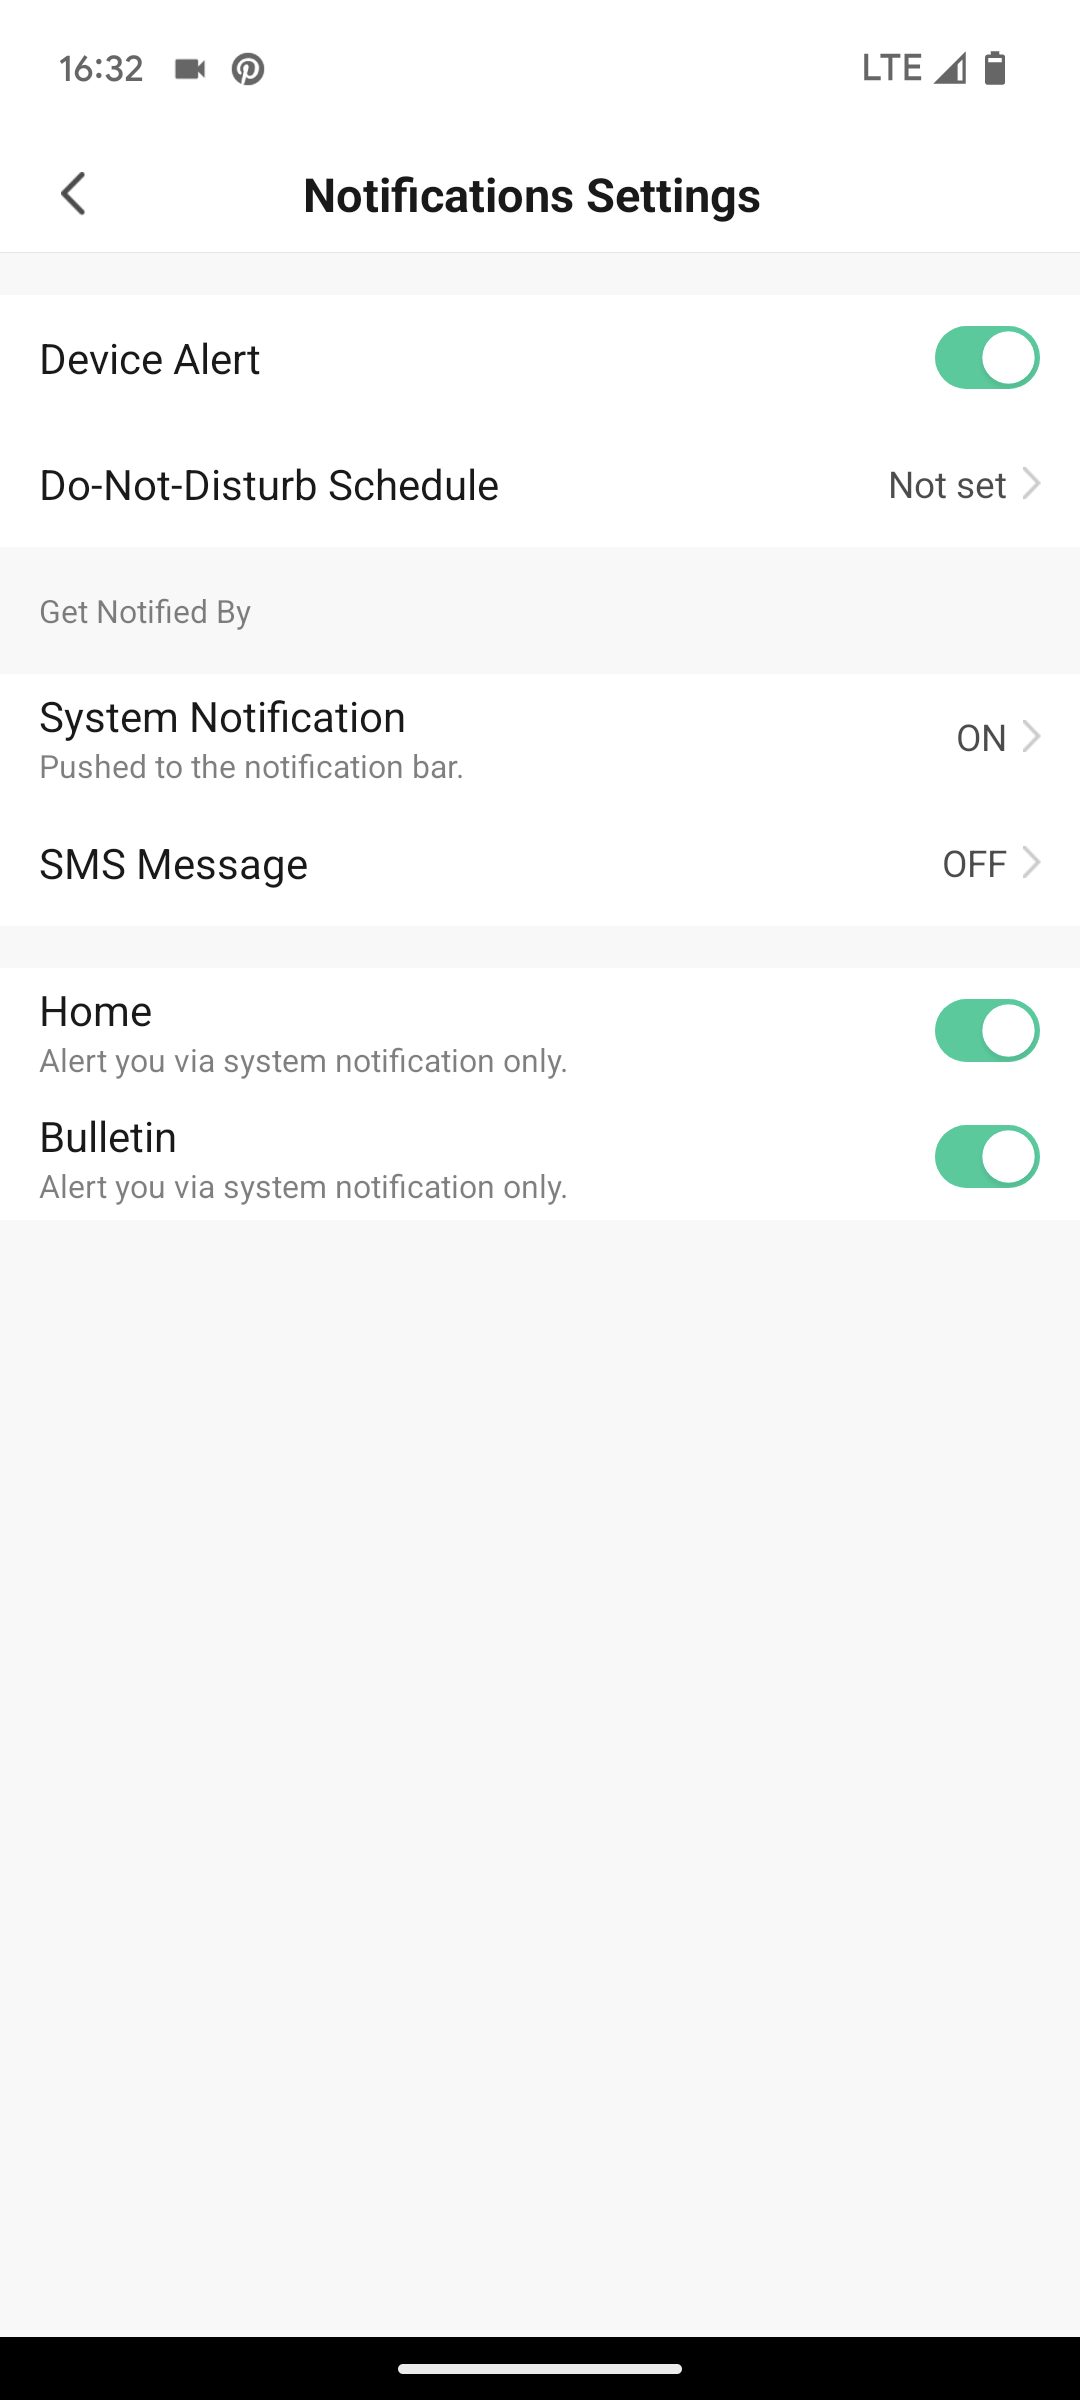
Notification Settings
Here you’ll find the important setting for receiving alerts not only as push notifications on your phone, but also via SMS to a specified phone number. As already mentioned, this unfortunately requires the purchase of paid SMS packages; email notifications are not available.
Global notification settings
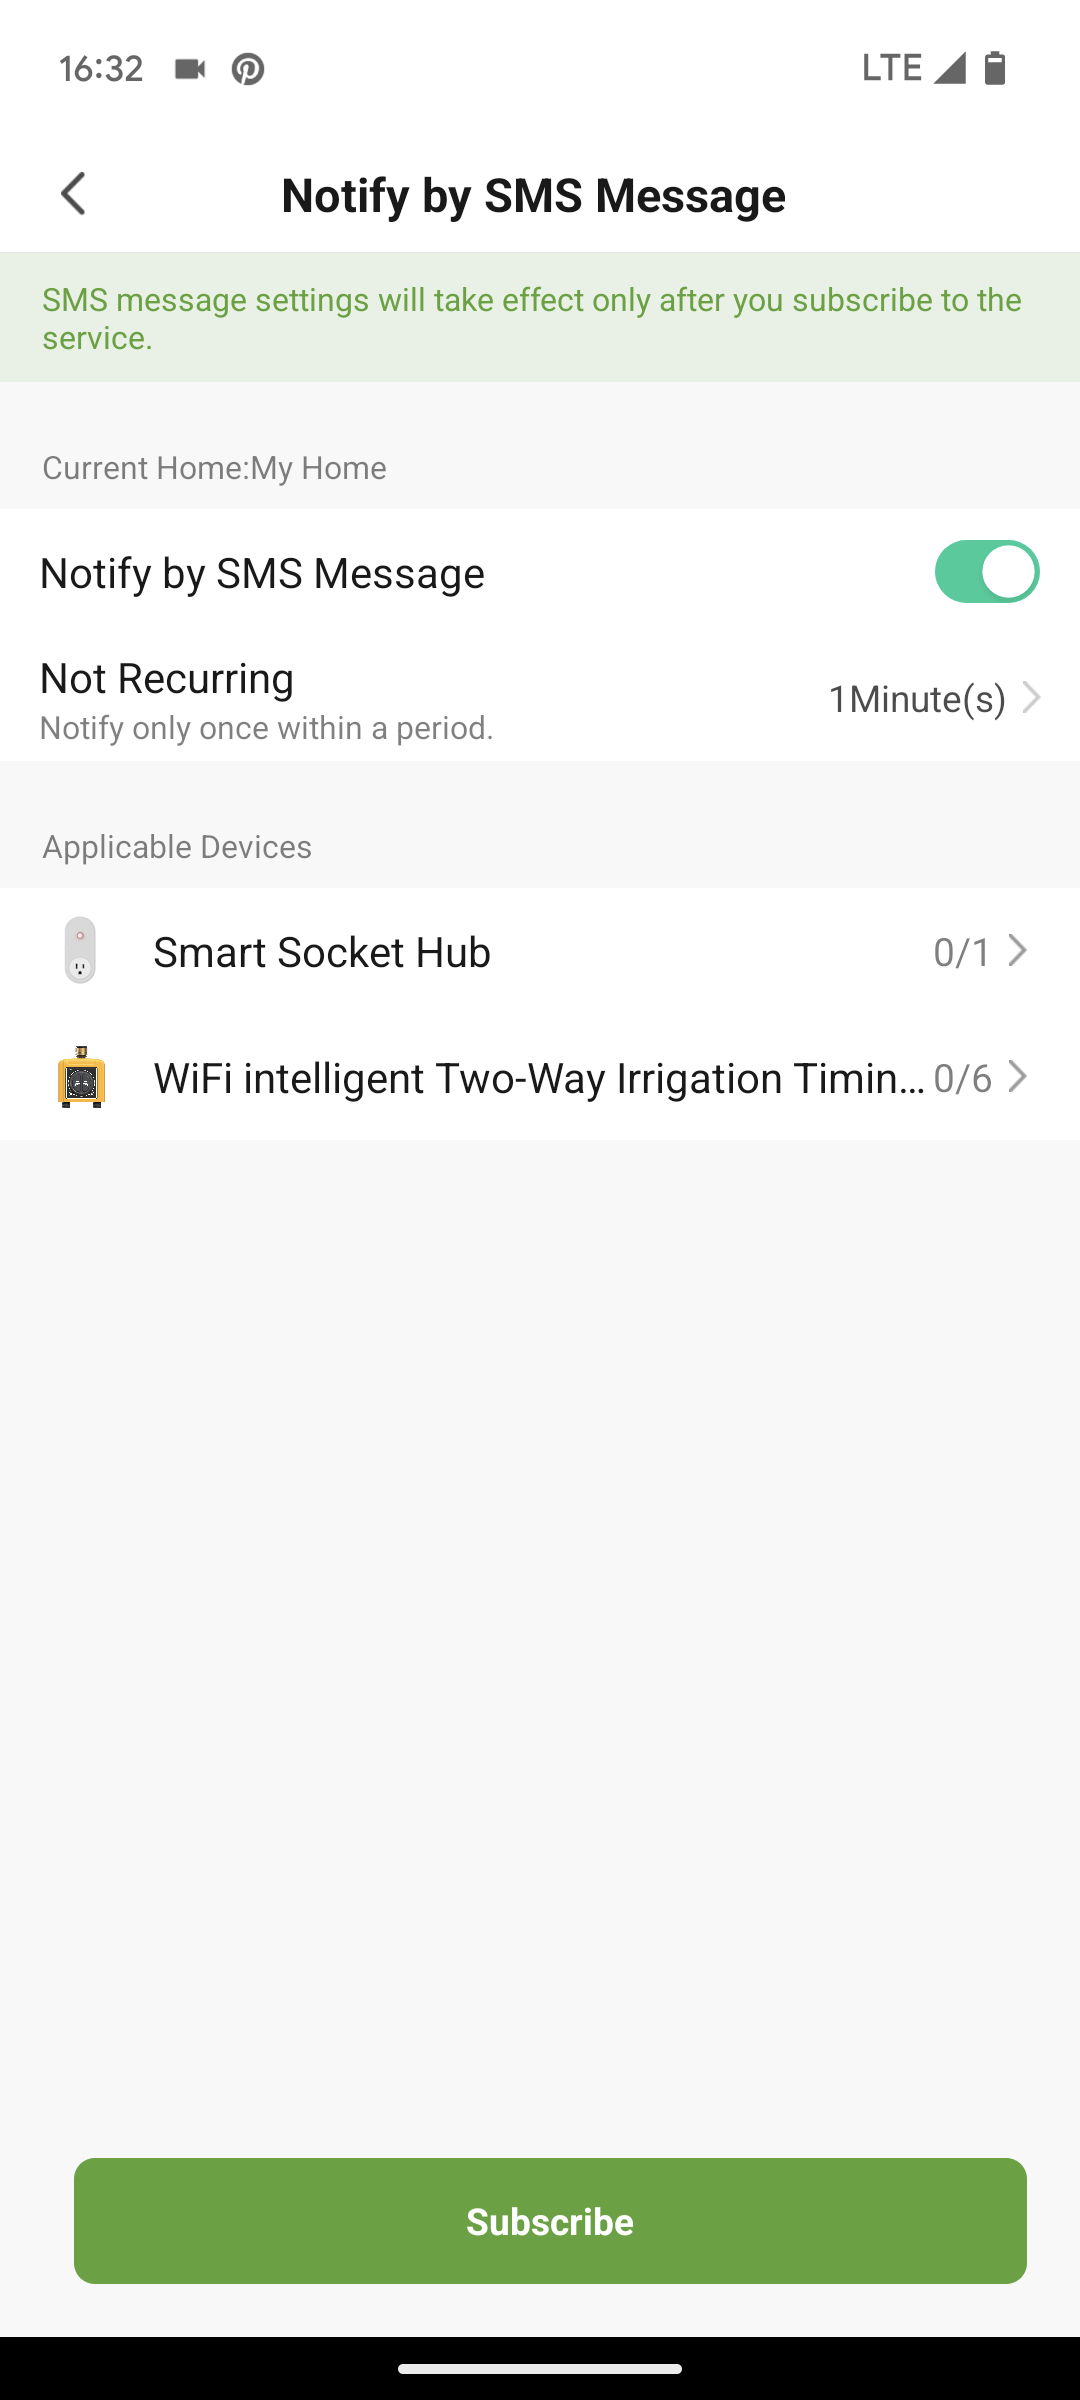
SMS settings
Privacy Settings
Here, you can specify which phone functions the app should have access to (e.g., location, camera, microphone), and the extent to which the app can collect data and suggest personalized products.
Interfaces
As mentioned above, integration with the Google Assistant and Amazon Alexa voice control systems is possible. Interaction with other products that use the Tuya standard is also possible, which could be particularly interesting if you want to integrate the irrigation computer into a more comprehensive smart home solution.
Conclusion and Recommendation
My impression of the RainPoint Tuya app is very mixed. The whole thing is theoretically quite powerful and might appeal to some smart home enthusiasts with a Tuya preference. However, if you’re simply looking for a standalone solution for a smart irrigation computer, you’ll have to unnecessarily struggle through the complexity of the software, which is also very illogical in places. Probably the most cluttered irrigation computer app I’ve tested so far; it takes some time to get used to it.
On the positive side, there’s the option for (limited) weather control. This distinguishes RainPoint Tuya from the second RainPoint app, HomGar, which doesn’t offer any weather control. Depending on the general weather conditions, temperature, humidity, and wind speed, you can pause or postpone irrigation. You can also receive notifications when a specific weather event occurs.
Unfortunately, the events are only so broadly defined that the weather control can only be influenced to a very limited extent. Instead of being able to adjust the irrigation program specifically based on a certain amount of rainfall in the past x hours or the next x hours, as with competing products, RainPoint Tuya can only refer to a general “rainy weather situation.” This is very poor and of limited use.
The lack of email alert notifications is also a major drawback. The same goes for the very limited options for setting up irrigation programs.
The RainPoint Tuya app is an alternative to RainPoint’s HomGar app if the (very limited) weather control or integration into the Tuya universe is very important to you. If you’re primarily looking for a simple remote control option for your irrigation computer so you can operate it while on vacation or on the go, then you’re better off choosing HomGar, which is a much more logical, clearer, and better-designed app. The third alternative from the RainPoint range also includes weather control (even slightly expanded), but is based on HomGar in terms of navigation, so RainPoint Home is currently the best of the RainPoint apps for me.
Compared to the apps of its best competitors, Hunter Hydrawise, LinkTap, and OpenSprinkler, all three RainPoint apps fall significantly short. These are simply much more sophisticated and offer much more functionality. So, if you value a truly sensible and well-functioning weather-dependent controller or things like automatic seasonal adjustment, proper monitoring of the computer for leaks, etc., then it’s better to research competitor products further! They cost more, but also offer significantly more!
Orbit B-hyve is also an alternative in the very affordable range. It’s only slightly more expensive than RainPoint, but has significantly more comprehensive and better software.
I don’t recommend the smart Gardena or Rain Bird computers as alternatives. These are significantly more expensive, but have very limited software that can’t keep up with the best products mentioned above. In that case, it’s better to go for the affordable RainPoint!
I am an enthusiastic do-it-yourselfer and have been running this blog on the subject of garden irrigation for more than 6 years now. In over 150 specialist articles, I share my own experiences and know-how from years of research and numerous product tests. -> More about me