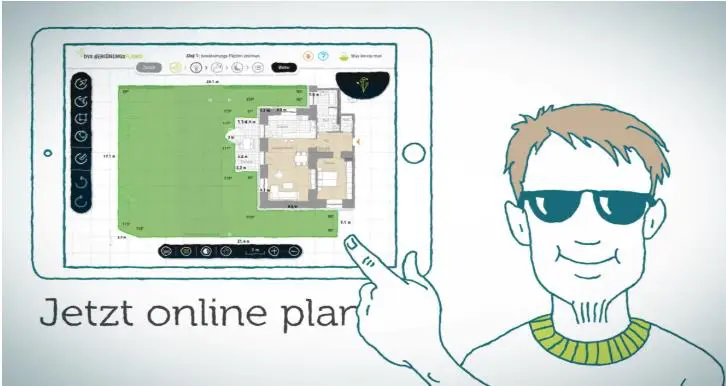
The range of online planning tools for planning your own garden irrigation is very small. For many years there was only one alternative for anyone who needed a free online tool to plan their garden irrigation: the myGarden planner from Gardena. Meanwhile there also exists a more poorly than well functioning planner from Orbit. Recently, the German company DVS Beregnung, an online shop for irrigation products, has offered a new alternative with the DVS irrigation planner. In this post, I explain how it works and why I recommend it as the best online irrigation planner currently available.
Gardena’s planning tool, the Gardena myGarden Planer, has been significantly improved in recent years and is now a solid tool, but the DVS Beregnung tool is a class better. Really a great tool for irrigation planning! Here, the specialist knowledge of irrigation experts has been very successfully mapped in a program, so that even a layman can plan a very professional irrigation.
Unfortunately, the program is currently only available in German, but with the following instructions it should be possible to use it even without German language skills and alternatively you can use the online translation for individual unclear terms. The DVS Planner uses the metric system, so users from the US and other countries that use the imperial system need to convert the measurements:
1 meter = 3.28 feet, 1 foot = 0.30 meters
1 liter = 0.26 gallons, 1 gallon = 3.78 liters
The application is no more difficult for the user than the Gardena program, but in the background the program automatically circumvents numerous potential problems and automatically takes important details into account. In addition, it is a great advantage that the DVS Beregnung tool selects irrigation for the planning from the best products available on the market from different manufacturers, whereas Gardena is limited to its own range. In my test comparisons, the automatic suggestion for sprinkler positioning was in many cases much more closely meshed and detailed than in the Gardena Tool, so that the optimum throwing circle overlap came quite close.
In addition, the program automatically ensures a matched precipitation rate (MPR) when setting the sprinklers. To do this, it uses the Hunter MP-Rotator sprinkler range, which has the MPR principle firmly integrated (see also the Hunter MP-Rotator sprinkler tip article). Alternatively, Rain Bird sprinklers can also be used. By suggesting the right bodies, the pressure regulation is automatically taken into account, so that all sprinklers in the pipeline receive the same pressure. In some constellations, the tool also automatically suggests laying a pressure-compensating pipeline circle in the pipeline. The control is professionally suggested with irrigation computers for valve control and solenoid valves and, if necessary, special requests such as the realization of a drinking water system and much more are also taken into account.
How does the DVS irrigation planer work?
The DVS irrigation planner is web-based, so it works without downloading it simply by calling it up in the web browser both on a stationary computer and on mobile devices. Free online registration with DVS Beregnung is required for use. When you create a new plan, you will automatically receive an e-mail with the direct web address of the plan. In this way, if you are interrupted while planning, you can conveniently call up the plan again at a later point in time and from any device and continue planning.
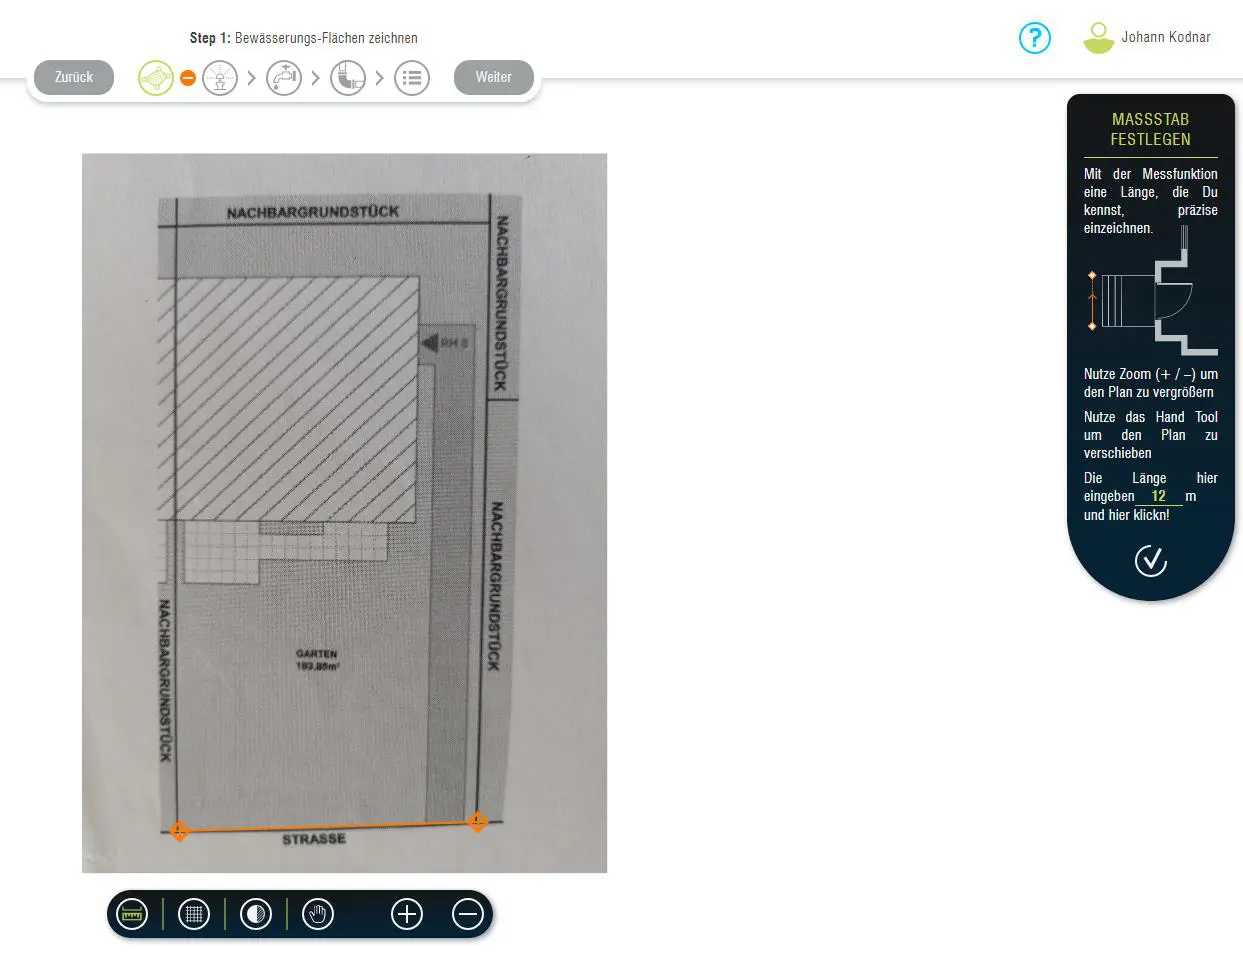
The planning takes place in 5 steps, which I present below. These steps must be carried out in the specified order. As soon as step 1 has been done correctly, the menu for the next step will unlock and you can switch to step 2. Going back to an earlier step to make corrections is always possible without any problems. The 5 steps are:
Draw a plan and determine which areas should and should not be watered
Place sprinklers
Determine water connection and planned control
Plan sectors and pipeline route
Check the shopping list and adjust it if necessary
Menus and Tools
These 5 steps and which of the steps you are currently in is displayed using the icon bar displayed in the middle at the top:
In the example shown you are still in the first menu “Draw plan” and cannot switch to the second step.
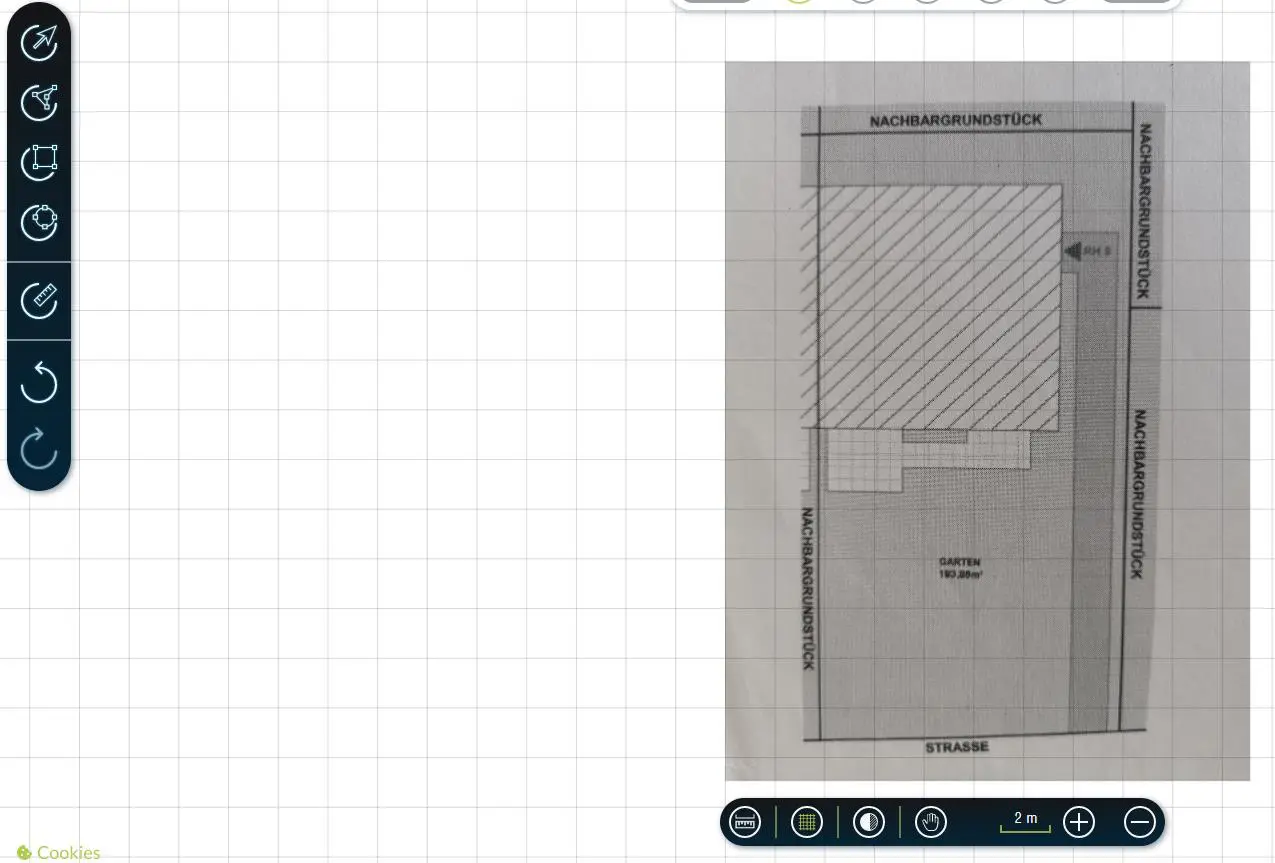
The usable tools are displayed in a toolbar on the left side of the planning software. These change depending on the currently selected menu item. Only the selection arrow symbol for marking objects and the circular arrow to the left or right (undo or redo the last action) are available across menus. This also applies to the button displayed in the middle below. The plan can be zoomed in or out by clicking on plus and minus, the square grid can be hidden with the grid symbol and the entire plan can be moved by activating the hand symbol. All very practical and intuitive to use.
When selecting an object, a properties window appears in some cases on the right-hand side, in which you can define additional properties for the object.
Additional properties can be defined for the sprinkling area created with the freehand tool in the menu on the right
Below is a description of the 5 steps to be carried out:
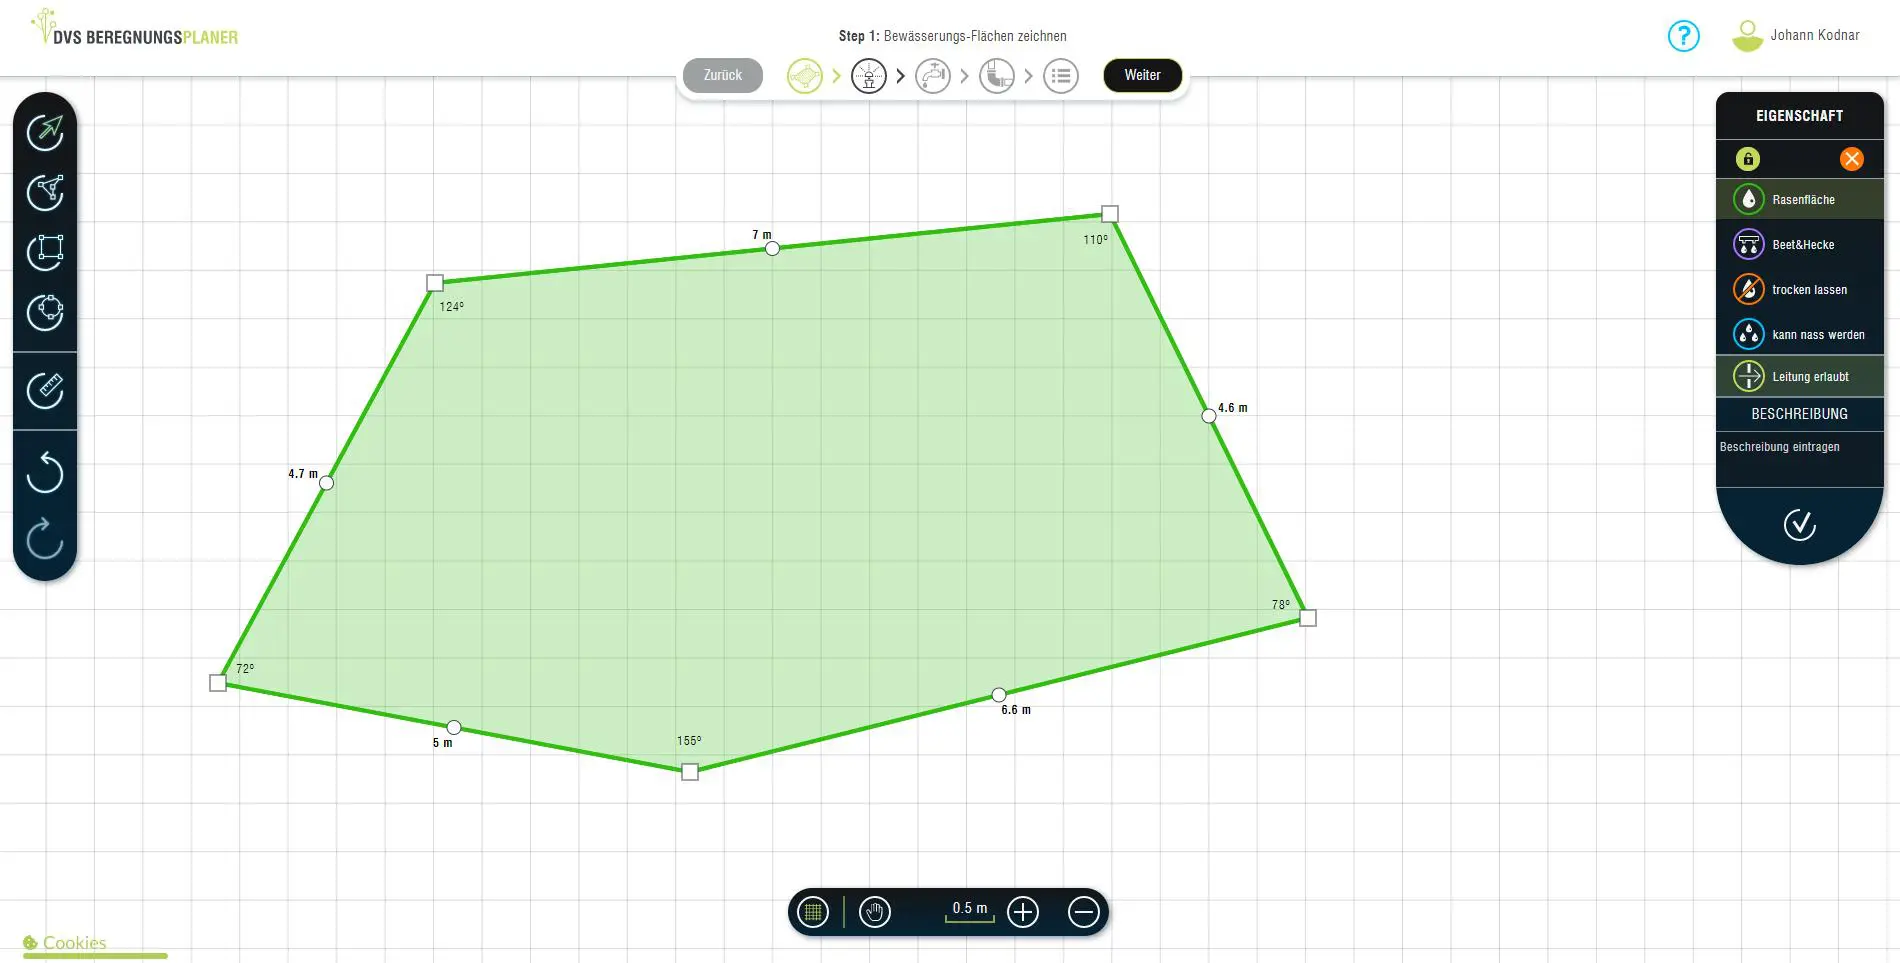
Planning step 1 – Drawing the plan and the areas to be irrigated
You can either start planning from a blank sheet of paper, or alternatively upload an existing garden plan as an image file. In both cases, the lawn area to be watered must be defined on the plan. However, it is a little easier with the uploaded plan, since you simply have to trace the relevant areas of the plan.
There are three options for drawing the surfaces:
Rectangle tool
Used to draw rectangular areas. A small square is added by selecting the tool and clicking on the drawing area. This is then changed by dragging the side lines to the required size.
Circle tool
This can be used to draw circular or oval areas.
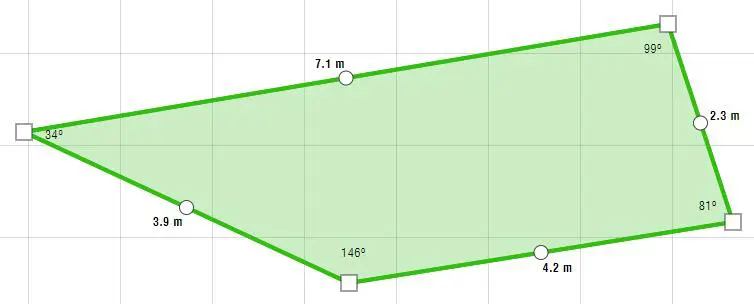
Free Shapes tool Allows drawing of irregular shapes. Each click adds a vertex. It should be noted that only as many corner points as necessary are to be set, otherwise setting the sprinklers will be unnecessarily complicated.
Example of a free shape drawing
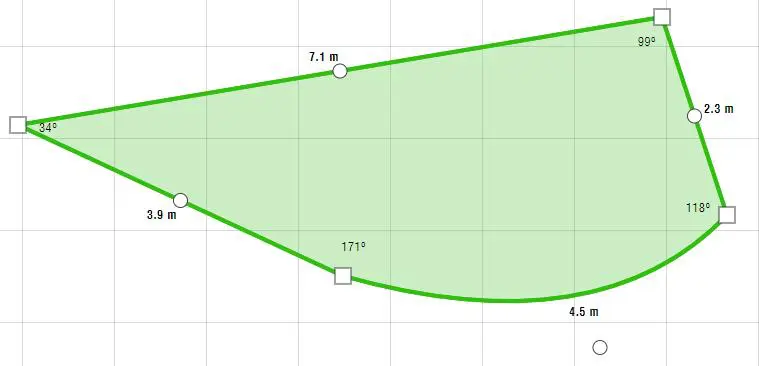
The set corner points are shown as squares. In addition, circles are displayed at the centers of the drawn straight lines. By clicking on one of these circles, the straight line can be modified into a curve. In the figure below, the straight line at the bottom right has been rounded.
Free shape with curve
For each drawn area you have to define what kind of area it is. By default, the program assumes a lawn area and that it is possible to lay pipeline under the area.
Properties of an area defined as a lawn area.
As an alternative to the lawn area, there are 3 other ways to define an area:
As a bed & hedge – for areas to be irrigated using micro-irrigation. The tool does not make a detailed sprinkler and pipeline plan for these, but calculates the material required for connection and water supply based on the number of square meters. A supply by means of a drip tube is always assumed here.
As an area that must remain dry – for sensitive areas that should under no circumstances be irrigated, e.g. the terrace.
As an area that can get wet – Defining as such as an area has the advantage that the irrigation planner can then, if necessary, rain minimally into these areas for optimal irrigation.. In contrast to the previously defined area type, where this is strictly avoided.
And for all 4 types of area, it must also be defined whether the pipeline may be routed through these areas. This option is enabled by default, so it must be disabled if required. For example, if an existing path does not allow you to lay pipes underneath.
Load an existing plan
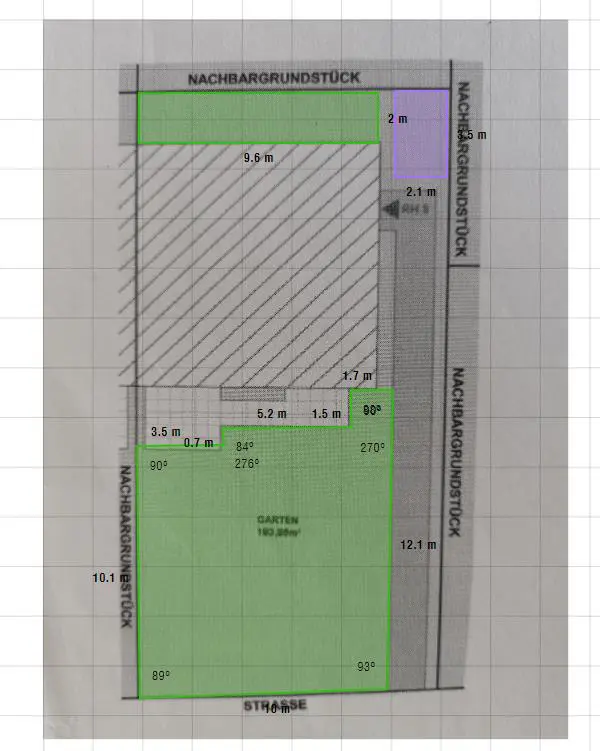
As an alternative to start with a blank sheet of paper, you can also load in an existing property plan. With the measuring tool you tell the system what scale the plan is on. To do this, you simply mark any straight line on the plan and tell the system how long it is.
Here the bottom side of the rectangular garden is marked with the Measure tool and told the system that it measures 12 meters (40 feet)
Based on the length entered, the system automatically calculates the scale of the plan and adds a grid. The plan is conveniently made transparent to a certain extent, so that you can see both the grid and the plan.
Measured plan underlaid with grid
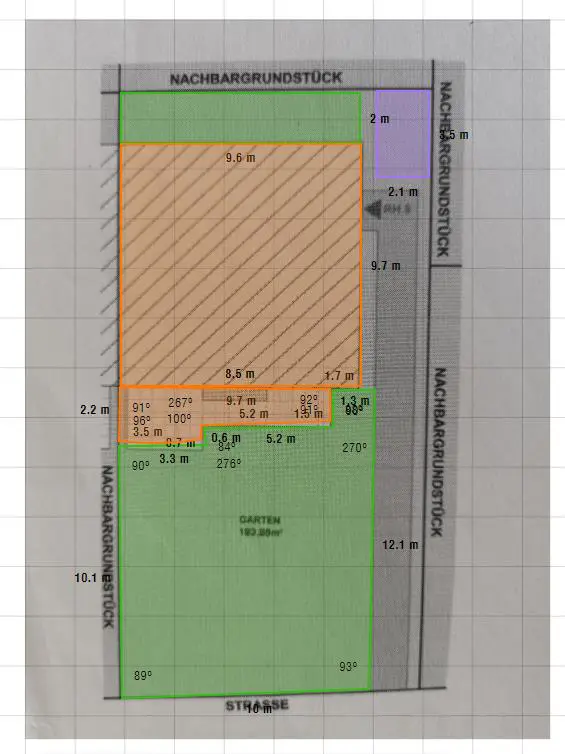
Everything else now works exactly the same as when you start from a blank sheet of paper. As described above, the first step is to define the areas to be irrigated. They are simply drawn on the plan here:
Large lawn area in front of the house with terrace, lawn strips behind the house and bed area to the right of it
Drawing the surfaces is very easy and fast with the drawing tools. I drew the lower part with the Freeform tool. The other two faces with the Rectangle Tool. The areas can be changed at any time after the first drawing, so if you have painted something wrong in some places, you can correct it without any problems. I leave the other positions blank. The system then assumes that a pipeline may be laid under them and that they may be minimally overlapped when sprinkling. If you don’t want that, then you have to explicitly define these as areas that have to remain dry or areas under which no pipeline is possible. In my example, this definitely applies to the house and the terrace in front of it, so I now mark this area as an area to be kept dry without a pipeline:
The house and terrace have now been marked as areas to be left out
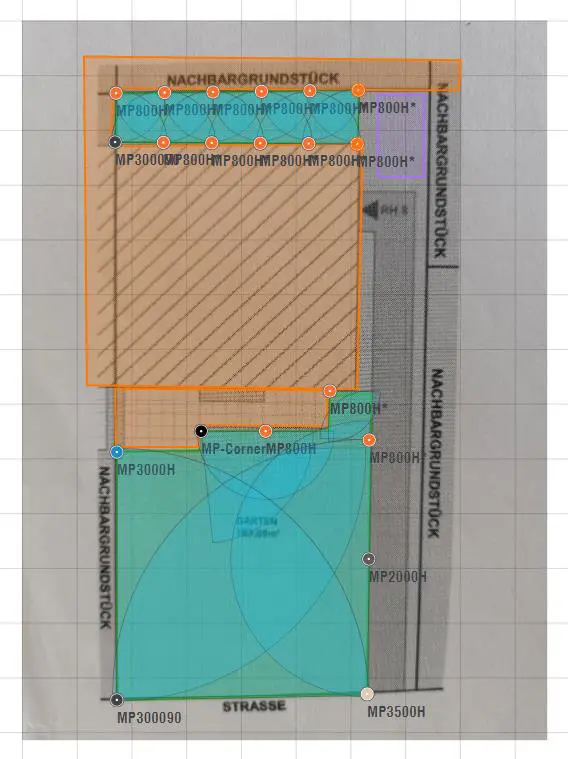
Finally, I mark the neighboring property in the upper area to the side of the lawn strip and above the lawn strip as an area that is taboo. I’m doing this because the water connection will subsequently be placed on the strip of lawn behind the house. Since the pipeline is always suggested to take the shortest route due to the automatic program, this suggestion would otherwise lead to the neighboring property instead of to the right of the house. So I encircle the lawn strip so that only the desired path remains possible. Theoretically, of course, you can also mark the entire neighboring property in this way, I have limited this to what is necessary here.
In addition, parts of the neighboring properties are now marked as not to be used
Now that the areas are drawn, it’s time to move on to the next step.
Planning step 2 – Place sprinklers
Like the Gardena planner, the DVS planner has an automatic feature that makes a suggestion for the placement of the sprinklers. This happens automatically when you switch to the sprinkler menu item. In my example case, the suggestion looks like this:
Suggestion for sprinkler placement created automatically by the system
The automatic is always based on the principles of the square pattern and tries to adhere to them as far as possible. In my example case you can see the square pattern in the upper stripe implemented textbook, in the lower larger lawn area this could not be 100% adhered to in all places for the automatic due to the more difficult shape, but the suggestion is still ok here. It is normal that the square pattern cannot be maintained 100% in all places. Even with professional manual planning, this is not always possible down to the last detail. From my point of view, however, a passable first proposal. Nevertheless, one should always be aware that it is a suggestion created by an algorithm. According to my previous experience with it, this is very sophisticated and the suggestions are actually always very useful. Nevertheless, in some cases there is still room or a need for manual improvements (see example below).
As written, no placement is suggested for the bed, since a drip hose is used here.
In some cases, this result can be very appropriate. In any case, you should check and control whether and to what extent the principle of the square pattern has been adhered to at all points and where you can still optimize. In any case, do not accept the suggestion as a given, but always question it critically and adapt it if necessary! If it doesn’t quite fit, you can easily use the tool to add additional sprinklers, remove suggested ones, or change the position or throw of the sprinklers. Very pleasant: The program automatically ensures a matched precipitation rate (MPR) based on the sprinkler selection, so that you no longer have to worry about it. The correct water pressure distribution is also automatically taken into account by selecting suitable pressure-regulating sprinkler bodies.
The following two tools are available for placing additional sprinklers:
Sprinkler
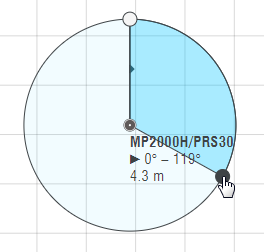
Used to place circular sprinklers. To do this, add the sprinkler to the desired location on the plan and use the mouse to increase/decrease the desired throw distance and the desired circle section. You don’t have to worry about the sprinkler type, the system automatically determines the appropriate sprinkler from the throw distance and circle section and also displays the name of the sprinkler model in real time. If you want to draw sections of a circle that cannot be irrigated by a sprinkler, the circle changes color and a warning message is displayed.
Throw distance and circular section of the circular sprinkler are changed by dragging the reference point. The appropriate pressure-regulating body is also listed for the sprinkler.
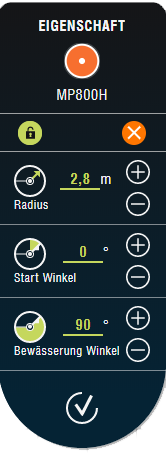
Alternatively, the sprinkler properties can also be defined via the properties window:
Sprinkler properties window
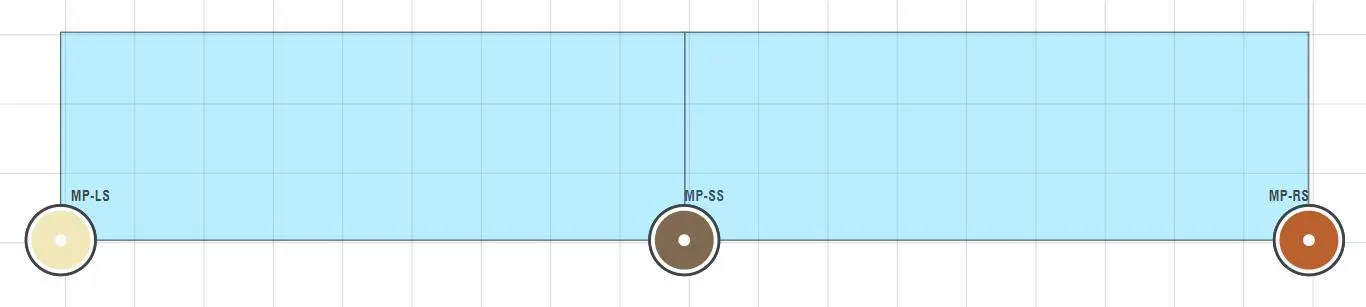
Strip Sprinkler
In addition to circular sprinklers, the program also includes the option of using strip sprinklers. These are used for irrigating narrow strips and irrigate almost rectangularly. They are not set automatically by the program, but can be set manually in special cases where they are needed. For this purpose, a combination of three sprinklers is always set, one in the middle, one on the left and one on the right. This principle is described in more detail here.
Example of strip irrigation: combination of 3 sprinklers, one in the middle, one on the left and one on the right
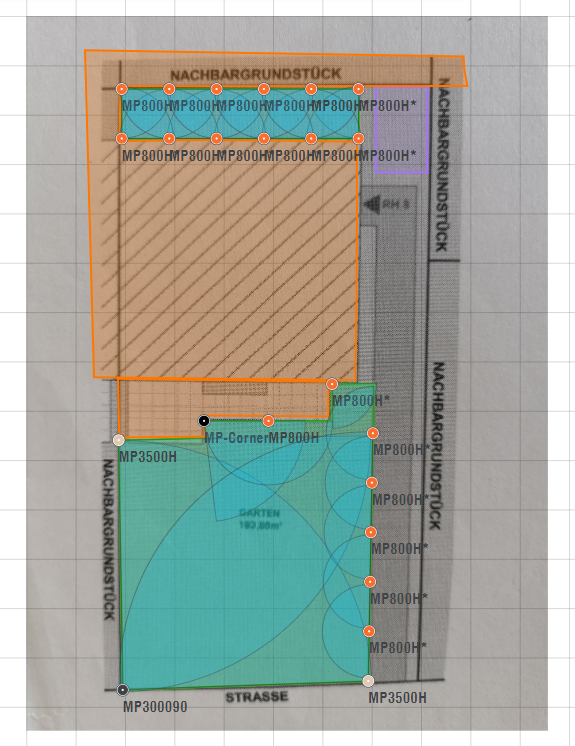
I have now critically reviewed the proposal created by the program. What I don’t like so much are the many MP 800 sprinklers on the lower lawn area on the right edge. These have a relatively short throw and the precipitation rate of the MP800 also differs from that of the other MP Rotator sprinklers. It doesn’t matter on the upper closed strip of lawn, but here on the larger lawn I would like to avoid it if possible. So I’m replacing four of the six MP 800 sprinklers on the right edge with a larger MP2000. This gives me a better overlap and the non-ideal situation with the different precipitation rates is mostly solved. I only leave the two MP800 in the corner, because you can’t get there with a larger sprinkler:
Manually adapted plan (4 small MP800 replaced by a larger MP2000)
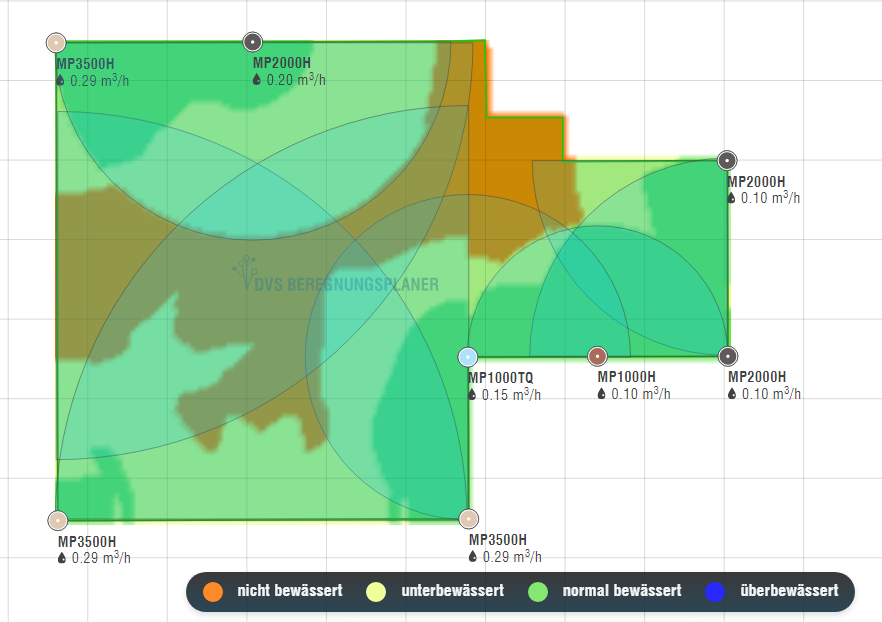
When setting the sprinklers, the planner also actively shows the areas that receive enough water or are under-watered or over-watered. This is done with a color radar as shown in the following example: Green spots are okay, spots going yellow and reddish indicate an undersupply, spots going blue an oversupply.
For example, the following sample plan still needs some optimization:
Some yellowish and reddish areas are not irrigated or not irrigated enough.
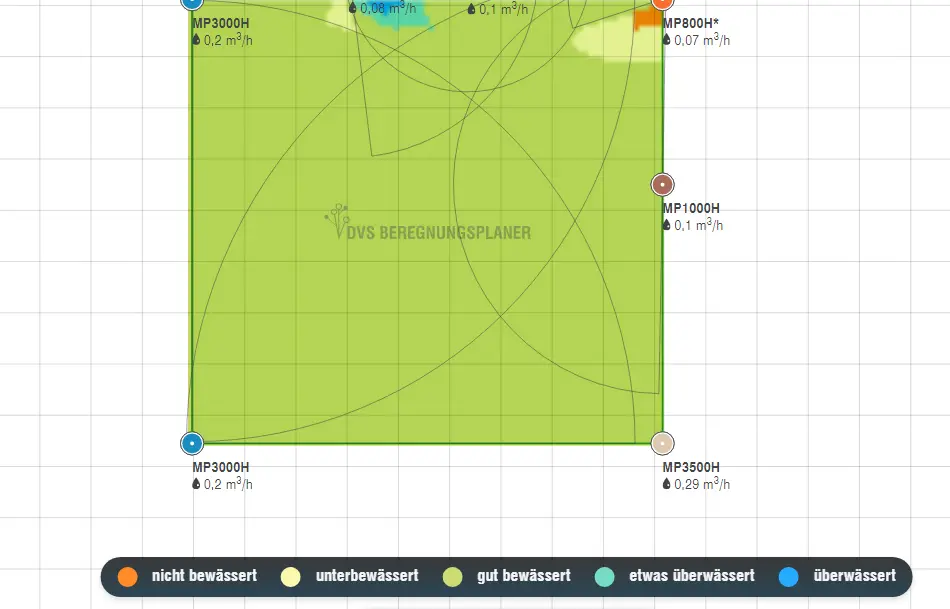
This one, on the other hand, looks pretty good:
There is hardly any potential for optimization here
Once you are happy with your sprinkler placement, you can proceed to Step 3:
Planning step 3 – Determine water connection and control
This step is relatively simple. A total of 3 things must be defined and it must be determined where they should be on the plan:
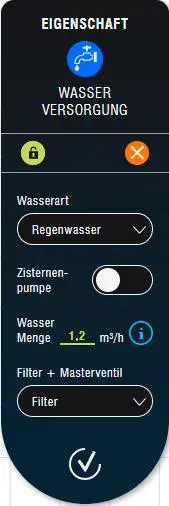
Water connection tool
This is used to mark the location of the water connection (water tap or pump) on the plan. In order for the system to know how much water to plan with, the water volume in cubic meters per hour must be entered in the associated menu. 1 cubic meter is 1,000 liters. 1 liter equals 0.26 gallons, 1 gallon equals 3.78 liters. For example, if the amount of water per hour is 400 gallons, you would enter 1.51 cubic meters here (400 x 3.78/1000)
The amount of water is required at a dynamic pressure of 3.5 bar (= 50 psi). This equates to a pressure of approximately 2.8 bar (40 psi) acting on the sprinklers plus approximately 0.7 bar (10 psi) of assumed pressure loss for traversing the pipeline and fixtures. This water flow is determined with a water pressure and flow test device. Compared to the bucket test – as used instead in the Gardena watering planner – this method has the advantage that it is much more accurate. The system therefore does not have to keep huge safety reserves.
Note: If you want to implement a drinking water system with a much more complex infrastructure, then you have to switch here from rainwater to drinking water.
Properties of the water supply
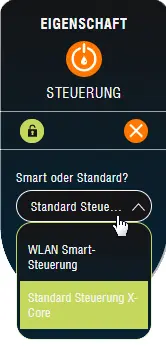
Irrigation control tool
Adds a controller to the plan. You can choose between W-LAN control (WiFi) and non-W-LAN control (= standard control).
Note: The DVS planner always provides for control with solenoid valves and suggests the irrigation computer and the valve distribution (next point) accordingly. You can read here which other types of control would be alternatively possible.
Properties of the control menu
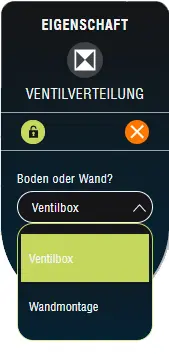
Valve distribution tool
Here you have the choice between a valve box built into the ground or a device for wall mounting.
Valve distribution menu
After the water connection, the control and the valve distribution have been defined and positioned on the plan, you can proceed to the next step:
Planning Step 4 – Determine Pipeline
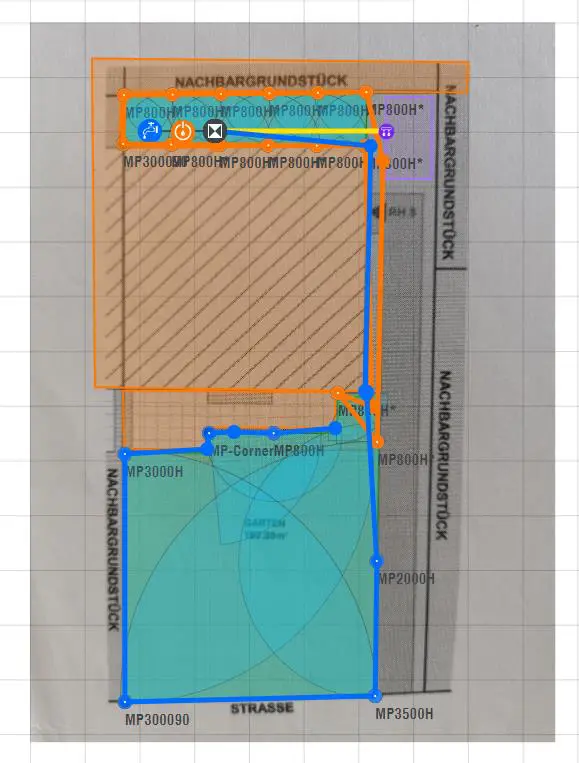
When you switch to step 4, the system automatically gives you a suggestion for the course of the pipeline and how many and which sectors it should be divided into. In my example it looks like this:
The DVS irrigation planner automatically takes into account the amount of water available and proposes the pipelines as pressure-compensating ring lines as far as possible. In my example, 3 sectors are necessary: Two for irrigating the lawn with circular sprinklers and one for drip irrigation of the bed. The pipeline lines are each shown in different colors for better differentiation.
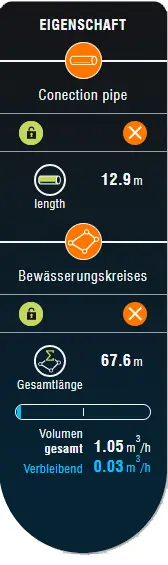
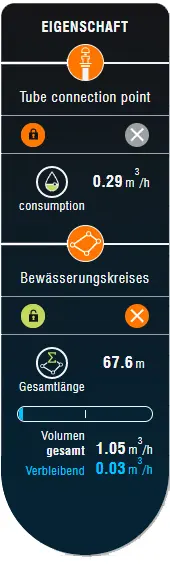
If you select a section of a pipeline line by clicking on it, then you will find out the length of the selected section and the total length of the pipeline line. In addition, the part of the water volume available in this sector that has already been used up is also output. From this you can see whether there is still a water reserve in the sector and to what extent it would be possible to expand the sector with additional sprinklers.
Pipeline menue
If you select a sprinkler, the water consumption of the sprinkler in the pipeline is displayed. In this case the sprinkler would distribute 290 liters/hour:
Information about a sprinkler
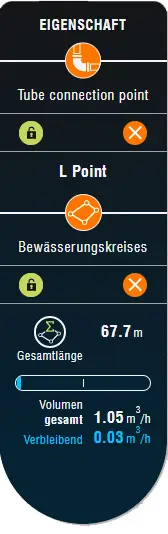
Clicking on a connector shows what type of connector it is. In the case of an L-piece:
Information about a connector
The proposed pipeline course can be modified manually by moving existing connector points with the mouse pointer or by clicking on a pipeline section and creating a new connector point and then modifying it. You can do this if, for example, the pipeline runs right through the lawn, but you would rather run it along the edge.
However, it is even more important to check whether the sector division makes sense as suggested, or whether it is better to combine the sprinklers into other groups, for example according to spatial criteria, according to sprinkler type or, for example, according to sunny and shady spots.
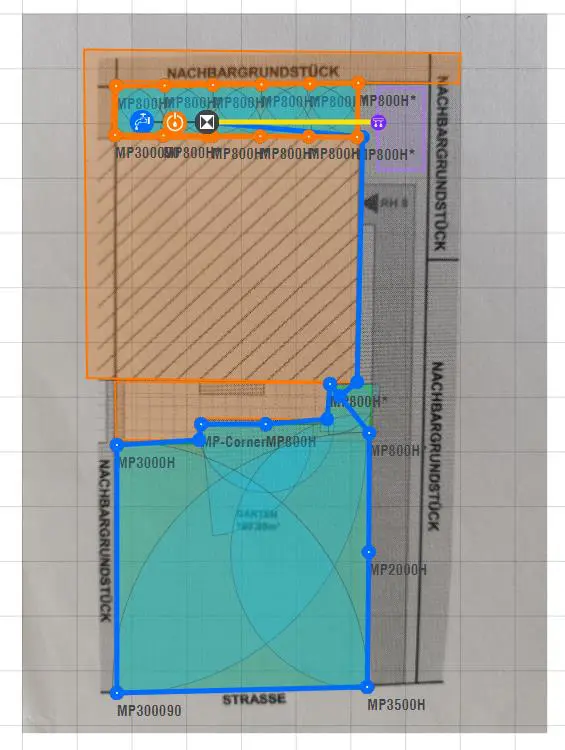
What bothers me about the pipeline division suggested above is that the two MP800 in the lower lawn area were assigned to the lower, blue sector. These have a different precipitation rate than the other sprinklers so I want to run them in a group with the other MP800s from the top strip of lawn. So I’m taking these two sprinklers out of the lower blue sector and adding them to the upper, orange sector instead.
To do this, I first make sure by clicking on a sprinkler in the orange sector that the sector still has enough water reserve, i.e. the water potential is still sufficient to operate the two additional MP800. Then I first delete the pipe connections that are no longer necessary in the blue sector by clicking on the relevant pipe sections with the mouse and pressing the Delete key on the keyboard.. I then use the Irrigation circle tool to recreate the sprinkler circle in the blue sector, bypassing the two MP800s. Now I open the orange sector, also by deleting a pipe connection, and extend it with the irrigation circle tool up to the two MP800 and connect them to the orange sector. Finally, I close the orange sprinkler circuit again – done. The result looks like this:
Modified Sector Plan (2 MP800s removed from Blue Sector and added to Orange Sector)
Planning step 5 – Material listing
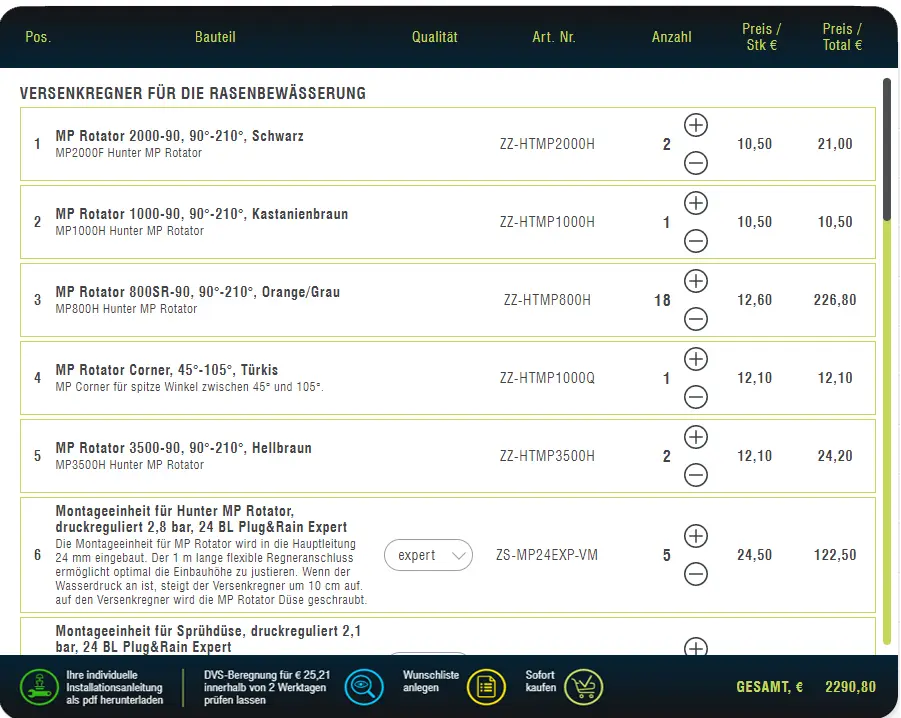
By clicking on the 5th planning step, the program automatically creates a list of materials with which the planned irrigation can be implemented. The list contains the right products from a wide variety of brand manufacturers. As mentioned above, the sprinklers are Hunter MP rotators, and Hunter was also recommended for the solenoid valves and controls in my tests. The Blu-Lock system, which is very simple for the end user, is used in the pipeline. In principle, however, DVS Irrigation carries products from a wide variety of brand manufacturers, so it is quite possible that Rain Bird and other manufacturers can also be found in different constellations in the list of materials. It is practical that the list also includes all the auxiliary tools, adjustment wrenches, etc. that you tend to forget when planning your own.
In the material list, you now have the option of changing the quality for some products. By default, this is set to the middle of up to three possible qualities and can be changed to a better or worse quality if a cheaper product is enough or if you want a more expensive product category than the one suggested.
If you want to realize something different than suggested, you can of course remove the corresponding product from the list.
Excerpt from the material list of the sample plan
There are now two ways to continue the list. Either you save the product recommendation, or you make the purchase directly from DVS Irrigation, which unfortunately only delivers within Europe at the moment. For the first option, a practical possibility is offered at the end of the shopping list to download the planning including the list of materials as a pdf (menu item “Download your individual installation instructions as a pdf”). This can then be used at will to obtain the suggested components and you will also find a very handy installation guide and instructions on how to make the irrigation ditches. I think this function is a very fair move from DVS Beregnung, since it does not willfully make it more difficult for those who do not want to become customers to use the tool! Even as a non-customer, you can take full advantage of the tool.
The second option is to buy the displayed products directly from DVS Irrigation.
Tip: With the voucher code DVSSEREGNUNG-MJK you get a 5% discount* in the DVS irrigation shop.
Conclusion
With the online irrigation planner, DVS Irrigation has succeeded in creating a great product. Regardless of whether you intend to buy from DVS Irrigation or not, it is definitely worth using. The planning has an amazingly good quality and is manufacturer and retailer independent. So you can simply do the planning on the planner and then buy the products wherever you want. That and the much more professional range of products from which the planner draws are decisive advantages compared to the Gardena planner. In addition, some important details such as MPR or pressure regulation are automatically taken into account in the planner. Especially as a layman, one tends to forget one or the other. Even if you are already well versed in the subject and planning yourself, it doesn’t hurt to do the plan again at DVS Irrigation to compare the result and make sure that you haven’t overlooked anything in the plan.
The DVS irrigation planner can possibly still improve when it comes to a loving design of the plan. At Gardena you can find nice details such as swimming pools, pots, various garden furniture and much more. place it on the plan, which does not actually do anything, but makes it look more lively and beautiful. And maybe it will also make orientation on the map a little easier. The DVS irrigation planner is limited to the functions and elements required for planning. However, it is currently still at the beginning of its development and the chances of further improvements are very good.
I am an enthusiastic do-it-yourselfer and have been running this blog on the subject of garden irrigation for more than 6 years now. In over 150 specialist articles, I share my own experiences and know-how from years of research and numerous product tests. -> More about me