The irrigation company Gardena offers a free online tool called “MyGarden” with which an irrigation system can be planned in just a few steps. Below is a brief introduction to the tool, including advantages and disadvantages.
The function of “MyGarden” is basically divided into 2 parts:
Garden plan
Sprinkler plan
In the first part, a plan of the property to be irrigated and the plants located on it can be created. In the second part you can then plan the appropriate irrigation. Both parts can also be used independently of each other, so the tool can also be used, for example, to create a plan of your own property, or to try out how (Gardena) sprinklers work or to get a feeling for which Gardena sprinkler type the appropriate one.
The tool currently only works with the metric system, so users from the USA have to convert their usual measurements (1 foot = 0.3 meters)
Conveniently, the tool can be used directly in the web browser without prior registration and without installing anything. So you can simply call up the page and get started right away. You only need to register if you want to save your plan.
At the beginning you start with an empty page on which you can add elements using the toolbar. A ruler overlaid on the image helps one place elements to scale. At the beginning, the “Garden plan” toolbar is available by default; if necessary, you can switch to the “Sprinkler plan”.
Garden plan
Items from 5 different menus can be added to the plan:
Property
Houses and extensions
Plants
Furniture + leisure
Ponds and pools
Each of these menus contains a handful of items to choose from, e.g. in plants you can choose between trees, shrubs, flowers, fruit and pots. This is not just a visual gimmick, but makes sense in practice because different plant species also have different watering requirements. It is therefore useful to be able to tell straight away from the plan whether it is a flower bed or a shrub, for example.
If you miss the “lawn” item in this list: This is in the Property menu, which can be used to sketch the basic subsurface: Lawn, earth, paving, wood, cobblestones, wall, gravel, water. This is also important information, not only to identify areas to be irrigated and not to be irrigated, but also to be able to read out whether the subsoil is not harmful to be watered (e.g. if a sprinkler circle is slightly above it raining away), or whether it is important to ensure that no splashing water falls on the ground.
For example, you first place lawns and buildings, then draw building extensions such as a terrace or large elements such as a swimming pool or a garden shed, as well as paths leading through the garden. Then the plants growing in the garden and any furniture or a barbecue grill in the garden are added. The plan is ready. The elements can be removed, moved or resized at any time. If you want to save time, you can alternatively load one of three templates and then change them as required.
Sprinkler plan
The sprinkler plan works in a very similar way. Here you can choose from the following menus, which you have to go through step by step (the second only becomes active once the first has been completed):
Irrigation area
Position sprinklers
Place water connection
Lay pipeline
Water control
Planning sketch with shopping list
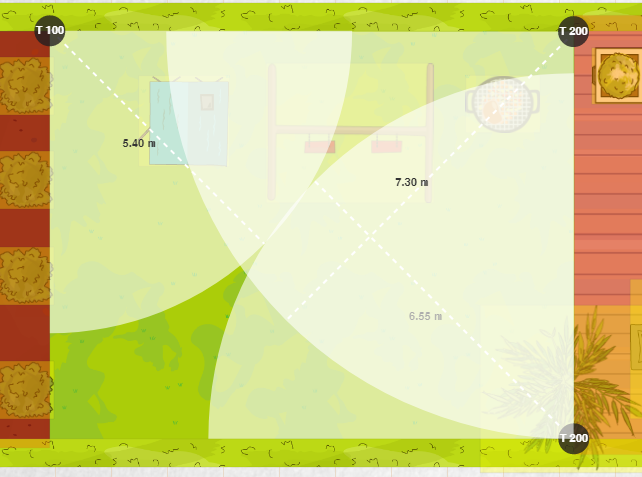
In the first menu sprinklers you define the area to be irrigated. In the second menu sprinklers are added to the previously created garden plan. You can choose between the usual circular sprinklers and rectangular sprinklers. Alternatively, you can also let the system place the sprinklers automatically. I would definitely try it once, just out of interest, to see how the artificial intelligence of the Gardena system would solve it. If you now place a sprinkler on the plan, the zone that it would water is shaded and highlighted. First of all, a huge circle to be irrigated is assumed and this is shown with the maximum throw range of the largest Gardena sprinkler T-380. The circle can be made smaller or larger and the display of the required Gardena sprinkler changes accordingly. If no circular irrigation is required, but irrigation of a section of a circle, the circle can be reduced accordingly.
Once all sprinklers have been placed, the place where the water source is located is marked and its output is specified (filling time of a 10 liter (2.6 gallons) bucket, see bucket test). As the water source is placed, the system also automatically draws pipeline connections between the water source and sprinklers. The most direct way is selected here. This can sometimes work, but mostly it will not be possible, e.g. due to structural conditions, in such cases the lines can also be set manually as an alternative.
It is also mandatory to go through the fourth water control menu in order to be able to advance to the 5th menu. Irrigation control is not an absolute must-have element of irrigation, irrigation can also be implemented without electronic irrigation control if you wish. So if you don’t want to have an irrigation computer, then simply indicate in the menu that none is planned and you can then go to the last menu of the planning sketch including the shopping list.
In this menu, a pdf is generated containing the following:
One side of the garden plan without watering elements
A page showing the perimeters of the areas to be irrigated and the segments irrigated by the sprinklers (to check that no area is left without water)
The previous page supplemented by the pipelines
A long shopping list with the Gardena products that are required to implement the irrigation system as planned
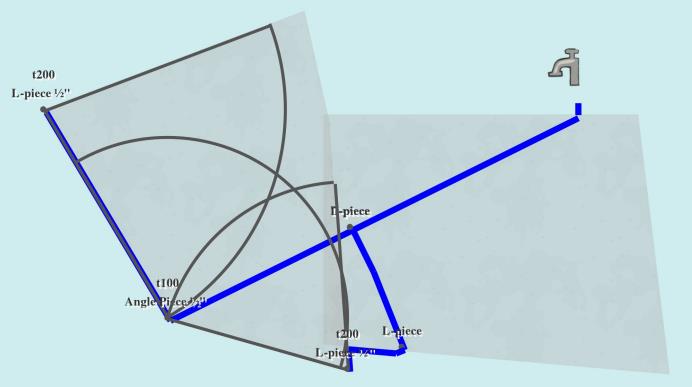
Pipeline plan: The property, the irrigated sector and the pipe connection (pipeline) are shown in a way that is reduced to the essentials
The last point, the shopping list, is of course not entirely altruistic and is undoubtedly aimed at selling Gardena products, but it can also be useful from a neutral point of view so that you don’t forget any required components. All connecting pieces and connectors are also output and the number of meters of pipe required is calculated.
Conclusion: Gardena “MyGarden” is an easy-to-use and uncomplicated tool. You can simply use it to create a garden plan very quickly, which then serves as the basis for further irrigation planning. I think that’s a very nice solution and you can reach your goal quickly with little effort.
The second part, the planning of the irrigation, can also be used quite well in principle, as long as you plan an irrigation that is reduced to the essential elements and do not want to go into too much detail. Choices between different types of watering computers (WiFi or not), practical swing joints, or even things like water distributors, water sockets, etc. etc. are not provided for in the online plan. You have to think about this independently if necessary. As a disadvantage, it should of course also be mentioned that the irrigation planning is only possible with Gardena products, a mix with products from other manufacturers is not possible. Understandable from Gardena’s point of view, but of course it is up to everyone to implement only the pipeline planning or even the connectors with Gardena products and to switch to other manufacturers for the sprinklers or other parts. Unfortunately, things such as pressure regulation or a matched precipitation rate cannot be implemented with the planner, or only to a very limited extent, since these functionalities are not offered by Gardena.
In any case, “MyGarden” is a good way to get a feeling for the planning and the interaction of the individual components or to try out possible solutions graphically. It can also be used as an additional control of a solution designed in a different way and of a shopping list that has already been written.
I am an enthusiastic do-it-yourselfer and have been running this blog on the subject of garden irrigation for more than 6 years now. In over 150 specialist articles, I share my own experiences and know-how from years of research and numerous product tests. -> More about me


")
")
