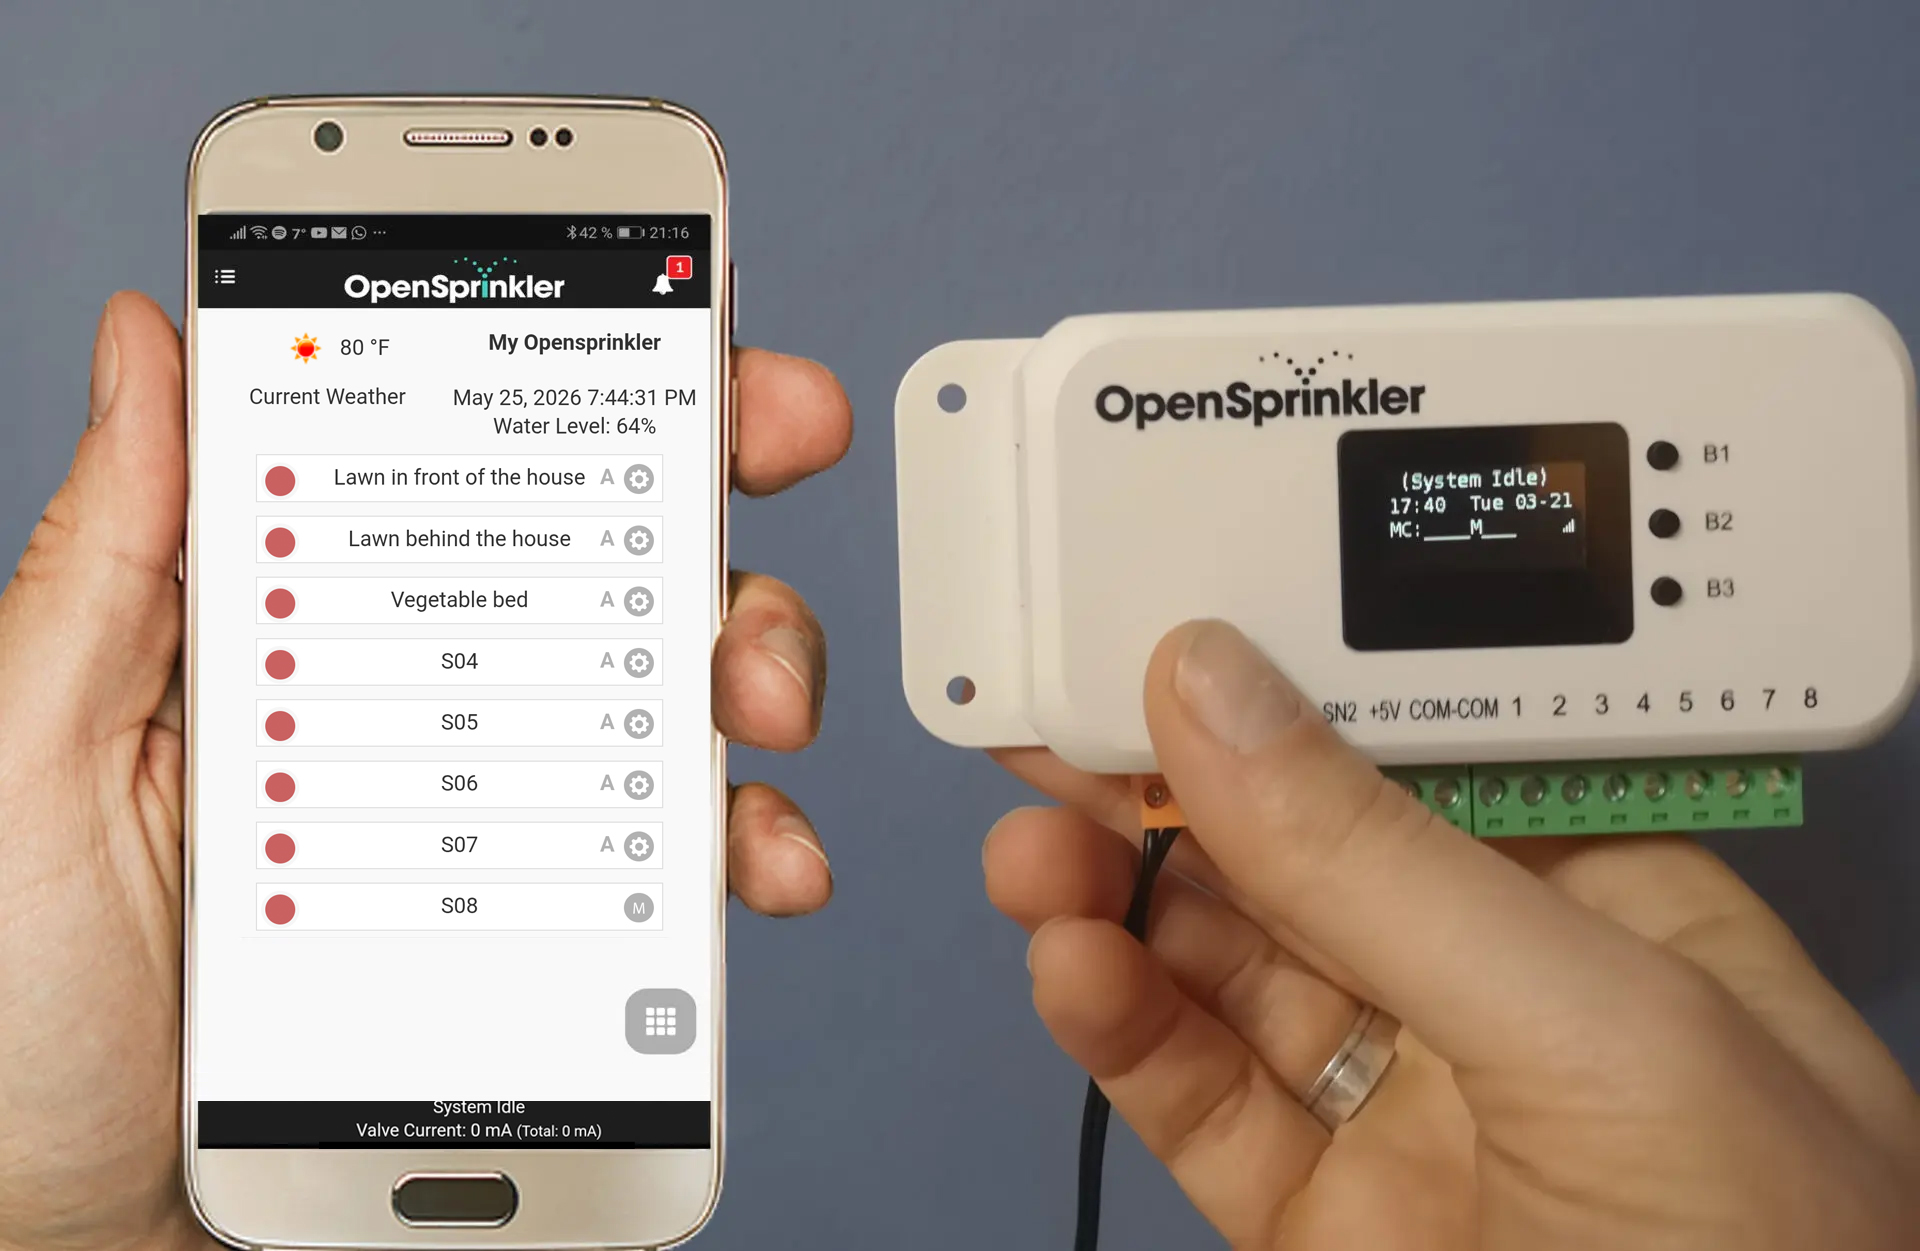
In the following article, I tested the OpenSprinkler irrigation controller. It is the only open-source irrigation controller available on the market. This means that both the software and the hardware plans are freely accessible to third parties, allowing users to further develop or adapt the product to their own needs.
This makes the OpenSprinkler ideal for those with more specific requirements that cannot be met by standard, commercially available irrigation controllers. You don’t necessarily need to be a programmer or engineer yourself; you can also benefit from pre-built solutions provided by members of the OpenSprinkler community.
However, you can also simply use the OpenSprinkler as a regular irrigation controller, as it naturally fulfills all standard irrigation controller requirements and comes equipped with several useful features that can be used without any manual configuration. More information about the philosophy and history of OpenSprinkler, as well as the advantages and disadvantages of an OpenSprinkler irrigation controller compared to conventional irrigation controllers, can be found in a separate report where I introduce the company OpenSprinkler:
This article focuses on the specific product test. So, let’s get straight to the first question:
Where can you buy an OpenSprinkler irrigation controller?
Unlike irrigation controllers from Hunter, Rain Bird, Gardena, Orbit, etc., which can be purchased from a wide variety of retailers both online and offline, the possible sources for an OpenSprinkler are limited to the following options: The manufacturer, Opensprinkler.com, in the USA, or possibly a local OpenSprinkler distributor in your country, although these only exist in a few countries.
The model I ordered for testing cost $183 at Opensprinkler.com. Opensprinkler.com is also offering a 10% discount coupon* for readers of this blog.To take advantage of the discount, simply enter the coupon code OSPOWER15YR when placing your order.
Key specifications of the tested OpenSprinkler
There are two other OpenSprinkler products: the OpenSprinkler Pi and the OpenSprinkler Bee. The OpenSprinkler Pi is an irrigation expansion board for Raspberry Pi computers, while the OpenSprinkler Bee is an irrigation controller limited to 3 outputs for 9V solenoid valves. My test focuses on the main product, the “standard” OpenSprinkler, simply called “OpenSprinkler” without any additional designation. This is a fully functional WiFi irrigation controller with 8 outputs as standard and a power connection.
Key specifications of the tested OpenSprinkler, hardware version 3.2:
OpenSprinkler 3.2
Model variants
3 variants: 24V AC (for 24V AC valves), 7.5V DC (for 24V AC valves and 7.5V to 12V DC valves), 7.5V DC Latch (for 7.5V to 12V DC Latch valves)
Number of controllable solenoid valves
8 (expandable by 16 additional zones with an additional module, a maximum of 4 additional modules can be connected, the maximum possible number of zones is therefore 72)
Can it be used with 24-volt or 9-volt solenoid valves?
Depending on the model variant
Programming options
Up to 40 programs can be configured to control the defined zones; each program can have up to 4 start times per day. A special feature of OpenSprinkler is the ability to start multiple zones simultaneously.
Irrigation duration
1 second to 1,080 minutes
Global increase/reduction of irrigation duration
1 to 250%
Connectable sensors
Four sensor ports are available, allowing the connection of a rain sensor, soil moisture sensor, flow sensor, programmable switch, or any other sensor operating on a normally open or normally closed principle. The specific sensor and its operating characteristics are defined in the software.
Connection for master valve/pump start circuit?
There is no dedicated connection, but one of the eight existing zone connections in the software can be defined as the connection for the master valve. Similarly, a second connection can also be defined as master valve 2.
Is direct control via computer possible?
Only to a very limited extent (the small display and the 3 selection buttons only show some basic information such as the time, zone status and rain status, and you can start programs manually)
Power/Battery
Power connection via externally mounted 24 Volt AC or 7.5 Volt DC transformer (depending on model)
Indoor/Outdoor
Indoor use (for weatherproof outdoor use, a separate IP-65 enclosure can be purchased)
WiFi?
Yes (optional additional LAN connection via add-on module also possible)
The app runs on
Apple iOS devices, Google Android devices
Access via web browser possible?
Yes
Use of local weather data?
Yes
Price
$140 or $183 with an additional LAN port
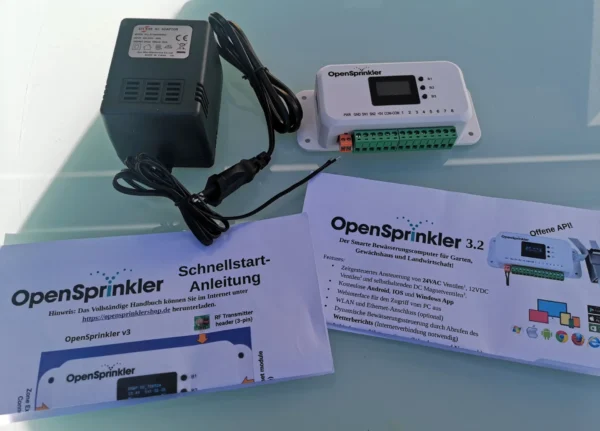
The test unit is the AC version for 24-volt solenoid valves in the standard configuration with 8 outputs, including the power supply ordered from the Opensprinkler shop. The test unit is a non-weatherproof indoor version. This device can be optionally expanded with the following components:
Extension module for adding 16 additional zones,
This allows 16 additional solenoid valves to be connected. The zone expansion module is simply connected to the designated slot on the irrigation controller. If needed, another module can then be connected to the expansion module, and another to that. This continues up to a limit of 4 extension modules, resulting in a total of 72 zones, including the 8 standard zones. The price per extension module is approximately $50. This makes increasing the capacity relatively inexpensive compared to other irrigation controllers.
The extension module must be of the same type of power supply as the irrigation controller. For example, if you have an AC irrigation controller, you’ll need the AC version of the expansion module; for a DC irrigation controller, the DC version; and for a latching irrigation controller, the latching version.
Ethernet Adapter
For directly connecting the OpenSprinkler to a LAN network.
RF Toy
The OpenSprinkler also has an RF output, which can be used to control radio frequency devices for home automation. This requires the RF Toy Bundle, which includes the RF Toy itself and several 433 and 315 MHz RF transmitters.
Included in the Package
Virtually all unnecessary items are omitted, including no branded product packaging. You only receive the irrigation controller itself and—if you ordered it separately, as I did—the corresponding power supply. Conveniently, a quick start guide and a function overview are also included. The quick start guide also provides a link to the OpenSprinkler manual. Everything is truly reduced to the essentials. Personally, I appreciate this, as it saves unnecessary waste and costs that would otherwise be passed on to the consumer.
Package contents of the OpenSprinkler order
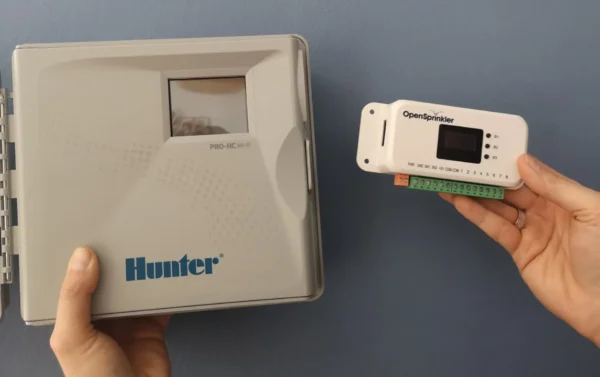
What surprised me at first glance is how small the OpenSprinkler is. Compared to other irrigation controllers, it’s very compact. I’ll show a comparison with a Hunter Pro HC below to clearly illustrate the difference in size.
Size comparison with the Hunter Pro HC Hydrawise
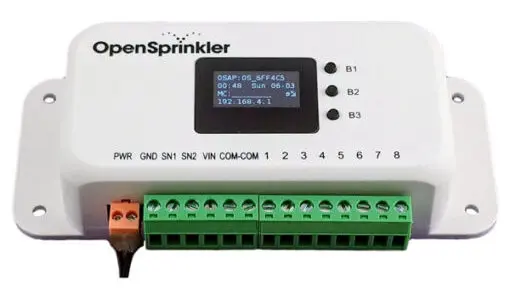
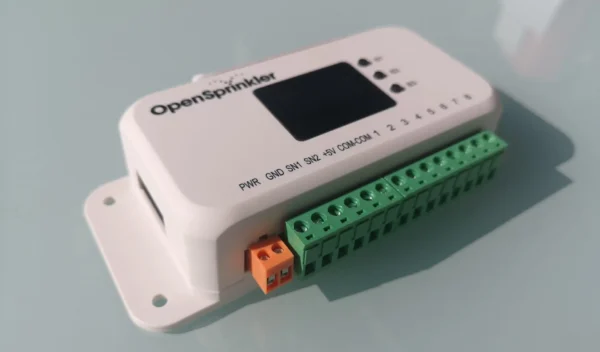
Connections
The OpenSprinkler has the following connections:
Connection strip on the frontside:
2 terminal blocks for power connection (orange, PWR)
Connections for 2 sensors (SN1, SN2, and GND for the second sensor wire)
5-volt connection for sensors requiring power (VIN)
8 zone outputs (Nr. 1 to 8)
2 common connections for the second solenoid valve wire (COM-COM)
On the left side of the OpenSprinkler is a connection for the optional zone expansion module.
Front: OpenSprinkler power strip, left: Connection for zone expansion
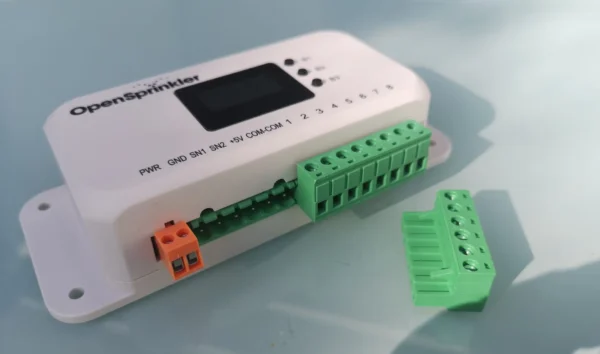
Practical: The power strips can be removed for easier clamping.
Detached part of the power strip
On the top and right side of the OpenSprinkler are two additional ports:
Port for an RF transmitter (this allows communication with standard 434MHz or 315MHz radio frequency devices such as wireless sockets, wireless lamps, wireless fans, etc.)
Ethernet port (for connecting the OpenSprinkler to a LAN network using the optional Ethernet adapter)
Connections for RF transmitter and Ethernet adapter
Initial Setup
The first thing that interested me was how complex the initial setup of the OpenSprinkler is. Does it require advanced technical knowledge, or is it easy to do even without prior experience?
My order from the OpenSprinkler shop included an A4 sheet listing the necessary steps. I then went through them.
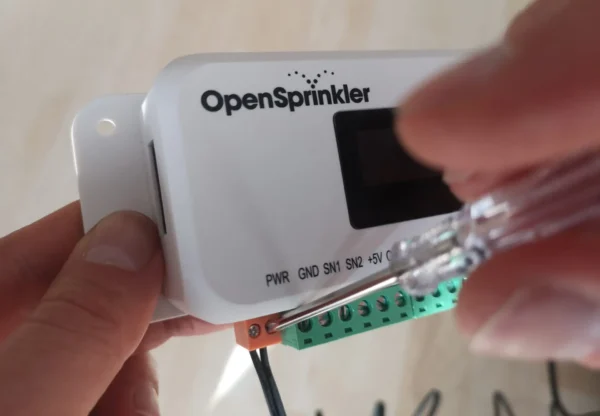
Step 1 – Connecting the OpenSprinkler to the power supply:
Simply loosen the orange clamp with a screwdriver and then attach the two power supply cable ends to it.
Attaching the power supply to the power terminal
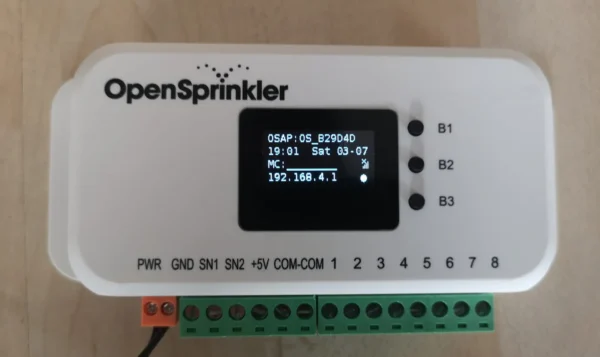
Step 2 – Connect the power supply:
The OpenSprinkler automatically starts in Access Point mode on its first boot and displays the access point’s IP address, 192.168.4.1. In this mode, the OpenSprinkler establishes a Wi-Fi network.
OpenSprinkler display after first boot
Step 3 – Connect to the Wi-Fi network with the OpenSprinkler
The established Wi-Fi network is named OS_xxxxxxx. To connect to it, simply open the Wi-Fi settings on your mobile phone or computer and search for available networks. Select the OS_xxxxxxx network from the list of displayed networks. This establishes the connection to the OpenSprinkler, allowing you to configure the necessary settings for the OpenSprinkler to connect to your home Wi-Fi network.
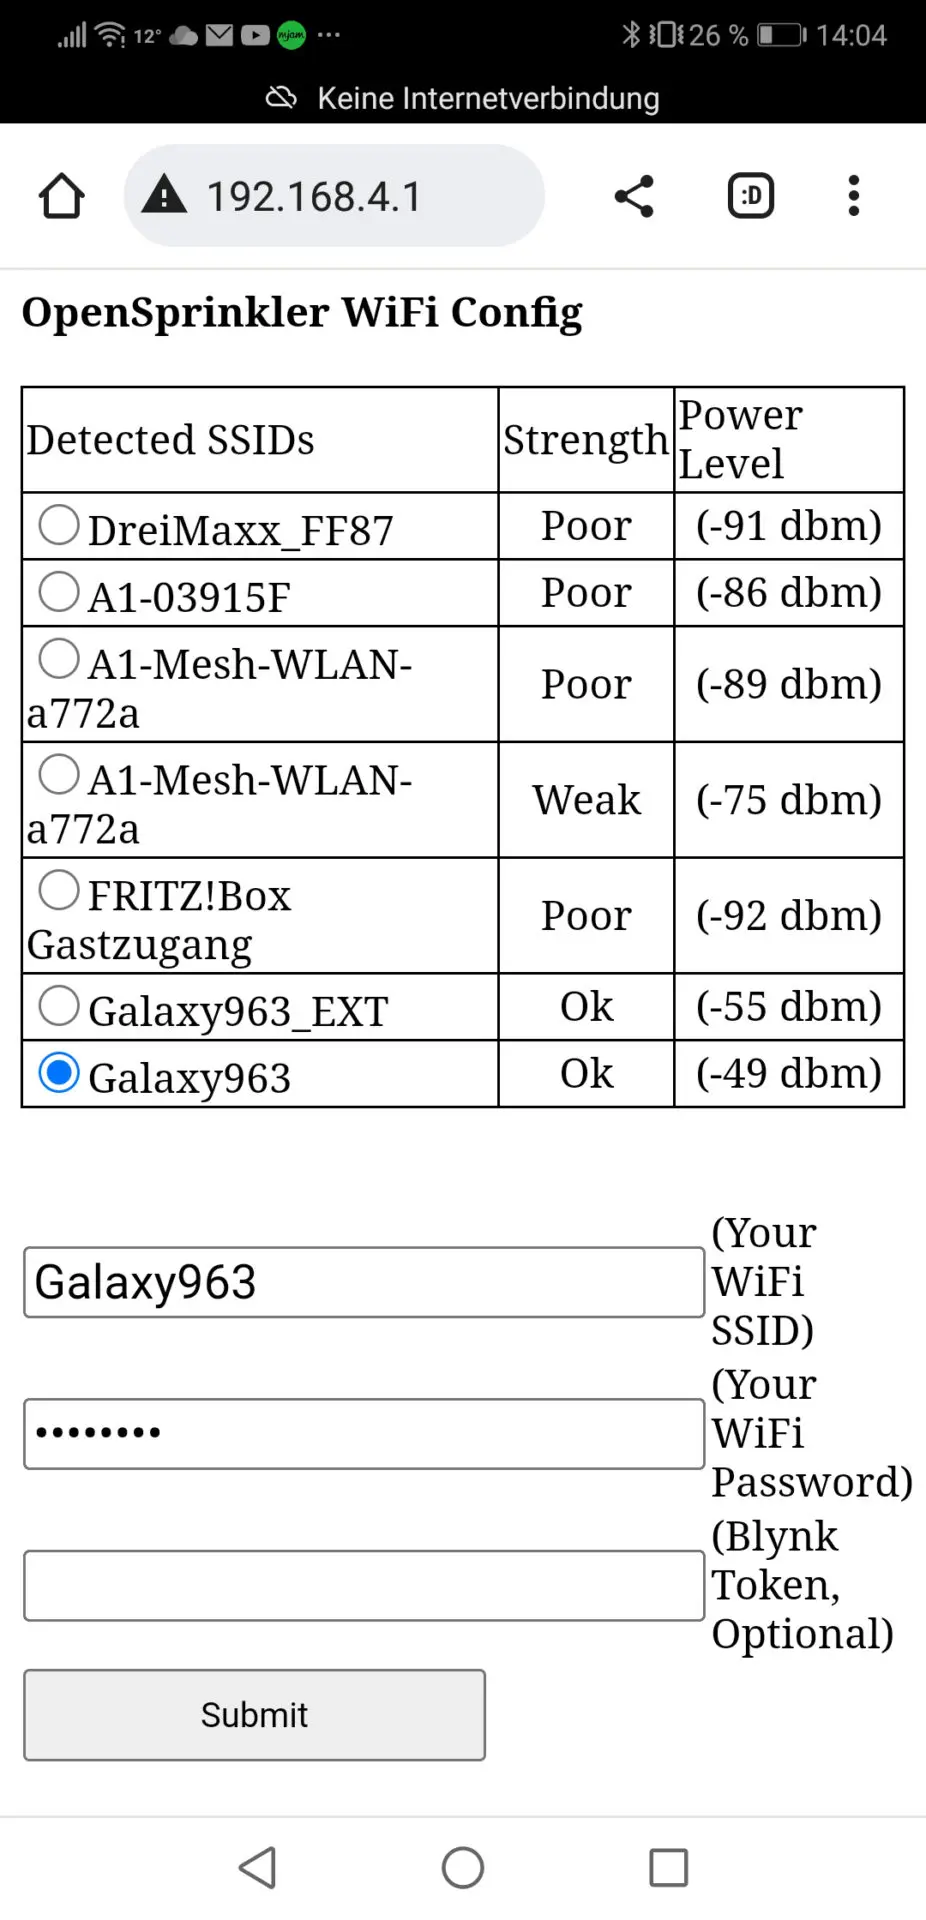
Step 4 – Enter Wi-Fi access data
To access the OpenSprinkler, enter the access point IP address 192.168.4.1 into the address bar of a web browser. On the page that appears, select your home Wi-Fi network and enter the password for your home Wi-Fi network. This allows the OpenSprinkler to access it. After clicking “Submit,” the OpenSprinkler establishes a connection to the Wi-Fi network and is now permanently connected.
Selection of the Wi-Fi network available at the location of use
Step 5 – Open OpenSprinkler Settings
This can be done in two ways:
Via a web browser
Via the OpenSprinkler app
The user interface and functionality are the same for both methods. Access is as follows:
Access via Web Browser
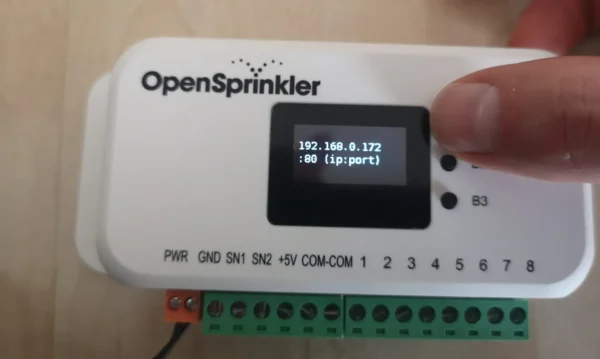
To do this, you need to know the IP address of the OpenSprinkler. You can find this out by pressing the “B1” button on the device. The IP address will then be displayed on the screen. Enter this address into your web browser to access the OpenSprinkler settings.
Displaying the IP address of the OpenSprinkler irrigation controller
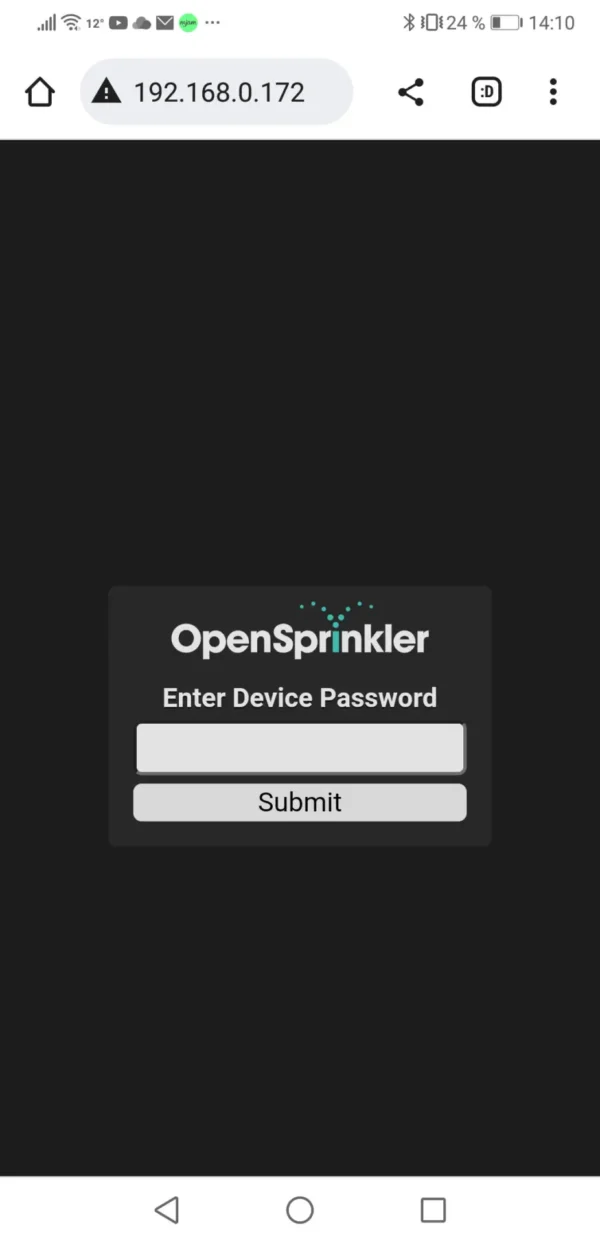
Accessing the OpenSprinkler in a web browser
Access via the OpenSprinkler App
First, install the app of the same name from the Google Play Store or Apple App Store. The first time you launch the app, it will ask you if you have an existing device. You can either add it manually or, even easier, have it automatically search for it (“Scan for Device”). This worked perfectly in my test! The existing device was found and automatically added after entering the correct device password. The app is now ready to use.
Conclusion: Setting up the OpenSprinkler controller is just as easy and straightforward as with the other smart irrigation controllers I’ve tested. However, there is one significant difference: Irrigation controllers from Hunter, Rain Bird, Orbit, Gardena, etc., have a cloud solution integrated, allowing you to control the controller from anywhere in the world after setup. With OpenSprinkler, after completing the steps mentioned above, control is only possible within range of the controller, i.e., when you are at home, either in the house or in the garden. If you want to access the OpenSprinkler remotely, an additional step is required (see next point).
Setting up remote access
As mentioned earlier, with OpenSprinkler, you only have access to the device in the immediate vicinity of your computer right out of the box. On the plus side, unlike with other manufacturers, you’re not forced to use their cloud solution. This can be an advantage if you have concerns about data security or simply don’t want to be at the mercy of the manufacturer. If the irrigation controller is tightly integrated with a cloud solution, you’ll no longer be able to use it, or only to a very limited extent, should the cloud solution be discontinued—for example, if the manufacturer goes bankrupt or simply ceases production and support.
However, this is a disadvantage if a standard, manufacturer-provided cloud solution would suffice and you don’t want to set it up and manage it yourself. Most users won’t want to forgo the option of remote access from anywhere in the world.
OpenSprinkler offers several options, the last of which has only recently become available for newer computers with hardware version 3.0 and higher. It’s a good alternative if a standard, off-the-shelf cloud solution is sufficient:
Setting up remote access to your home network (IPv4 internet access with the ability to define port forwarding rules is required)
Setting up a Virtual Private Network (VPN)
Using the Openthings.io cloud solution
The first two options require some familiarity with the subject matter and basic technical knowledge, while the last option is very simple and can be implemented without any IT background. I will describe exactly how it works below.
Making your OpenSprinkler accessible remotely with OpenThings Cloud
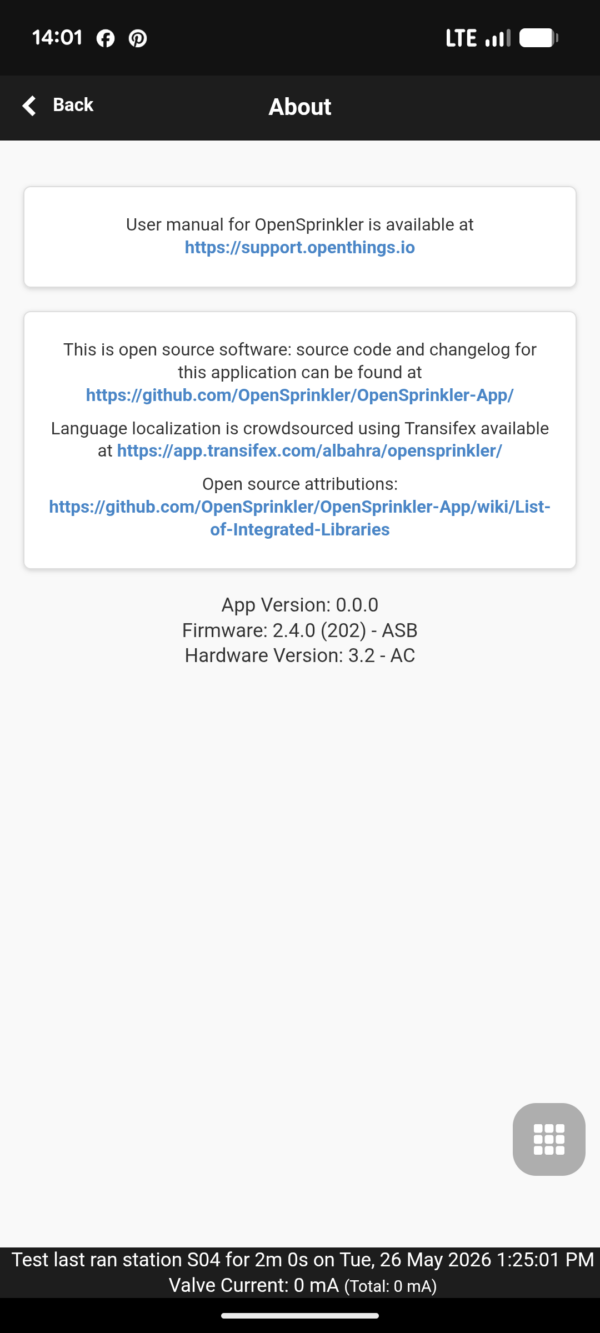
The prerequisites are that the OpenSprinkler computer has at least hardware version 3.0 and that the software (firmware) installed on the OpenSprinkler is at least version 2.2.0. The easiest way to find out both of these things is to go to the “About” menu item in the software, where the hardware, firmware, and app versions are displayed.
The first criterion was met by the OpenSprinkler I tested, which already had hardware version 3.2. However, it didn’t yet have sufficiently recent firmware. Therefore, the first step was to update the firmware to the latest version.
Updating the OpenSprinkler Firmware – Steps to Take:
If you have already configured settings on the OpenSprinkler, you should first save your current configuration, because unfortunately, updating to a new firmware version will erase the current settings. The password will also be reset to the original entry, and the Wi-Fi settings will also be lost and must be re-entered after the update. You can save your current settings under the “Export Configuration” menu item.
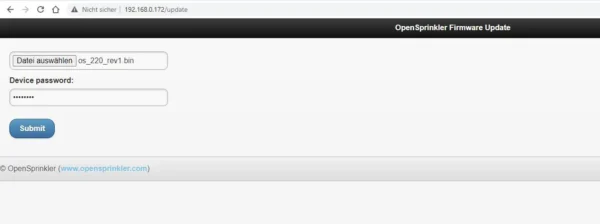
Download the latest firmware from http://raysfiles.com/os_compiled_firmware/. There you will find the latest firmware versions. Navigate to the folder containing the latest version and download the .bin file.
Enter the URL http://x.x.x.x/update in a web browser to access the OpenSprinkler’s update mode, replacing x.x.x.x with the OpenSprinkler’s IP address. In my case, I accessed the URL http://192.168.0.172/update. On the update page, select the previously downloaded .bin file and enter the OpenSprinkler password. After clicking Submit, the update will be performed.
OpenSprinkler Update
Reset the device by pressing buttons B2 and B3. According to the OpenSprinkler shop, this shouldn’t always be necessary, but it was for me because I could no longer connect. First, check if your device is still working; if so, this step is unnecessary.
Re-enter your Wi-Fi access data and, if necessary, load the previously saved configuration file.
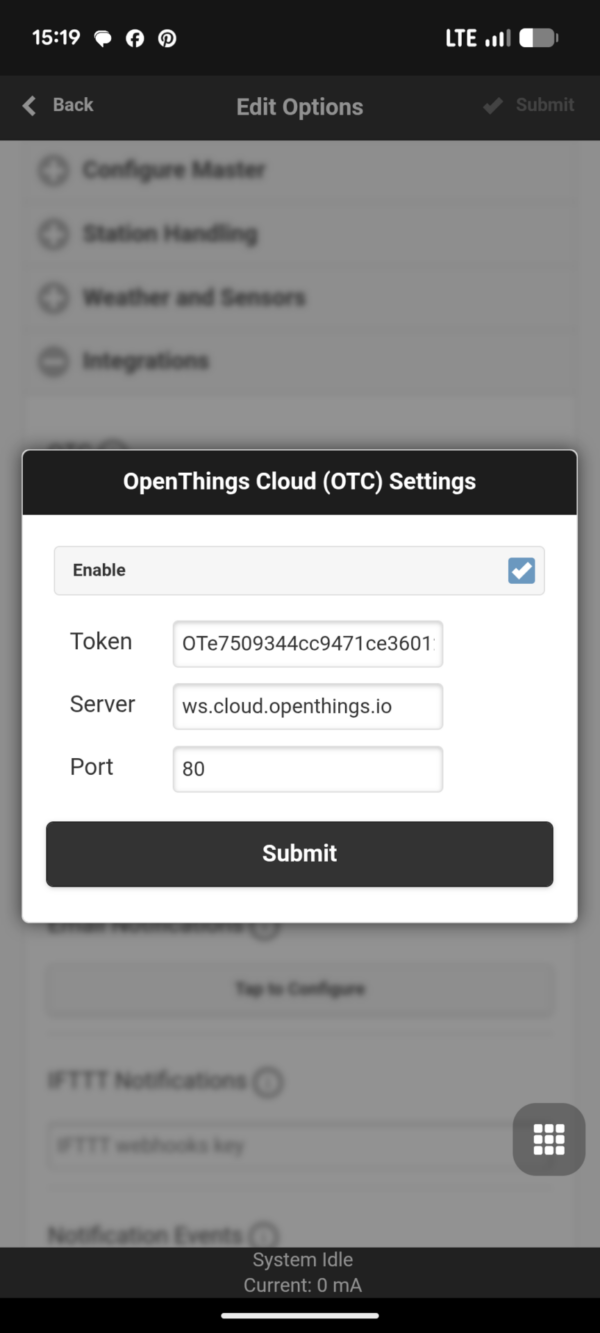
In the updated software, under the menu item “Edit Options – Integration,” you will now find the additional option “OTC,” which was missing in older software versions. Here, you need to enter the OTC token to enable remote access. I will explain how to obtain it in the next section.
Creating an OTC Token
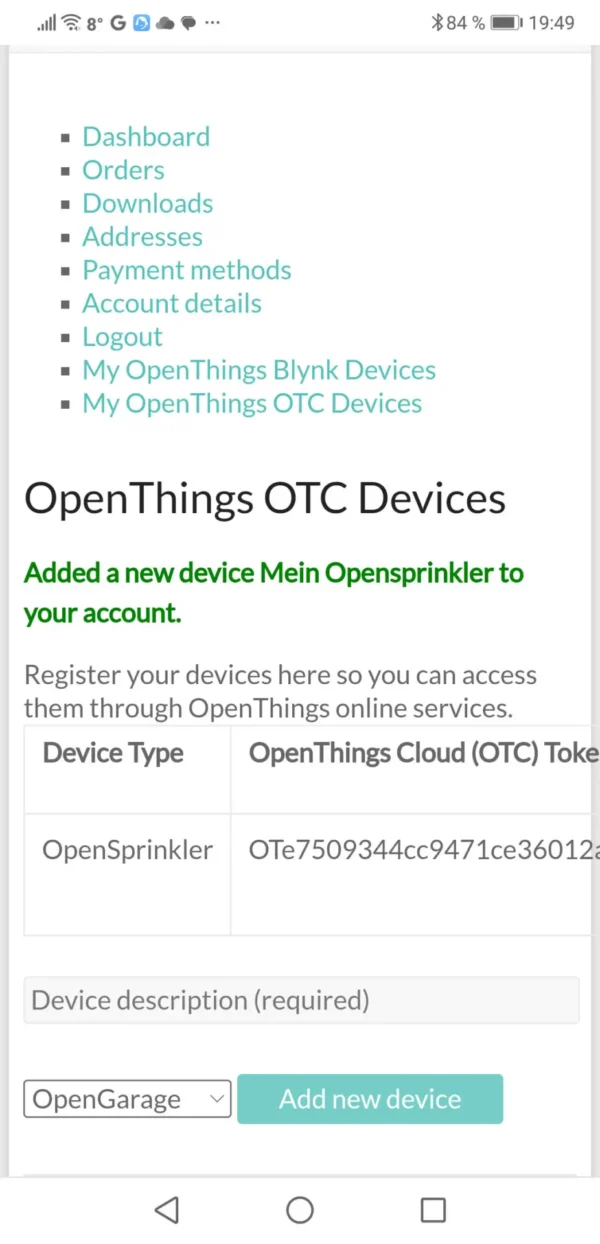
You can obtain the OTC token in the OpenThings Cloud (OTC). This is a cloud solution that OpenSprinkler created for its users to enable easy remote access to their devices. To create the token, follow these steps:
First, go to the website https://opensprinkler.com/ and register under the “My Account” menu item. You will need this account in the next step to log in to the sister site openthings.io. If you already have an Opensprinkler.com account, this step is unnecessary.
Go to the website https://openthings.io and select “My account.” Log in using the credentials you previously set up on Opensprinkler.com.
Select “My OpenThings OTC Devices.”
Change the selection from “OpenGarage” to “OpenSprinkler” and click “Add new device.”
Enter a device name.
The OpenThings token has now been created.
The token is created.
It’s best to copy the token number. With this, you now have two options for remotely accessing the computer.
Remote access via a web browser
Remote access via the OpenSprinkler app
Remote access via a web browser
To do this, simply enter the address https://cloud.openthings.io/forward/v1/token into your browser’s address bar. In my example, this would be https://cloud.openthings.io/forward/v1/OTe7509344cc9471ce36012a68093d30. You will be redirected from the Openthings Cloud directly to the irrigation computer and can access it after entering your password. It’s best to save the URL as a favorite in your browser.
Remote access via the app
To do this, you first need to enter the token in the computer’s software. This is done via the menu item “Edit Options – Integrations”. There you’ll find the OTC option and the ability to activate OpenThingsCloud by entering the token. The system automatically suggests the server and port.
Adding the Token in the App
At this point in the test, I expected remote access to already be working, since the app now has everything it needs to access the irrigation controller via the OpenThingsCloud using a token. However, it still wasn’t working! Upon further consideration, it seems that the previous step only stored the token in the software on the irrigation controller itself, but not in the app. Therefore, the app lacks the necessary access information when launched.
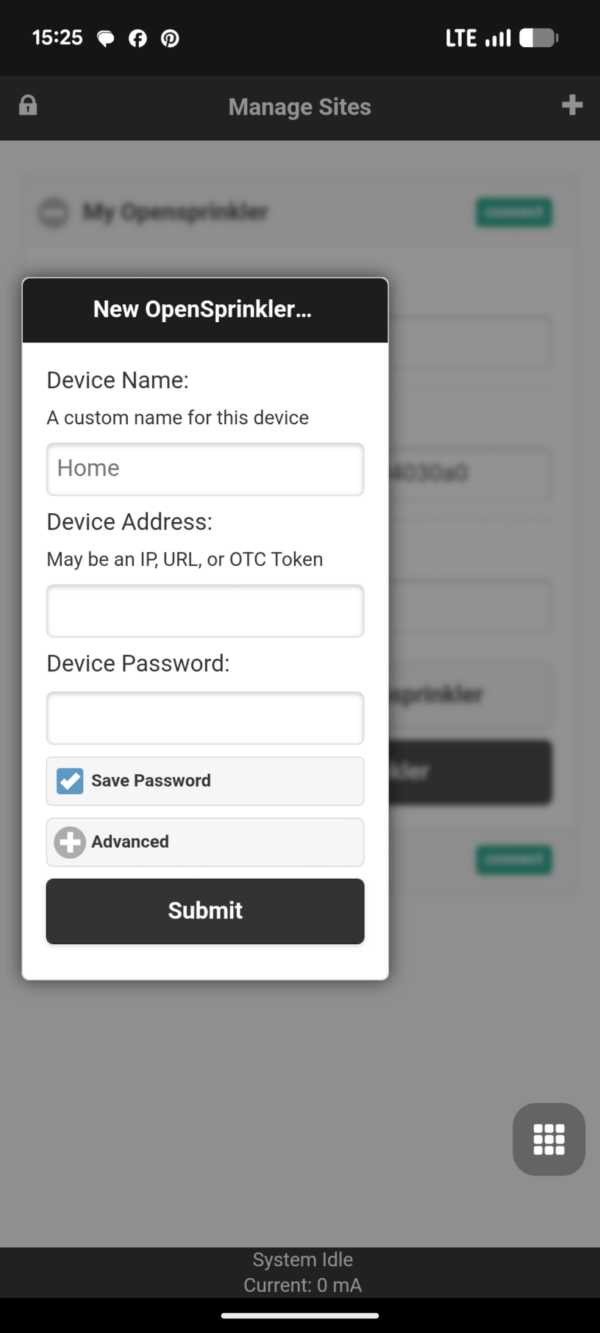
For this to work, the code must be entered a second time within the app itself. This can be done under the “Manage locations” menu item. After clicking “Add,” you add another device, but for this one, the OpenThings token must be entered in the “Device address” field instead of an IP address.
Add as a new device with access via OpenThings Cloud
This adds a second device that enables remote access. However, this device cannot directly access the irrigation controller’s IP address via Wi-Fi. If you don’t want to lose this capability, keep both devices in the list; otherwise, you can delete the originally listed device without remote access.
In conclusion: Setting up remote access takes about half an hour if you follow the step-by-step instructions, but it’s relatively straightforward. OpenSprinkler has created a very useful service with the OpenThings Cloud, which will certainly make it easier for some potential customers to choose OpenSprinkler, as the other remote access options required a bit more effort. Adding remote access via the app isn’t quite ideal yet. It would be preferable if the two described steps were combined into one, and if remote access were added to the existing device instead of creating a separate one. But this feature is still quite new, and it may be further refined in future updates.
Connecting Solenoid Valves
To enable the controller to switch something, solenoid valves must now be connected (Caution: Disconnect the controller from the power supply beforehand!). This works exactly the same as with other irrigation controllers: One of the two cables of the solenoid valve is connected to the zone port where the solenoid valve is to be connected, and the other to one of the two ports labeled COM. COM stands for “common,” meaning the port where the shared cable of the solenoid valves is connected. This differs from the zone outputs, each of which has its own dedicated cable for a solenoid valve.
Device Functions
The OpenSprinkler’s focus is clearly on operation via a mobile phone, laptop, or other Wi-Fi-enabled device. Functionality directly on the device is very limited, although a few basic functions are available. Operation is via three buttons, B1, B2, and B3, and a small display provides information.
Depending on whether the buttons are pressed individually or in combination, and whether they are pressed briefly or held for a longer period, they will perform different functions. Below is an overview of all functions:
Key Action
Triggered Function
Pressing key B1
Displays the IP address of the irrigation controller
Pressing key B2
Displays the MAC address of the irrigation controller
Pressing key B3
Switches between the irrigation controller and any expansion modules
Pressing and holding key B1
Stops all zones immediately
Pressing and holding key B2
Restarts the controller
Pressing and holding key B3
Manually starts a program (pressing B3 again selects from the available programs; pressing and holding it again starts the selected program)
Pressing and holding key B1 and pressing key B2 in addition
Displays the gateway (router) IP address
Pressing and holding key B1 and pressing key B3 in addition
Starts each zone for 2 seconds (for internal testing)
Pressing and holding key B2 and pressing key B1 in addition
Displays the external (WAN) IP address
Pressing and holding key B2 and pressing key B3 in addition
Displays the time of the last successful weather query
Pressing and holding key B3 and pressing key B1 in addition
Displays the Time at which the system was last booted
Pressing and holding key B3 and pressing key B2 in addition
Resets the irrigation controller to AP mode (to reconfigure the Wi-Fi connection)
Press and hold key B1 while the OpenSprinkler logo is displayed
Resets the settings to factory defaults
Press and hold key B2 while the OpenSprinkler logo is displayed
Accesses the internal test mode
Press and hold key B3 while the OpenSprinkler logo is displayed
Accesses the setup options
Software
Next, I will present the software used in OpenSprinkler in detail.
Basic Navigation
This takes some getting used to and can be a little confusing at first, as there are two separate main menus: One in the upper left is for setting the basic configuration of the irrigation controller, while the other, in the lower right, is where the actual irrigation programming takes place. However, you’ll understand the principle after a few minutes of use.
OpenSprinkler configuration and program menu (highlighted in green)
What’s actually confusing is that once you go to the program menu, you no longer have access to the configuration menu; the button disappears. The first time I used it, I wasn’t sure how to get back to it—it’s not very intuitive. The solution: Clicking the black bar at the bottom takes you back to the home screen, where both menus are accessible again.
I also found the following tip in the user manual: You can access the configuration menu even more easily by swiping from left to right, or, on a desktop computer, by moving the mouse cursor from left to right.
Configuration Menu
OpenSprinkler Configuration Menu
Functionality of the individual menu items from top to bottom:
Device Selection
At the very top, you can switch between different OpenSprinkler irrigation controllers using the selection field, should you have multiple devices configured in the app. In my case, I am currently in the settings for the device named “My OpenSprinkler.” If I were to select a different one, “My OpenSprinkler” would be exited, and the connection to the other selected device would be established.
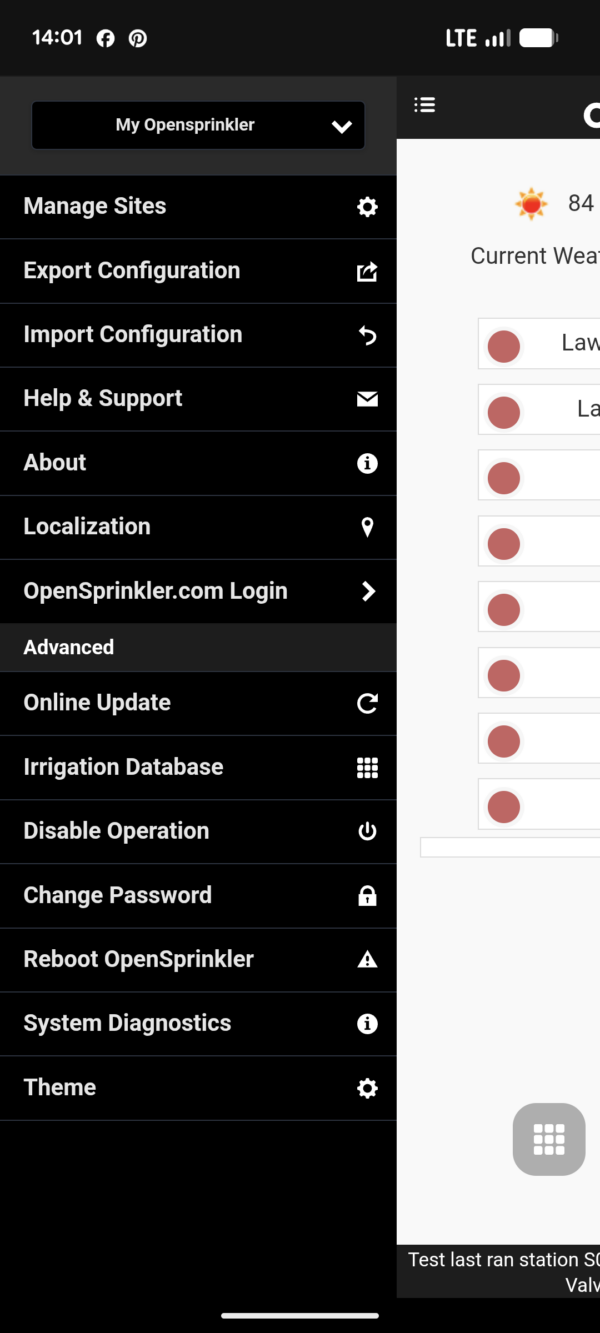
Manage Sites
This section is for managing existing OpenSprinkler devices (changing IP address or access password, enabling SSL or authentication), deleting devices, or adding new ones.
Export Configuration
Here you can save your current settings to back them up and reuse them later if needed.
Import Configuration
Imports previously exported settings.
Help & Support
Visit the OpenSprinkler support page, where you can submit a help request, if you get stuck.
About
Here you’ll find links to the user manual and the OpenSprinkler source code on GitHub, and you can also see which hardware, firmware, and app versions you’re currently using.
About page with version information
Localization
Here you can change the language if necessary. Currently, 31 different languages are supported.
OpenSprinkler.com Login
The function of this menu item isn’t immediately obvious, and even after consulting the user manual, I wasn’t able to figure it out. Only after contacting Opensprinkler did it become clear: It’s about avoiding having to re-add the devices when using OpenSprinkler on multiple smartphones or tablets. This works by entering your OpenSprinkler login credentials here, thus activating synchronization. If you then want to access the connected irrigation controller(s) from another phone or tablet, you first enter your OpenSprinkler.com login credentials in the app there as well. This automatically adds the existing devices to the app and synchronizes them from then on, so that any further added or removed devices are automatically reflected at all access points.
Disable Operation
This deactivates all zones, so that any programmed settings will no longer run. This is useful if the OpenSprinkler will not be in use for some time, e.g., over the winter. This saves you from having to disable individual programs; instead, you can deactivate the entire computer at once.
Change Password
To change the device password. You should definitely do this at the beginning and replace the default password with your own!
Restart OpenSprinkler
Restarts the OpenSprinkler. This may be necessary, for example, after a firmware update.
System Diagnostics
Various system information is displayed here:
Last system restart
Wi-Fi connection strength
Connection to the weather service
Weather method used and date of the last weather data update
Data obtained from the weather service regarding average humidity, average temperature, and rainfall
Information on whether a connection to the OpenThingsCloud exists
OpenSprinkler System Diagnostics
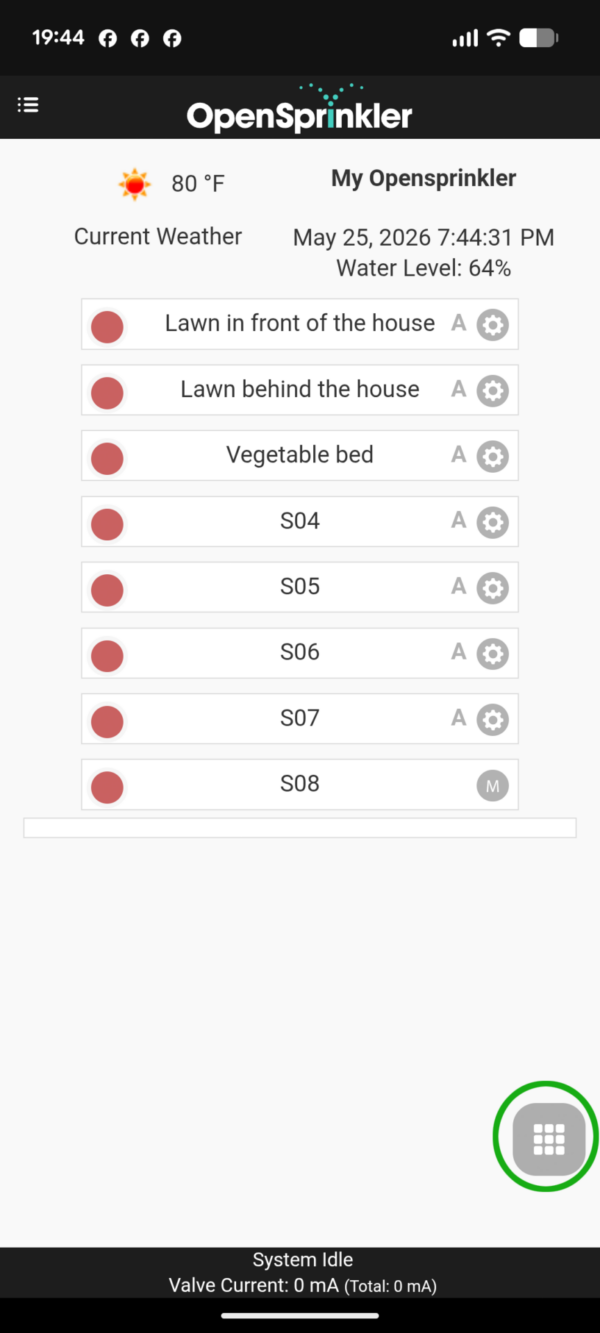
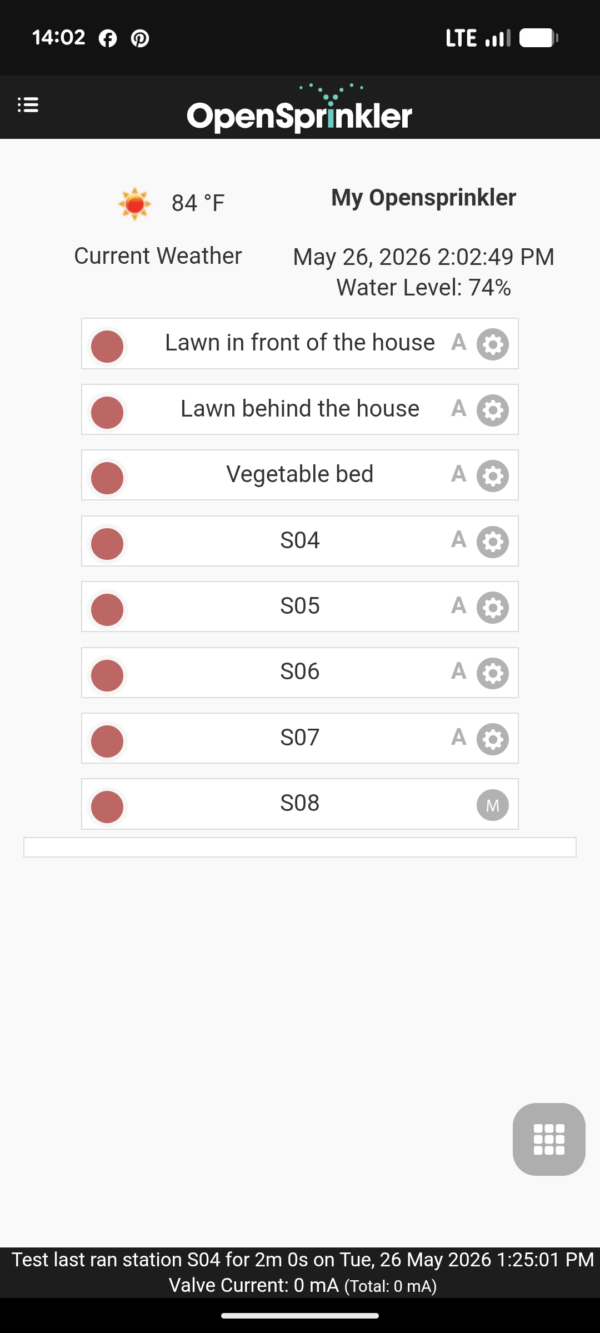
Home Screen
Screen displayed after starting the program
The OpenSprinkler home screen contains the following functions:
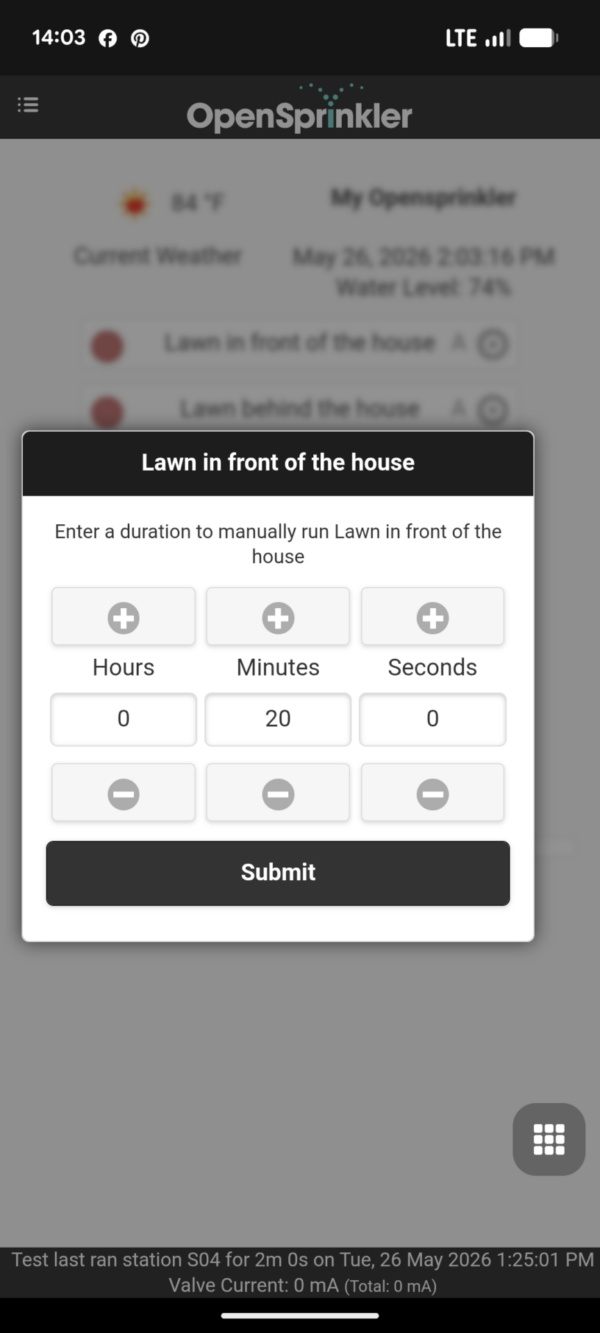
Quick Start Irrigation Run
Each of the eight available zones can be selected and a watering duration set. After confirmation, the watering starts immediately.
Entering the Watering Duration
Zone Settings
Settings for a zone can be configured via the gear icon displayed to the right of the zones:
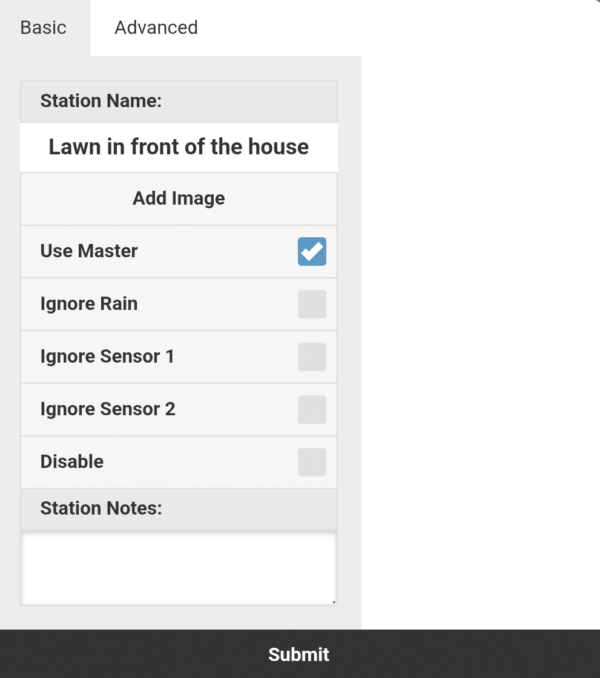
Zone Basic Settings
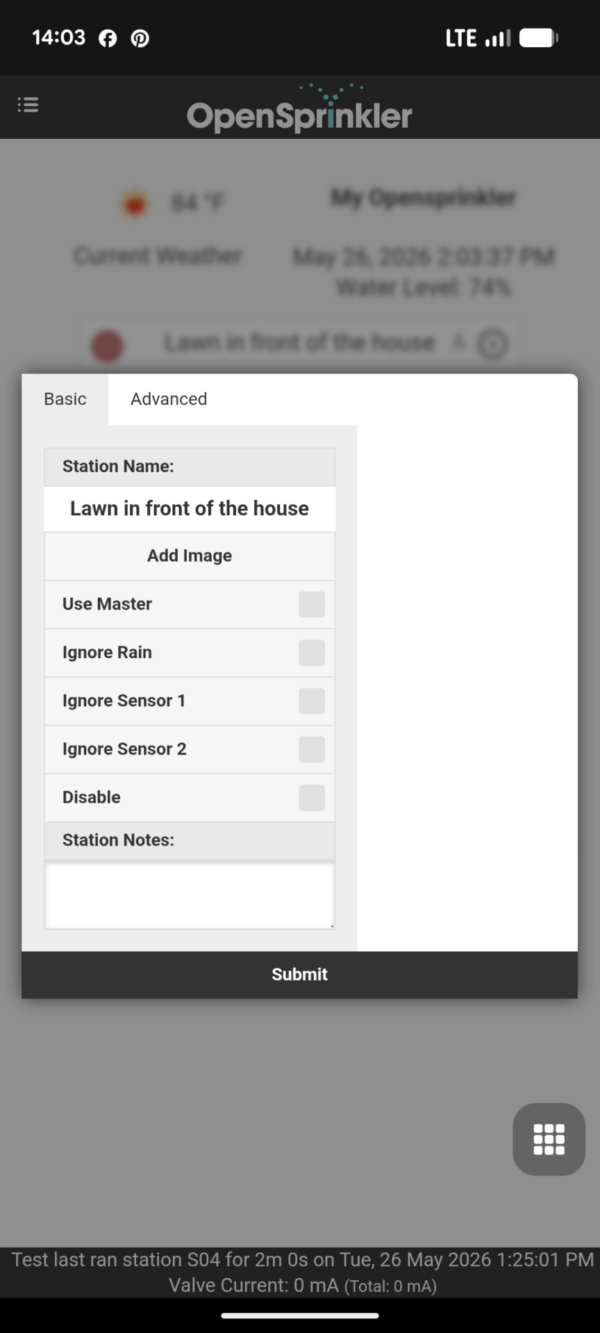
Defining a Zone Name
Adding a Zone Image
Use the zone as master zone
Ignore Rain: When enabled, the zone ignores data measured by a connected rain sensor and any rain delay.
Ignore Sensor 1: When enabled, the zone ignores any influences that would result from Sensor 1.
Ignore Sensor 2: When enabled, the zone ignores any influences that would result from Sensor 2.
Disabling the Zone: Useful, for example, if there is construction work underway in the garden area and watering should therefore be discontinued. Existing programs for this zone will not be executed, and the zone will no longer be displayed in OpenSprinkler. It can be re-enabled later in the program menu by selecting “Show off.”
Zone Note
Advanced Zone Settings
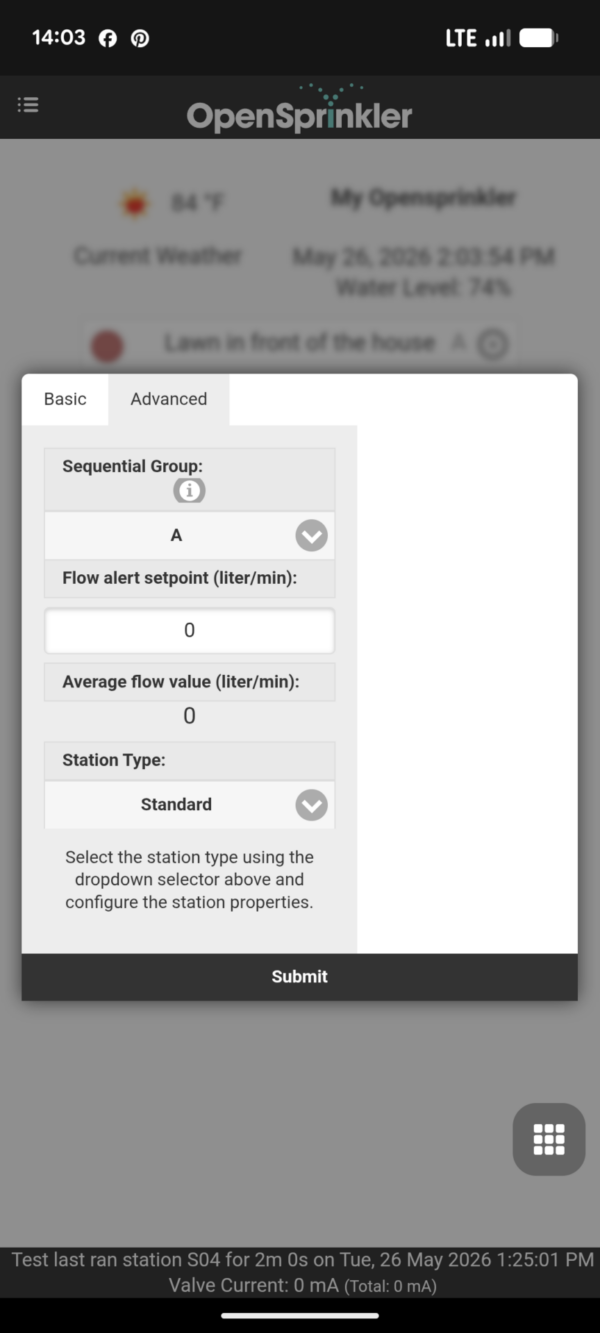
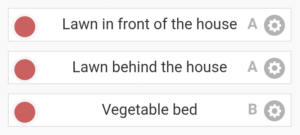
Sequential Group
Here you can specify whether zones are executed sequentially or simultaneously. This is controlled by the sequential group to which they are assigned. By default, all zones are assigned to the same group “A.” This means that zones in this group never run simultaneously. In a program run, the second zone only starts when the first zone has finished, the third only after the second, and so on. This makes sense for most scenarios. Below is an example of a typical irrigation program sequence:
One irrigation zone is executed after the other.
However, if you want zones to be irrigated simultaneously, you must assign them to different sequential groups.
Zones in two different groups, A and B
If, as in the screenshot above, zones 1 and 2 were in group A, but zone 3 were in group B, then the same program as before would be executed as follows. Zone 3 would start simultaneously with zone 1, and after zone 1 finished, it would continue with zone 2.
Zone 3 (group B) is executed simultaneously with zone 1 (group A)
Note: Group “P” is a special case. All zones in this group are always irrigated simultaneously.
Irrigation zone type
This is a very powerful function that allows you to use the zones not only to activate zone outputs but also for other purposes related to home automation. The following types are available:
Standard
RF
Remote
GPIO (Relay)
HTTP
Important note: All non-standard types can be added in addition to the existing 8 zone outputs, meaning they do not take away any of the 8 standard zone slots for irrigation control.
Standard
Selected by default, this switches the zone outputs on the OpenSprinkler.
RF (Radio Frequency)
Switches radio frequency devices such as wireless sockets, wireless lights, etc., via the RF output. Additional equipment is required. The RF code of the device in question must be entered for use.
Remote Station
Allows you to control other OpenSprinkler irrigation controllers remotely. The controlled master controller can thus control one or more remote controllers and open and close the solenoid valves of these controllers. This can be useful if the irrigation system is very extensive, for example, on a large property, requiring multiple irrigation controllers. This allows you to control them all from a single location.
GPIO (Relay)
This allows you to directly switch GPIO pins (relays) available on the controller. In my OpenSprinkler software, this option is grayed out because the device itself doesn’t have these pins. However, the OpenSprinkler Pi, the sprinkler board for Raspberry Pi computers, does have them.
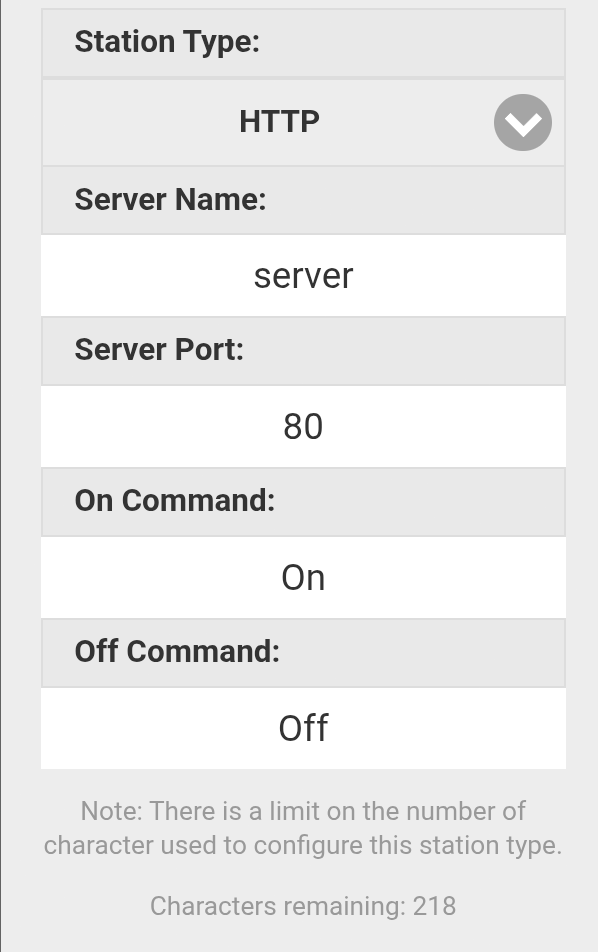
HTTP
This type of connection is the potential gateway to a multitude of further automations. It allows you to send a GET request to a predefined server (domain or IP address). Specifically, one request can be sent to start the zone and another to end it. Assuming the server is configured accordingly, it will execute certain predefined actions upon receiving the commands. A GET request can be thought of like accessing a URL in a browser. The address to start the zone is server:port/startcommand, and to stop the zone it is server:port/endcommand.
Creating the HTTP Zone
Weather Report
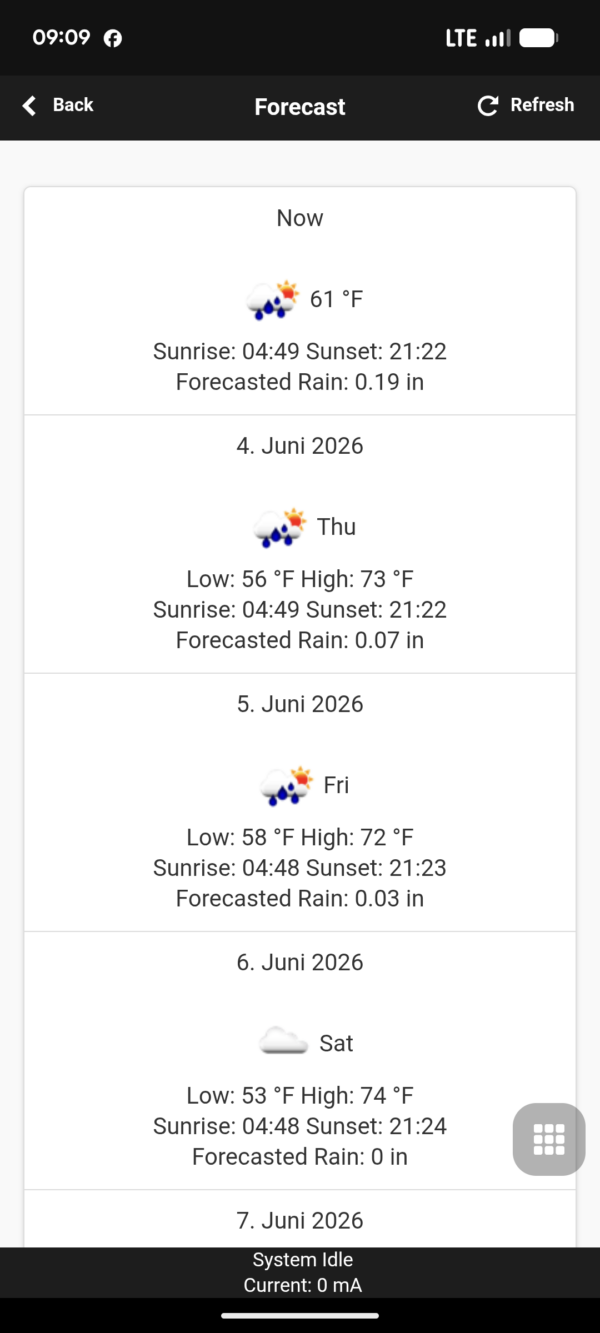
The home screen displays an icon showing the current weather and temperature. Clicking the weather icon opens an 8-day weather forecast based on data from Dark Sky.
Weather forecast for today and the next 7 days
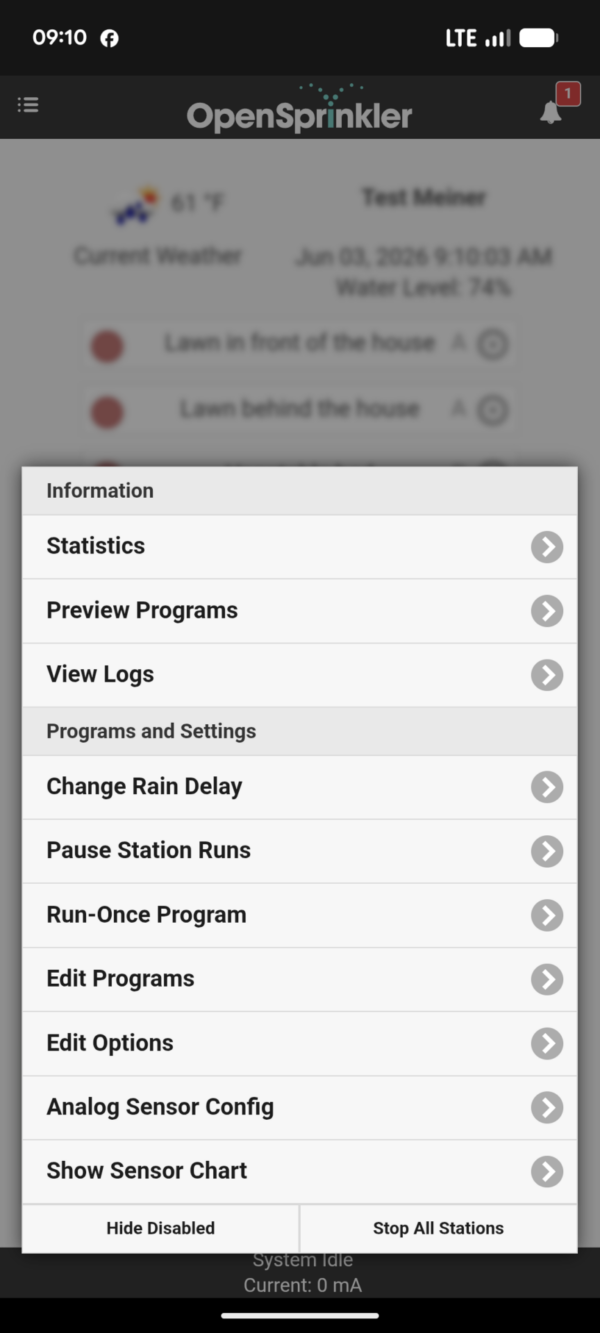
Program Menu
OpenSprinkler Program Menu
This is where you configure all the settings necessary for operation, such as programming irrigation cycles, weather-dependent irrigation rules, and much more. At the bottom of the menu, you can also toggle the display of deactivated zones on and off, or stop an ongoing irrigation cycle.
The following is a description of the individual menu items:
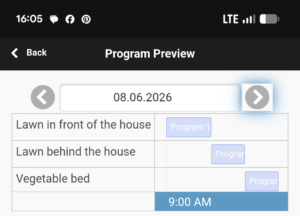
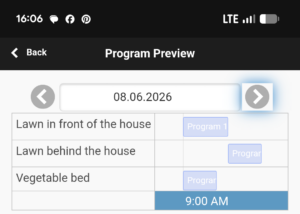
Program Preview
Shows the irrigation cycles scheduled for today and the coming days.
View Logs
Here you can review past events in detail.
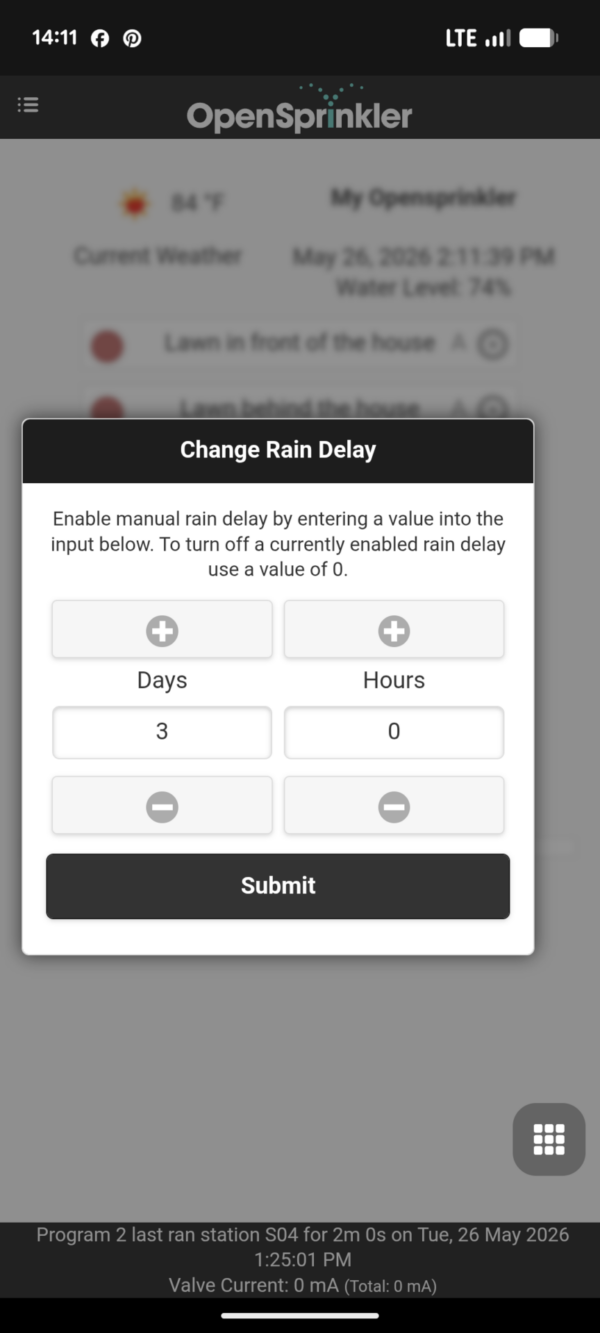
Change Rain Delay
The rain delay allows you to suspend irrigation for a specific period. All scheduled programs will be skipped during the specified time, and if a program is already running when you enter the delay, it will be stopped immediately. This function is typically used after heavy rainfall, when the soil is well-moistened and it would be pointless to run irrigation cycles for the foreseeable future.
This setting suppresses all irrigation runs scheduled for the next 3 days.
Pause Station runs
This menu item at first glance seems identical to the rain delay, but the functionality and the reason for its use are completely different: This menu item is about not skipping irrigation runs that have already started or are about to start, but simply postponing them. This can be useful, for example, if an irrigation program is about to start, but you want to do something in the garden. You can then enter a pause of 2 hours, and the entire irrigation program will simply take place 2 hours later. In my opinion, this is a very practical function that I hadn’t encountered before!
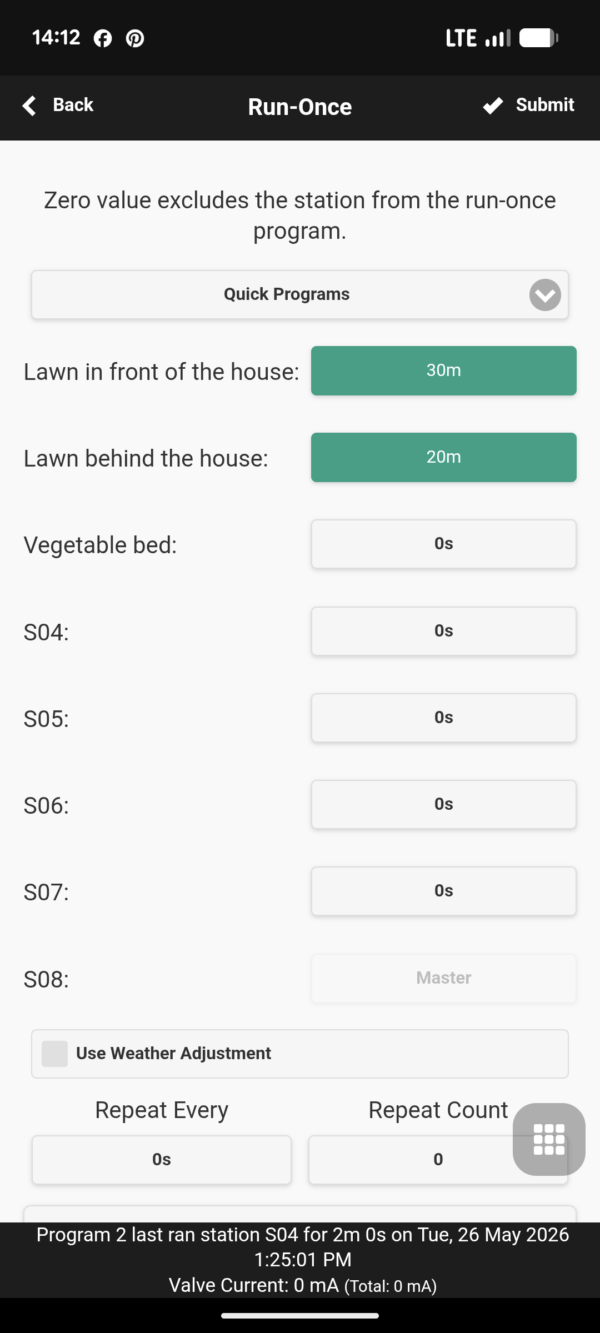
Run-once program
Here, as on the home screen, you can spontaneously start an irrigation run. You define the irrigation duration for one or more zones and then start the defined quick program. Conveniently, the system remembers the last quick program run and automatically displays it again the next time you access this menu item. For spontaneous execution, all programs stored in the system are available for selection, and by selecting “Check all irrigation zones,” you can run all irrigation zones sequentially for one minute with a single click.
Creating a Run-once Program
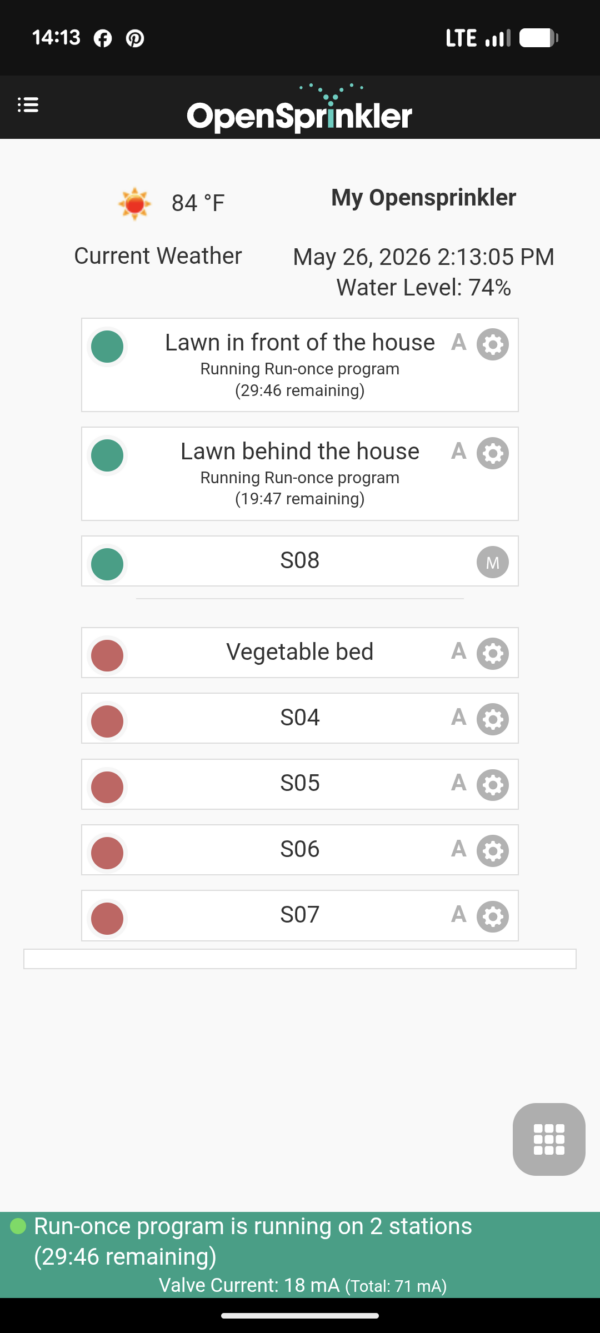
This is how the started run-once program is displayed on the start screen.
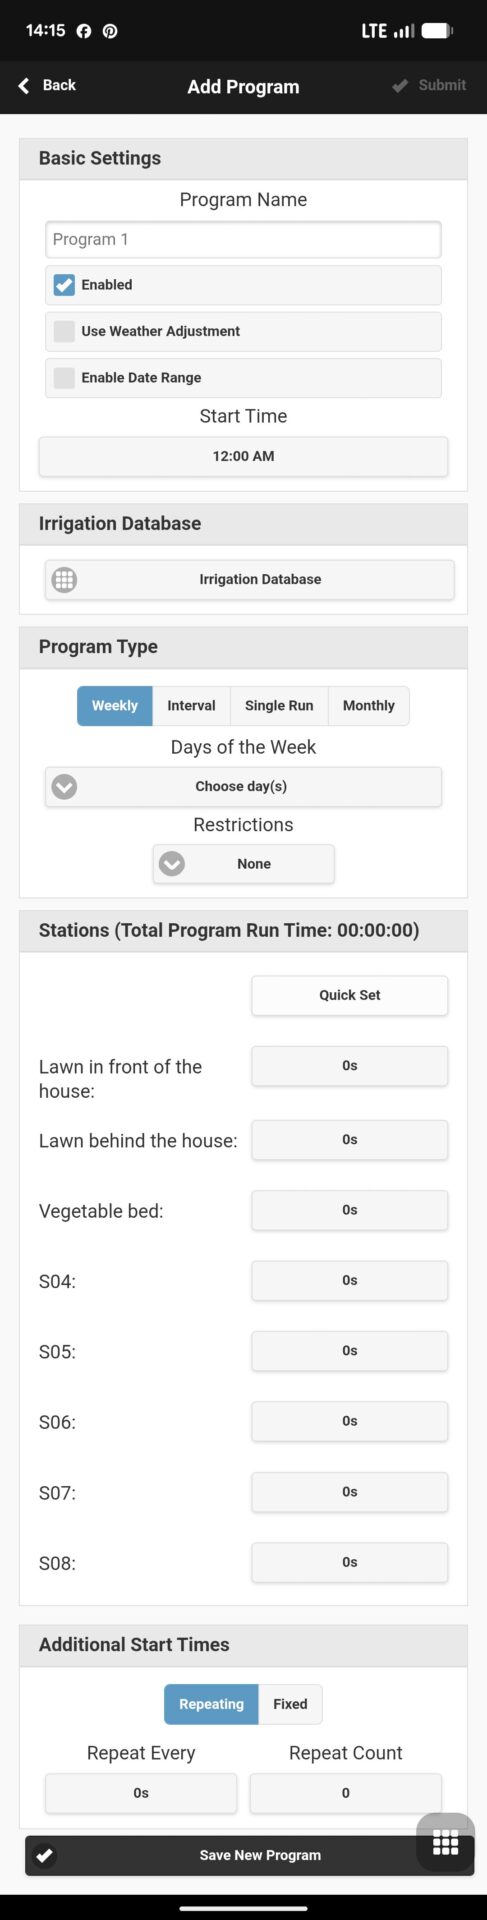
Edit Programs
Under this menu item, irrigation programs can be created, modified, or deleted. Below, I will show you the available options when creating a program.
Program Name
Here you can give the program a name.
Enabled
Determines whether the program is active or not. It is enabled by default.
Use Weather Adjustment
Determines whether the program incorporates weather data.
Enable Data Range
Here, the program can be time-limited (enter a start and end date).
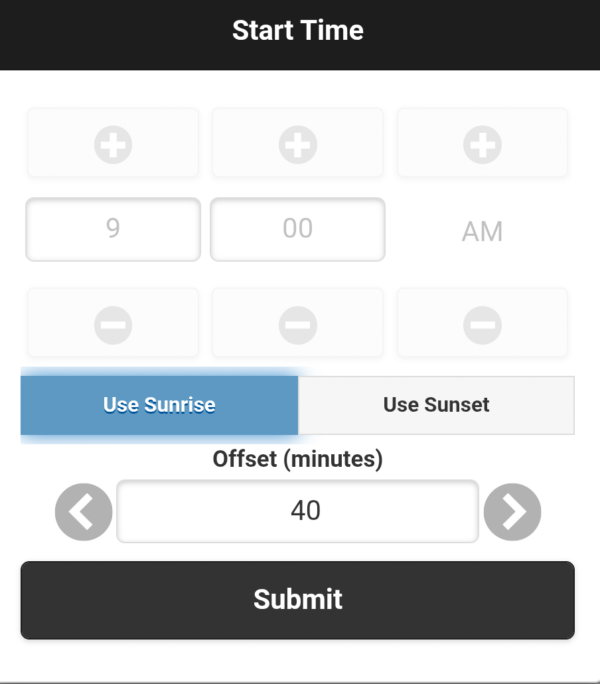
Start Time
Defines the time at which the program begins to run. A fixed start time can be entered, e.g., 9:30 a.m., or a flexible start time based on sunrise or sunset, e.g., 40 minutes after sunrise.
This program would start running 40 minutes after sunrise.
Program Type
Basically, you can choose whether the program should run on predefined days every week or at intervals. In weekly mode, the program could run, for example, on Mondays and Thursdays. In interval mode, the interval can be set, e.g., every 3 days, and the start date of this interval can be specified, e.g., in 2 days. For both program types, you have the option to restrict watering to only even or odd days.
Irrigation Zones
Here you define which zones should be irrigated and for how long. As an alternative to a time period, you can optionally specify that the irrigation should run from sunrise to sunset or from sunset to sunrise.
Additional Start Times
You can define up to three additional start times for the program. For example, in addition to the program start time of 9:00 AM, you can also start it at 1:00 PM, 5:00 PM, and 9:00 PM. Alternatively, you can set an hourly interval at which the program should repeat, for example, every four hours. You can also specify how many times the program should repeat within this interval, for example, three times.
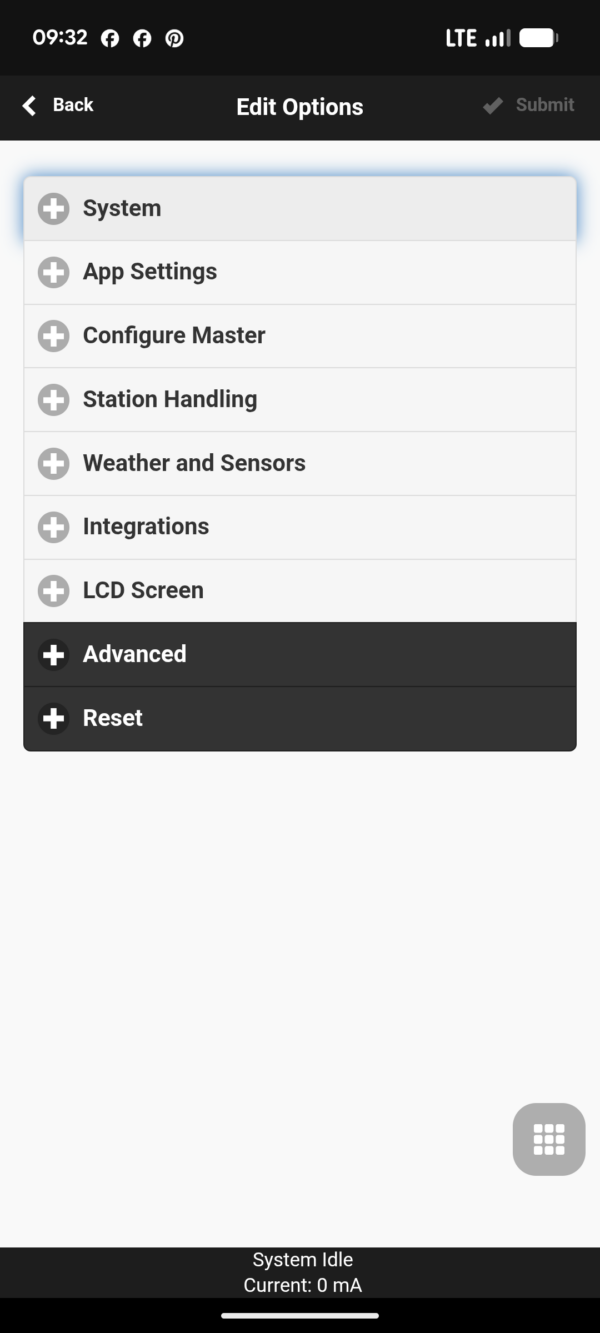
Edit Options
Extensive functionality is hidden within the options:
OpenSprinkler Options Menu
Below, I’ll show you what you can configure in the sub-items of the options menu.
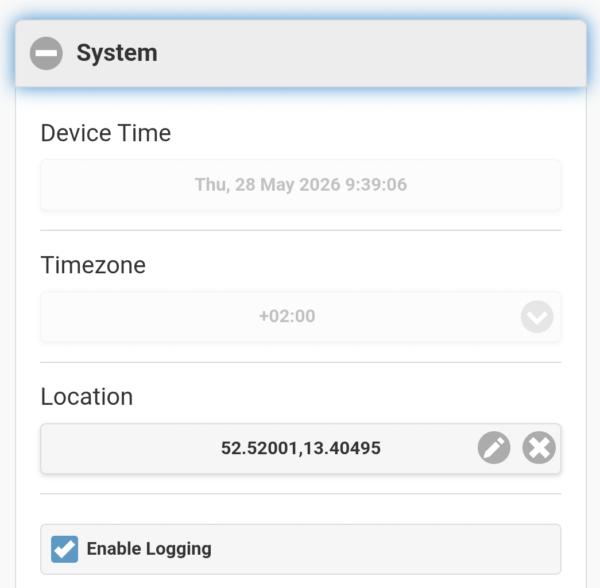
System
System Options
Location
Here, you can first enter your location. This is crucial information for the OpenSprinkler software, as it determines how weather data, time data, and even daily sunrise and sunset times are retrieved from the web. Entering your location is very simple: Click in the location field and then select your location on the Google Maps map. Once it’s correct, click the “Submit” button to transfer the coordinates to the OpenSprinkler software.
Enable Logging
This is enabled by default and records data on completed irrigation cycles, rain delays, and the rain sensor status in the internal flash memory. This data can then be accessed under the “View Logs” menu item.
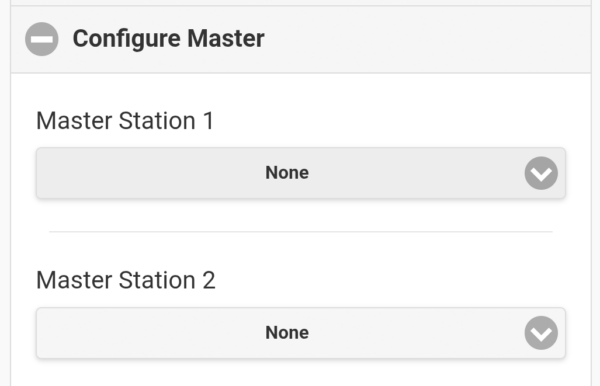
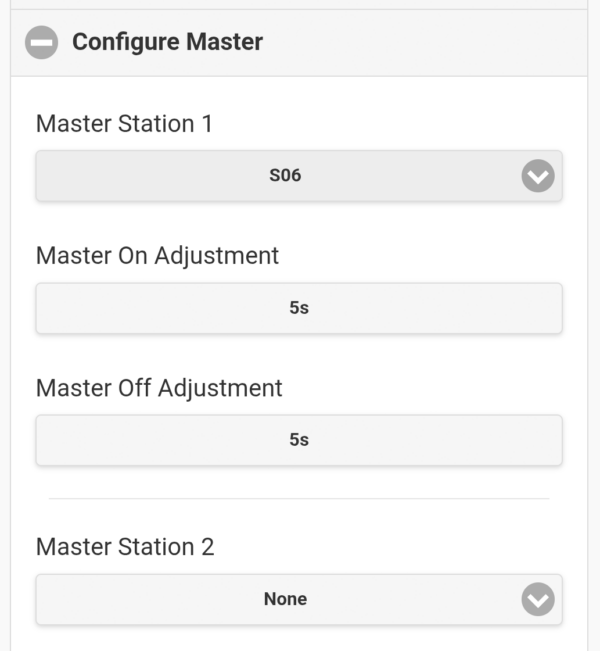
Configure Master
Menu Configure Master
Here you can define a master valve. This valve serves as a safeguard for an irrigation system by being placed before the other zone solenoid valves in the irrigation circuit: The water must always pass through the master valve before it can flow through any of the zone valves. The advantage of this setup is that it provides double redundancy should a solenoid valve fail to close properly.
The irrigation controller automatically opens the master valve along with every other zone solenoid valve. For example, if the irrigation program starts with Zone 1, the zone for the master valve opens in addition to Zone 1, and then closes again as soon as Zone 1 ends. The same process occurs when the next zone starts, and so on.
When starting and ending an irrigation cycle, a specific time interval can be set for the master valve, causing it to open earlier or later than the zone. Positive values indicate later opening, and negative values indicate earlier opening. The time difference for activating the master valve at the start of the irrigation cycle is set under “Master On Adjustment,” and the time difference for deactivating the master valve at the end of the irrigation cycle is set under “Master Off Adjustment” A value of -5 seconds in the “Master On Adjustment” would mean, for example, that the master valve opens 5 seconds earlier than the zone valve. These fine-tuning settings can be particularly relevant in conjunction with appropriate pressure build-up, especially if the master valve is to be used to control a pump.
Delayed or Earlier Opening and Closing of the Master Valve
Unlike many competitors, the OpenSprinler does not have a fixed output for the master valve. Instead, one or at most two of the available zone outputs can be defined as master valve outputs. Ideally, these should be zones that are not already assigned to an irrigation program. After defining a zone as the master valve, an additional option, “Use Master” appears in the zone settings. If this is activated, the master valve will also start when the zone is activated.
Activated Master Valve
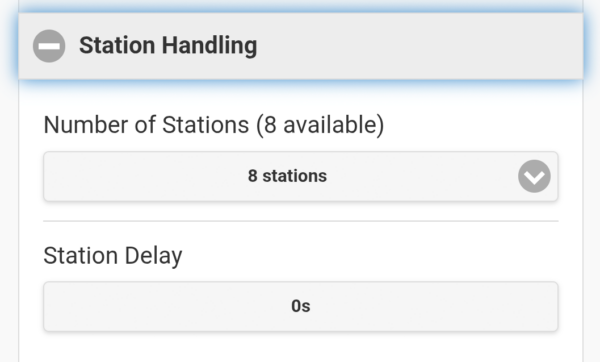
Station Handlung
Station Handling Options
Two relevant zone options are hidden in this menu item. On the one hand, you can specify how many zones should be available in the system. This might seem strange at first glance—doesn’t the system automatically detect how many zone outputs are present? But it does, and it displays this information here. However, as described above, virtual non-irrigation zones can also be used on the device, and for this, you may need additional zones besides the actual outputs, and therefore increase the number of zones accordingly.
And here, a delay can be set for the transition of a program from one zone to the next. This means the next zone won’t start immediately after the previous one, but, for example, with a 5-second delay. Negative values are also possible, so theoretically, the following zone can be started early.
Weather and Sensors
Weather and Sensors Options
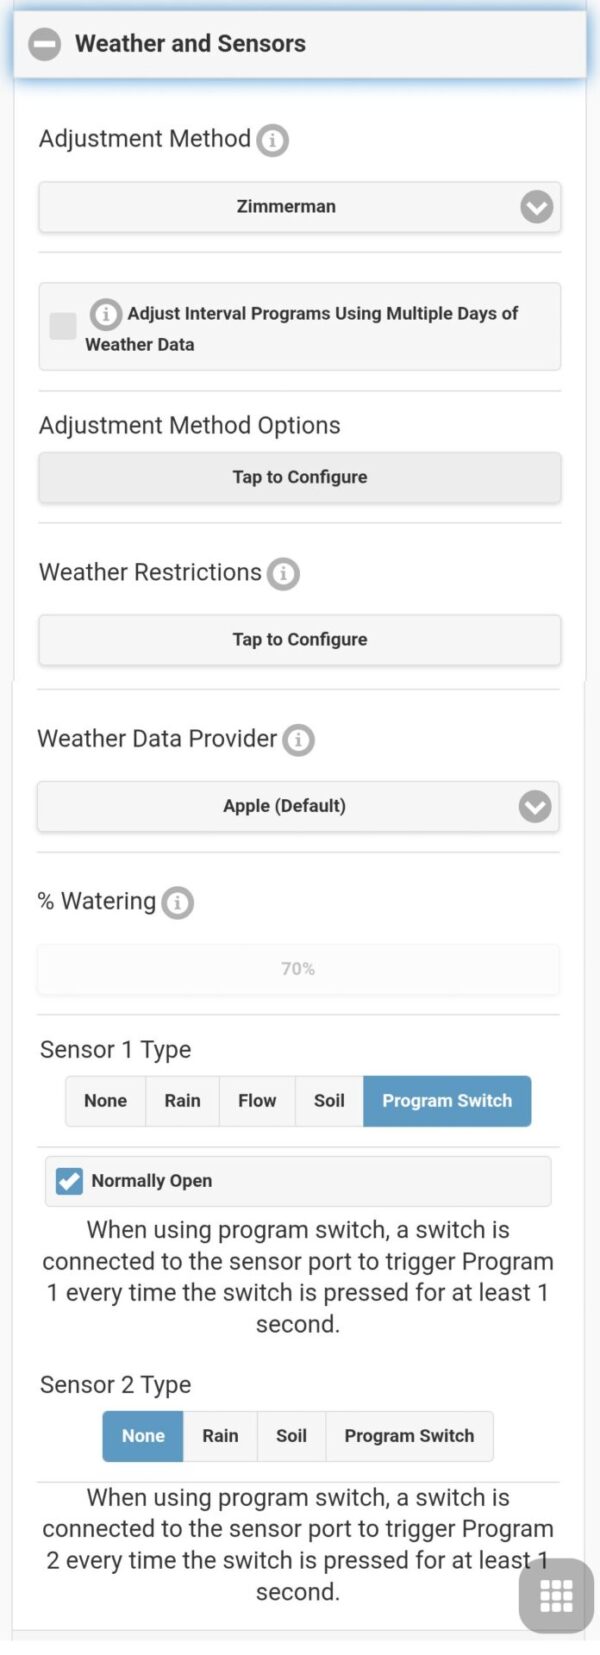
The Weather and Sensors menu offers extensive settings:
Adjustment Method
Here, you first decide whether you want to operate weather-dependent irrigation at all. If not, simply leave the selection on “Manual Operation.” If you choose to automatically incorporate the transmitted weather data into the irrigation schedule, you have the following three options:
Zimmerman
Automatic Rain Delay
ETo
How do these three options work?
Zimmerman
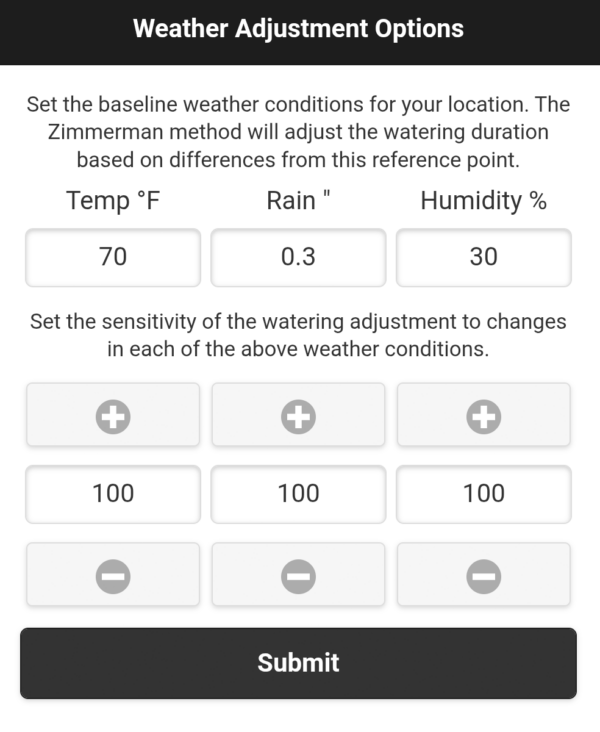
This method works on the principle of first defining typical average values and then comparing them with the actual values. Depending on the deviation, the planned irrigation cycle is then either lengthened or shortened.
The three values used for this are temperature, precipitation, and humidity. First, it’s necessary to determine the average values for these three measurements over an irrigation season. For example, if you’re watering from the beginning of March to the end of October, what are the average daily temperatures, average daily precipitation, and average daily humidity over the entire observation period? You can find this information by researching weather websites. These values are then used as baseline values.
The system then compares the following values with the established baseline values:
The average humidity of the previous day
The sum of the precipitation from the previous and current day
The average temperature of the previous day
If these values deviate from the set baseline values, a correction factor is calculated.
For humidity: 1% for every percentage point difference in humidity.
For precipitation: 200% for every inch difference in precipitation (8,5% für each millimeter)
For temperature: 4% for every degree Fahrenheit difference in temperature. For degree Celsius the calculation is slightly more complex. The deviation factor for degree Celsius is calculated as follows: (Average temperature of the previous day in °C * 1.8 + 32) – (Baseline temperature in °C * 1.8 + 32) * 4
Depending on whether the deviation has a positive or negative impact on irrigation requirements, the factor is either positive or negative:
Higher humidity than the baseline results in lower irrigation requirements, while lower humidity results in higher requirements.
Higher precipitation than the baseline results in lower irrigation requirements, while lower precipitation results in higher requirements.
A higher temperature than the baseline results in higher irrigation requirements, while a lower temperature results in lower requirements.
For example: The baseline values are defined as 60% average humidity, 0.3 inches (8 millimeters) of average rainfall, and an average temperature of 70° Fahrenheit (21°C).
Weather control according to the Zimmerman method: Example of set baseline values and sensitivities
The previous day, the average humidity was 65%, yesterday it rained 0.08 inches (2 mm), and today another 0.12 inches (3 mm), and yesterday’s temperature was 82°F (28°C).
This results in a total of -5% + 20% + 20%= 35% -> Irrigation runs 35% longer than planned.
These correction factors can be further adjusted by changing the weighting of the three factors (= sensitivities). By default, all three are set to 100, meaning they are weighted equally. If, for example, you want a deviation in humidity to have less of an impact than previously described, you could change it to 70, so that the deviation is only considered at 70% instead of 100%. Or you could increase it to 120, so that it is considered at 120%.
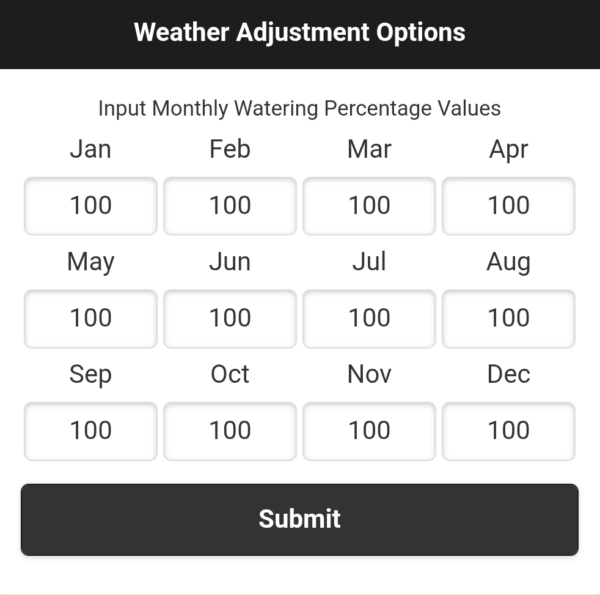
Additionally, the “Monthly” option in the weather method selection allows you to define a seasonal adjustment independent of actual weather conditions. In this option, an adjustment factor is defined for each month. 100 means that the irrigation program is carried out as planned, 90 means that the runtime is reduced to 90%, and 110 means that it is extended to 110%. This way, you avoid having to adjust the program during an irrigation season, where temperatures typically vary from month to month.
Determining the Seasonal Adjustment Factor
Automatic Rain Delay
The alternative option, Automatic Rain Delay, is comparatively simple: Here, you define by how much time a watering run scheduled for the current day should be postponed if the weather forecast predicts rain.
Automatic Rain Delay
Unfortunately, in my opinion, this option is practically unusable because it is currently poorly designed and lacks sufficient detail. It cannot be specified within what timeframe the forecast must predict rain for watering to be canceled, and I can’t find any information about the timeframe the system considers. Furthermore, there is no setting for how much rain needs to be predicted to trigger a postponement. This means that even a minimal drizzle of perhaps 0.05 inches (1 mm) would postpone a scheduled watering run. If this happens for several days in a row in the height of summer, the lawn will be ruined because no irrigation took place due to daily drizzle. Furthermore, the system only reacts to the weather forecast, regardless of whether it actually rains. This means that if rain is forecast for five consecutive days but never materializes, the irrigation cycle will be postponed five times.
Conclusion: This option is better implemented elsewhere, for example, in Hydrawise and LinkTap. To use it effectively, the observation period and the threshold value would need to be user-defined, and ideally, both forecasted and actual rainfall could be included.
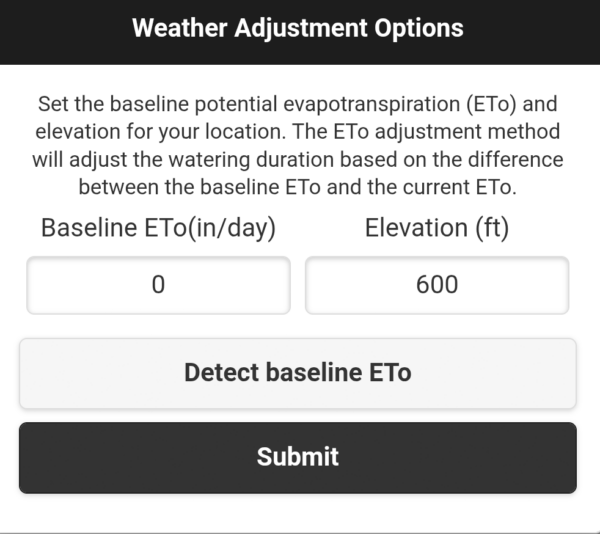
ETo
Evapotranspiration Mode
The evapotranspiration mode works on essentially the same principle as the Zimmerman mode: Based on the location and elevation of the site, the system calculates a baseline annual evapotranspiration. This is the average expected value. Based on weather data such as solar radiation, rainfall, humidity, and temperature, the actual evapotranspiration is calculated daily and compared to the baseline value. If it is higher than the baseline value, the irrigation run time is increased; if it is lower, it is shortened.
The exact logic and dependencies behind this are not transparently disclosed and cannot be changed.
Weather-Based Restrictions
Currently, only the “California Restriction” option is available, which prevents irrigation if more than 1 inch (2.5 mm) of rainfall has occurred in the last 48 hours. This should comply with legal requirements in the US state of California not to irrigate after rainfall.
% Watering
Adjusts the run times of irrigation cycles to a specific percentage (default = 100%).
Sensors
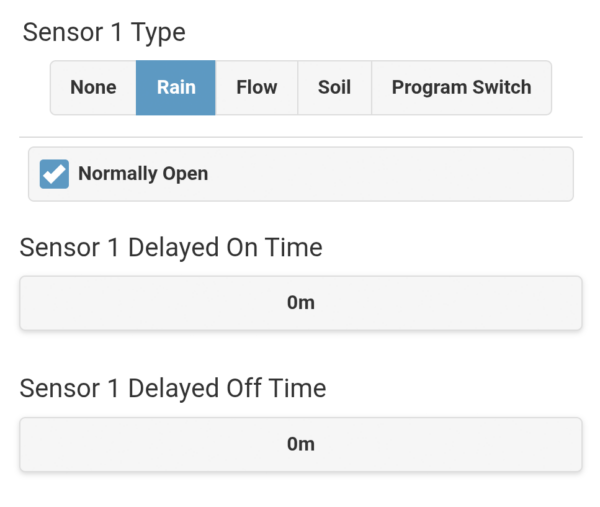
The OpenSprinkler has two sensor inputs. Four different types of sensors can be connected to these:
Rain sensor
Soil moisture sensor
Flow sensor
Program switch
Which sensor is connected to which input is easily defined in the software. The software also allows you to define whether each sensor operates on the normally open or normally closed principle, enabling the use of both types of sensors.
Rain sensor and soil moisture sensor
The rain sensor and soil moisture sensor operate on the same principle: If a certain amount of rainfall or soil moisture level is exceeded, the sensor sends a signal and blocks scheduled irrigation cycles. When the predefined amount of rainfall or soil moisture level falls below the threshold again, the block is released, and irrigation can resume as scheduled.
For these two sensor types, an optional switch-on and switch-off delay can be set. A switch-on delay prevents the irrigation system from being immediately blocked when the rainfall or soil moisture threshold is exceeded, but only after a specified delay, provided the sensor signal is still present. The length of this delay, in minutes, can be set. This setting is useful to prevent the sensor from being triggered by a faulty signal.
The switch-off delay works on the same principle, but delays the end of an existing blockage. For example, if a switch-off delay of 120 minutes is set, the blockage will remain in effect for up to two hours after the rain or soil moisture sensor has reported a drop below the threshold. This can be useful to ensure that a specific irrigation break is observed after a recent rainfall event.
Rain sensor settings (identical to those for the soil moisture sensor)
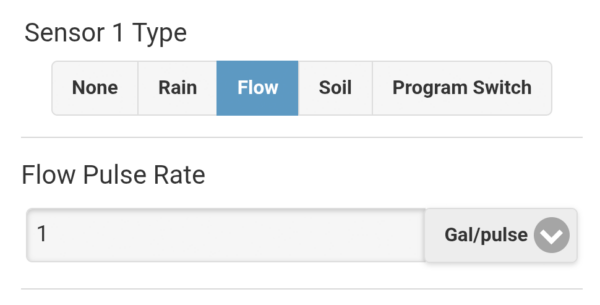
Flow sensor
Flow sensors operate on the principle of sending a pulse for each measured unit of water flow. The size of this unit can vary from sensor to sensor. One sensor might send a pulse every 3 gallons (10 liters), another every 1.5 gallons (5 liters). This value, represented by a sent pulse, can be flexibly defined in the software, allowing OpenSprinkler to be used with flow sensors from various manufacturers.
Flow sensor settings
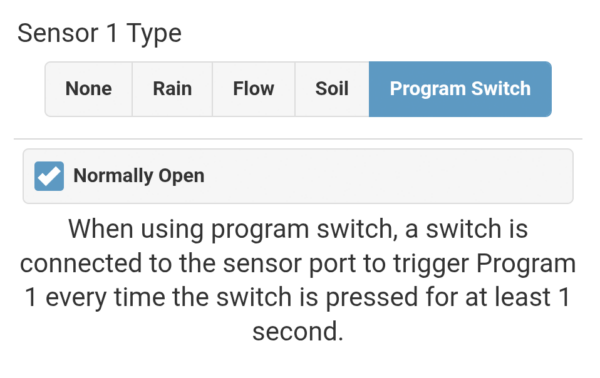
Program switch
This refers to a button or switch connected to the sensor port. Pressing it for at least one second sends a signal, and OpenSprinkler automatically starts program number 1. Alternatively, program number 2 will start if the program switch is connected to sensor port 2. The program switch can also be configured to operate on a normally open or normally closed principle.
Program Switch Settings
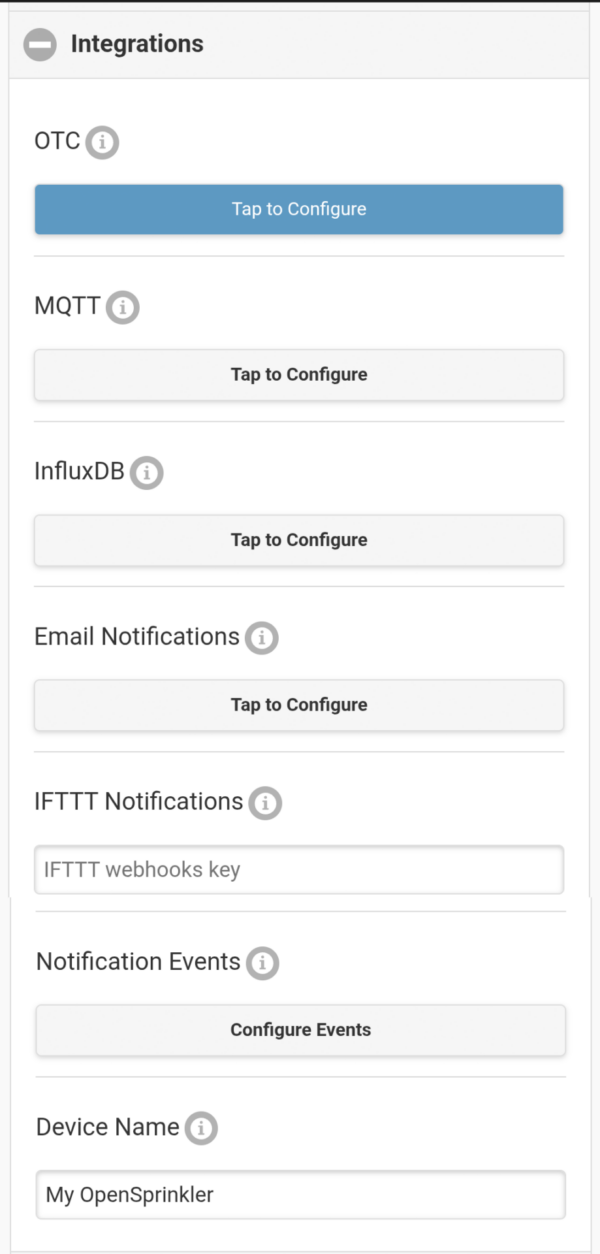
Integration
Options for Integrating with Other Systems
This menu item deals with connecting the OpenSprinkler to other systems.
OTC
The first option, connecting to the OpenThings Cloud by entering the OTC token, was already described earlier in this article. This enables remote access to the OpenSprinkler.
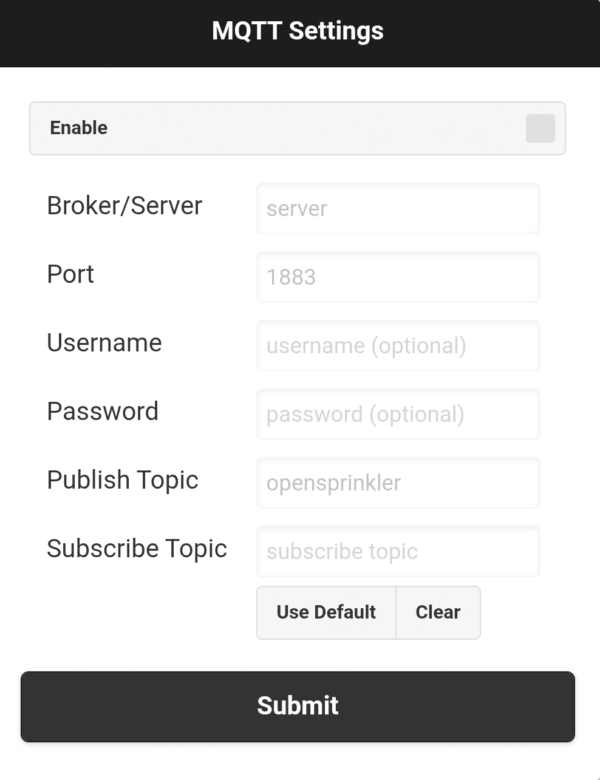
MQTT
This abbreviation stands for Message Queuing Telemetry Transport. MQTT is a messaging protocol used to communicate messages. In the OpenSprinkler software, for example, it enables alerts when certain events occur, such as the start or end of irrigation. For this to work, an MQTT broker must be configured. This is the server to which the messages are sent. The messages are not sent directly to the recipient but to the server address of the MQTT broker. The broker then forwards these messages to all recipients who have subscribed to them (publisher/subscriber principle).
Configuring an MQTT server and access credentials
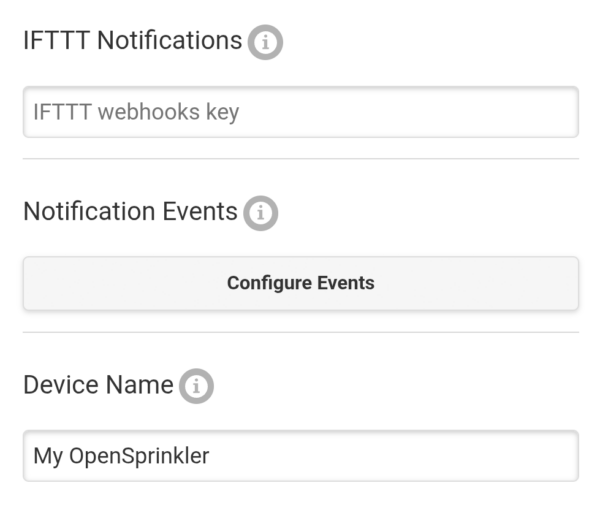
IFTTT
Stands for “if this then that,” meaning “if this happens, then do that.” It is an online service that can be used free of charge up to a certain limit (3 automations). The IFTTT server receives notification from OpenSprinkler that a specific event has occurred and then executes a corresponding action based on the rule you created in the IFTTT portal. This is a very powerful tool that can be used for all sorts of home automation applications. For example, you could make switching on a specific light or outlet dependent on the start or end of an irrigation cycle. The alerts described in the previous section would also be possible in this way.
To use IFTTT, you need to register on the IFTTT website. There you will receive the webhook key, which you need to enter under “IFTTT Key.” The device name at the bottom is also transmitted to allow for differentiation when using multiple devices.
OpenSprinkler IFTTT Settings
The OpenSprinkler currently supports the following IFTTT events. You can select which of these should be sent to IFTTT in the software:
Program start
Update sensor 1
Update flow sensor
Update weather service
Restart OpenSprinkler
Start irrigation circuit
Update sensor 2
Update rain delay
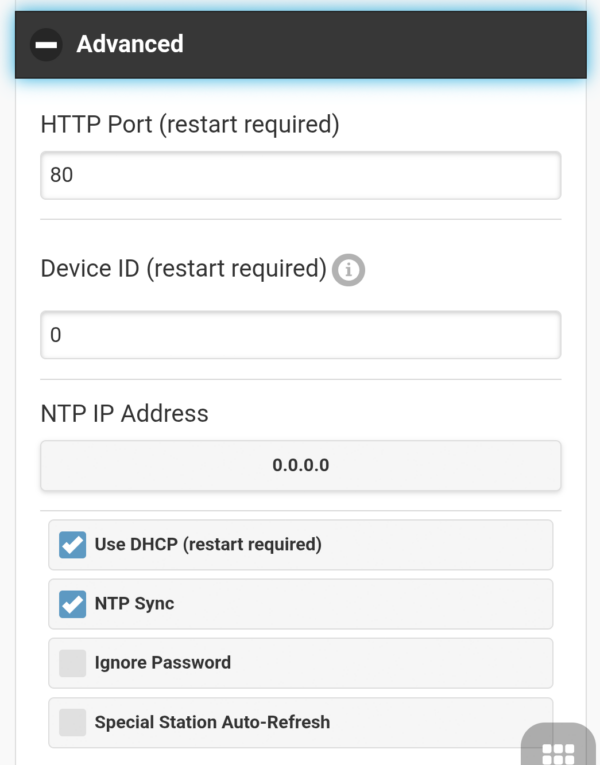
Advanced
Advanced Options
Weather Underground API Key
By entering a Weather Underground API key, you can change the weather service used from DarkSky to Weather Underground. This allows you to integrate your own weather station, for example.
HTTP Port
Here you can enter a different HTTP port if you are not using the default port 80.
Device ID
Here you can change the last byte of the MAC address. I don’t know where this might be needed.
NTP IP Address
A Network Time Protocol (NTP) server is used to display the correct time on the OpenSprinkler. This works automatically based on the location you specify. If it doesn’t work correctly, you can enter your own NTP server here.
Use DHCP
Normally, the IP address of the OpenSprinkler is dynamically assigned by the router. This can be disabled to manually configure a static IP address, gateway IP, subnet mask, and DNS IP.
NTP Sync
Enabled by default. Retrieves the current time from the NTP server.
Ignore Password
Disables the password prompt when accessing OpenSprinkler.
Special Station Auto-Refresh
When enabled, special zones (RF, HTTP stations, etc.) are automatically updated periodically to ensure they remain synchronized with the system status.
Conclusion and Recommendation
So, what’s my conclusion after testing the OpenSprinkler irrigation controller?
First, let’s talk about the hardware: It does what it’s supposed to. While it appears a bit more delicate than those from other manufacturers, it’s sufficiently robust and, in my opinion, absolutely fulfills its purpose. The additional outputs for optional connection to a LAN network and for using an RF transmitter are a definite plus.
The ability to remove the terminal connectors is another clever detail. Having two freely programmable sensor connections is also a great feature, and the option to use sensors that require a power supply is an additional advantage.
One minor drawback is the lack of a weatherproof version. While this can be easily remedied by purchasing a weatherproof enclosure, it doesn’t look quite as neat as a custom-made one.
However, the most important aspect of this product is the software, which truly shines in many areas. I’m not aware of any other product that offers such extensive configuration options and is so well-suited for implementing projects that deviate somewhat from mainstream solutions. It’s very clear that the developers maintain close contact with users and quickly integrate real-world requirements into the software. This applies to many details that you might not notice at first glance, but which significantly simplify your daily life.
Furthermore, in addition to its use as an irrigation controller, OpenSprinkler also has great potential as a central hub for various home automation projects. The term “zone” here doesn’t necessarily refer to an irrigation zone; zones can also be used to communicate with various other systems.
Looking to the future, OpenSprinkler’s commitment to continuous improvement is significant, and new firmware updates with added features are released every few months. This makes them significantly more proactive than the competition, whose software often remains largely unchanged for years.
Furthermore, users can benefit from custom developments by other users. Many other users share the code of their own developments online, so these ready-made solutions can be used as needed.
Currently, I would rate the weather integration as only average. The Zimmerman method is simple yet ingenious, and the evapotranspiration method, due to its simplicity, is certainly popular with some users. In my opinion, the automatic rain delay, in its current form, is practically unusable—a black box with no configurable settings.
What I find completely lacking is the ability to tailor the irrigation to individual needs using weather rules, as the Hunter Hydrawise predictive watering system allows. Rules like, for example, “If rainfall in the last 24 hours was greater than 0.2 inches (5 mm) and in the last 3 days greater than 0.4 inches (10 mm), then do not irrigate.” In my opinion, Hydrawise currently has the edge here and remains the system with the best weather-controlled irrigation. However, the OpenSprinkler software is constantly being improved, so there’s a good chance that it will catch up.
A positive aspect regarding weather is the option to integrate your own weather station for free. With Hydrawise, this requires an extra fee.
What I also find somewhat lacking is the ability to easily create alerts. This is possible indirectly by connecting to external systems, but this method is likely too cumbersome for many users. It would be great if this could be integrated directly into the software in the future, for example, via the Openthings Cloud.
Recommendation: Highly recommended! The device is truly versatile and absolutely worth its price! And even as a layperson, you won’t be overwhelmed here, in my opinion, because the software is designed so that you can use many things optionally, but the normal settings are set by default, so you are not forced to deal with it.
I am an enthusiastic do-it-yourselfer and have been running this blog on the subject of garden irrigation for more than 6 years now. In over 150 specialist articles, I share my own experiences and know-how from years of research and numerous product tests. -> More about me